
I saw some pretty little grape tomatoes in the fridge and a pot of basil that was begging to be used. I whipped my mom up a small super simple tomato salad… It took no time and it was delicious to boot!

I saw some pretty little grape tomatoes in the fridge and a pot of basil that was begging to be used. I whipped my mom up a small super simple tomato salad… It took no time and it was delicious to boot!
Tomatoes are so good for you because they contain lycopene, an antioxidant. To get the most nutrition when you eat a tomato pair it with a little olive oil. The good lycopene found in tomatoes is fat soluble, so if you add a little good fat, like olive oil it helps your body absorb lycopene more easily. Here’s the recipe… no need to even write it down… cut up the tomato into bite sized pieces (whatever kind of tomato you like, the darker the tomato the more antioxidants), drizzle with a little olive oil, sprinkle a little salt and pepper then top with fresh basil. If you happen to have a little fresh mozarella (MUST be FRESH, that’s my opinion) chop up a bit and toss it in, that’s delightful! Quick and easy!Added tip… cooked tomatoes are more concentrated, therefore have more lycopene… Enjoy!

HAPPY 4TH OF JULY! There are 4th of July parties all around us today. What better time to try something that will cool you off? This is similar to an “Arnold Palmer” (half lemonade, half iced tea)… something refreshing to beat the heat! Give it a shot, something different and fun to bring to a party!
You can click HERE to go directly to MyRecipes website where it’s quick and easy to print… or see below:
A Southern Living Recipe from www.myrecipes.com
Ingredients
Preparation
Southern Living
JULY 2009
ENJOY! Drive careful and have a good time today! Catch you back here tomorrow!

This has been a favorite in our house for many years now, it’s quick to make and takes full advantage of all mother nature has to offer… you can make it your own by tossing in anything else that sounds tasty. The recipe calls for white balsamic vinegar, I used regular and it was fine. This salad side dish goes well with anything, and is best served at room temperature or warm. Often times I’ll make it early in the day so the house stays cool, then just take it out of the fridge for a little while, that works! This is a recipe from Cooking Light magazine… tasty!
Here’s the link to where it’s easy to print, otherwise, below is the recipe… ENJOY! ROASTED CORN SALAD (Cooking Light) YIELD: 4 servings (serving size: 3/4 cup)
Ingredients
Preparation
Cooking Light
JULY 1998
Catch you back here tomorrow!

Ahhh Rosemary… a heavenly spice that we see planted around Charleston, SC as shrubs in some cases… it grows easily and is tasty in many ways. Today, I’m going to share a dry marinade (rub) that I got out of Williams-Sonoma GRILLING cookbook about ten years ago. It’s one we’ve made many times and it’s a keeper!

Basil is such an all purpose herb. I use it lots, not only in spaghetti sauce, but in salads and sandwiches. Basil is easy to find and just as easy to grow. I buy a small plant at the grocery store for a few bucks and it turns into a massive bush. Don’t let it flower, cut the leaves before that happens and USE IT! Make pesto, make a sandwich on a baguette with fresh mozarella, tomato and basil piled high, it’s so refreshing… another idea is a caprese salad… slice fresh tomatoes and some fresh mozarella. I put it in a plate alternating the mozarella and tomato with some basil tucked beside each, drizzle with a little olive oil, a light sprinkle of S&P and whoa! You have yourself the most delightful little salad!

Oh what a beautiful sight this is! Don’t you agree? I read an interesting article from the Blueberry Council (www. Blueberrycouncil.com) regarding all the good things that blueberries do for our bodies… after reading this and after walking through Whole Foods and seeing that blueberries were on sale I took it as a sign… A sign to make a nice “healthy” blueberry pie… ok, not sure about the healthy part, but I’m thinking it couldn’t have been too bad? First some blueberry facts, then a quick and easy blueberry pie recipe… Oh, I’m telling you that pie was so good… it’s almost time for another! I feel like my antioxidant level is low (hee hee)… unfortunately, I took a picture of the pie BEFORE I cut it, but never got around to snapping a photo afterwards… darnit! Live and learn… hmmm, a sign to make another pie?
First the facts:
Blueberries have only 80 calories/cup, and are virtually fat free.
They’re an excellent source of Vitamin C.
Blueberries are a great source of fiber.
Blueberries contain substances that have antioxidant properties… antioxidants help neutralize free radicals which are unstable molecules linked to the development of a number of diseases including cancer, cardiovascular disease and other age-related conditions such as Alzheimer’s Disease. According the USDA database of antioxidant activity of selected foods, blueberries rang among the highest on a per serving basis. Substances in blueberries called polyphenols, specifically anthocyanins that give blueberries their blue hue, are the major contributor to the antioxidant activity of blueberries! Thank you Blueberry Council for your information!
Now… on to the recipe. I tried a simple recipe out of Better Homes and Gardens cookbook. I used more blueberries than it called for which was why mine was a tad on the runny side. These were sweet blueberries, so I could have used even less sugar. I don’t care for cinnamon in my blueberry pie, it’s a deal breaker… so I used a tiny bit of lemon zest. I like it pure… just blueberries! I didn’t have time to make a pie crust, so I used a Pillsbury pie crust that you buy in the refrigerated section at the grocery store. It’s closest to homemade, I won’t use any other. HOWEVER, if you have a good crust recipe and the time… good crust always trumps store bought, even if it is close…
Because mine was a tad runny (and partially because I couldn’t wait for it to cool, hee hee) I went ahead and scooped out about ½ cup of juice, put it in a container and the next week we had a small scoop of vanilla ice cream with heated blueberry sauce on top… YUM!
Ok, ok… quit talking… now the recipe!
BLUEBERRY PIE
1 double crust pie crust (store bought or homemade)
5 cups blueberries (fresh or frozen)
2/3 – 3/4 cup sugar (depending upon how sweet the blueberries are)
3 tablespoons flour
2 teaspoons (I used maybe one if that) finely shredded lemon peel
Directions…
Prepare the pie crust. Line a 9” pie plate with half the pastry.
In a large bowl combine the sugar and flour. Stir in blueberries and lemon peel. Gently toss berries until coated. (If using frozen blueberries, let mixture stand for 45 minutes or until fruit is partially thawed but still icy.)
Transfer berry mixture to the pastry lined pie plate. Trim bottom pastry to edge of pie plate. Now place top crust on filling and seal. Crimp the edge together. Cut slits in the top to allow steam to escape.
To prevent overbrowning, cover edge of pie with foil. Bake in a 375˚oven for 25 minutes (or 50 minutes for frozen fruit). Remove foil. Bake another 25-30 minutes (watch it closely, mine doesn’t take this long), OR until filling is bubbly and pastry is golden brown. (Always a good idea to place it on a foil lined cookie sheet in case it bubbles over).
Cool on wire rack (good luck to ya!)
Hope you enjoy! Catch you back here tomorrow!

This is such a quick and fabulous meal! Perfect for those hot days when you want to get out of the kitchen as quickly as possible. You can also add whatever you like, add onions, olives, cheese, you could use steak instead of chicken, endless possibilities, so see what you have hanging out in your fridge and toss this together, sit down and enjoy!!
CHICKEN PITA WITH HOMEMADE TZATZIKI
2 Chicken Breasts (boneless/skinless)
1-2 T Lime Juice (more or less to taste)
2 Fresh good pitas
1 Tomato, chopped
Tzatziki: 1 cucumber, greek yogurt, some garlic, fresh or dried dill and a splash of lemon juice.
In a skillet with olive oil (or canola) sauté the chicken, when its close to being done cut it up (while it’s still in the pan) into bite size pieces (I use scissors, it’s much quicker), then continue to cook until just about done. Squeeze the lime juice over the chicken in the skillet, and cook until absorbed. This makes the chicken turn a beautiful golden brown color. You can also throw in some onions if so inclined..
Finely chop up a cucumber with seeds removed, add to plain greek yogurt with fresh or dried dill and a splash of lemon (squeeze a wedge). You can use a microplane to get a little (or a lot) of garlic added, stir it together and set aside while you assemble the pita.
I like the pita heated. It’s not necessary, just a personal preference. I heat the pita wrapped in wax paper and a tiny sprinkle of water and put in microwave just until warm. Take it out and place one pita on each plate, put chicken on top, cut up tomatoes, a spoonful of tzatziki, some black pepper and a sprinkle of dill.
Oh la la…. ENJOY!
Catch you back here tomorrow!

This recipe is courtesy of Paula Deen’s son’s, (AKA “The Deen brothers”). It was featured on her Food Network show Paula’s Best Dish’s, the All in the Family episode. I didn’t see it, my mom told me she tried this recipe and got rave reviews. Everyone wanted the recipe. THAT’S the kind of thing I like to take somewhere. Once you throw it together, put it in a pretty dish and off you go! (OK, some of you may have noticed, I didn’t put it in a pretty dish, but I was taking this to a neighborhood get together on a very warm evening, so I put it in a stainless bowl and then placed the stainless bowl inside a larger stainless bowl filled with ice, I topped it with plastic wrap and a thick towel to keep the heat out. So much for my pretty dish, ugh. Might want to take printed recipes with you or a link to the online version (click HERE , easy to print), otherwise, here you go…
English Pea Salad
Ingredients
Directions
In a large skillet, cook the bacon over medium heat until crisp. Transfer to a paper towel-lined plate to drain. Let cool.
In a medium serving bowl, combine the bacon, peas, cheese, and eggs. Stir in the mayonnaise, lemon juice, and salt and pepper, to taste. Serve immediately or refrigerate until ready to serve.
Catch you back here tomorrow!

Sometimes you need a quick and satisfying breakfast, not something that takes too long… it’s nice to be able to grab something and head out the door! These muffins are good alone, or paired with a fruit smoothie or a greek yogurt, mmmmm. They are filled with good things BUT they don’t taste “healthy”. The good thing about this recipe is that you can put whatever fruit you like in it… I made it pretty much as the recipe indicated. I used greek yogurt because it’s what I had (which boosts the protein a weee bit), I didn’t have wheat germ so I just added more flax. Next time I’ll probably use dried apricots or cherries instead of pineapple since the pineapple is so sweet… fresh blueberries would also be good! We eat some and freeze some, they’re great heated in the microwave for a few seconds!
YIELD: 18 servings (serving size: 1 muffin)
Ingredients
Cooking spray
1 cup whole wheat flour (about 4 3/4 ounces)
1/2 cup all-purpose flour (about 2 1/4 ounces)
1 cup regular oats
3/4 cup packed brown sugar
1 tablespoon wheat bran
2 teaspoons baking soda
1/4 teaspoon salt
1 cup plain fat-free yogurt
1 cup mashed ripe banana (about 2)
1 large egg
1 cup chopped pitted dates
3/4 cup chopped walnuts
1/2 cup chopped dried pineapple
3 tablespoons ground flaxseed (about 2 tablespoons whole)
Preparation
Preheat oven to 350°.
Place 18 muffin cups liners in muffin cups; coat liners with cooking spray.
Lightly spoon flours into dry measuring cups, and level with a knife. Combine flours and next 5 ingredients (through salt) in a large bowl; stir with a whisk. Make a well in center of mixture. Combine yogurt, banana, and egg; add to flour mixture, stirring just until moist. Fold in dates, walnuts, and pineapple. Spoon batter into prepared muffin cups. Sprinkle evenly with flaxseed. Bake at 350° for 20 minutes or until muffins spring back when touched lightly in center. Remove muffins from pans immediately; cool on a wire rack.
Charlotte Moore, Toronto, Cooking Light
JULY 2007
Check out my photo blog at http://almostdailypic.wordpress.com – catch you back here tomorrow!

Whenever I make these cookies and take them somewhere, people go nuts! Seriously… These are too good, and when I give out the recipe, NO ONE can believe they’re “light”. This recipe is from Cooking Light magazine. Make no mistake, part of what makes them so light is the serving size (one). With 81 calories, 3 grams of fat, 1.4 gm saturated fat, and 0.5gm fiber you have to be careful to not eat more than one (or two), but if you exercise a lot and can burn off what you eat… by all means, have at it! I love the cookie dough (I’m aware of the safety issues… to me, the dough is worth risking my life for taking a wee bit of a risk… I’m happy to report that in my little world there is no calorie content in the dough UNTIL IT IS BAKED… (and if you believe that I have swamp land, I mean a deep water lot for sale, hee hee).
I do make a few modifications, ALTHOUGH they’re perfectly fine as the recipe indicates. Here are some of the changes I’ve made throughout the years.Leave out the brown sugar. OOPS… it happened once and I thought they turned out BETTER. But the difference between it being there and NOT being there is barely noticeable (therefore why waste the extra calories?).I use regular chocolate chips instead of mini. I didn’t care for the mini chips, they were, ahhhh, TOO MINI… I like a hefty bite of chocolate not a tiny smear where you THINK you may have just gotten chocolate (or maybe not)…I usually use walnuts and I don’t always toast them. One reason, I’m almost always in a hurry. Another reason, I forget about them until I smell them burning. Soooo, since nuts are good for you I use a generous amount, usually a few handfuls. Same with chocolate chips… I put a few handfuls… I buy good chocolate chips, free of allergy causing soy and other miscellaneous ingredients that takes away from the flavor of the chocolate. I also use dark chocolate chips…I usually (not always) make the cookies SMALLER. I like them bite size. No crumbs that way, boy do I have things figured out or what? You just have to watch them closely because they won’t always take as long to bake. I think you tend to eat less when you think, HAVE I JUST EATEN FIVE COOKIES? When in reality it was probably 2.5… a way I mess with myself, ha ha…Lastly, I use a Silpat cookie sheet liner instead of parchment, but either way it’ll work just fine! Give these a whirl, I do believe they’ll quickly become your favorite! Click HERE for the recipe from MyRecipes.com where you can easily print (as well as see the full info on nutritional info) or see below…
These easy drop cookies are crisp on the outside and slightly chewy on the inside. Chocolate minichips disperse better in the batter, but you can use regular chips.
YIELD: 3 dozen (serving size: 1 cookie)
Ingredients
Preparation
Preheat oven to 350°.
Lightly spoon flour into dry measuring cups; level with a knife. Combine flour and next 4 ingredients (through salt), stirring with a whisk; set aside.
Place sugars and butter in a large bowl; beat with a mixer at medium speed until well blended. Add vanilla and egg; beat until blended. Gradually add flour mixture, beating at low speed just until combined. Stir in pecans and minichips. Drop dough by tablespoonfuls 2 inches apart onto baking sheets lined with parchment paper. Bake at 350° for 12 minutes or until edges of cookies are lightly browned. Cool on pans 2 minutes. Remove cookies from pans; cool on wire racks.
Julianna Grimes and Ann Taylor Pittman, Cooking Light
DECEMBER 2007
Catch you back here tomorrow! If you get a chance, check out my photo blog at http://almostdailypic.wordpress.com !

I made a few changes, one reason was that I was cooking for two and didn’t want leftovers… the other, I didn’t have any sesame oil… I made this a few times before I feel it was perfected. The first time I halved everything, BUT I kept the amounts for the sauce the same. There wasn’t enough. It was a tad dry… I didn’t measure the broccoli, so perhaps I had too much AND I had more shrimp… For two, I made these changes: 3/4# shrimp, and however much broccoli you want, it’s awesome so we ate quite a bit, probably close to 4cups… I used 1/3 cup of low sodium chicken broth, 2 1/2 Tablespoons rice wine vinegar and 2 1/2 Tablespoons soy sauce and 2 1/2 teaspoons of cornstarch.
If this sounds tasty to you, view the recipe below, or click HERE to go to their website for easy printing… NOTE: start your rice long before you start the stir fry because it goes quickly. I start the rice, and then start getting the other ingredients ready. Once the rice is almost done (or is done) THAT is when I start tossing ingredients into the wok!Enjoy!
Stir-fry a zesty shrimp dish for a quick weeknight dinner. Spoon over basmati or jasmine rice. Try the recipe with chicken or steak, too.
Ingredients
Preparation
Combine first 6 ingredients in a small bowl, stirring with a whisk.
Heat 2 teaspoons canola oil in a large nonstick skillet over medium-high heat. Add ginger and garlic to pan; stir-fry 30 seconds. Sprinkle shrimp with salt. Add shrimp to pan, and stir-fry 3 minutes or until done. Remove shrimp mixture from the pan.
Add remaining 1 teaspoon canola oil to pan. Add broccoli and onion to pan; stir-fry 4 minutes or until broccoli is crisp-tender. Add shrimp mixture and broth mixture to pan; cook 1 minute or until thickened, stirring constantly.
Jackie Mills, MS, RD, Cooking Light
JANUARY 2008
Catch you back here tomorrow! If you get a chance, check out my photo blog at http://almostdailypic.wordpress.com !
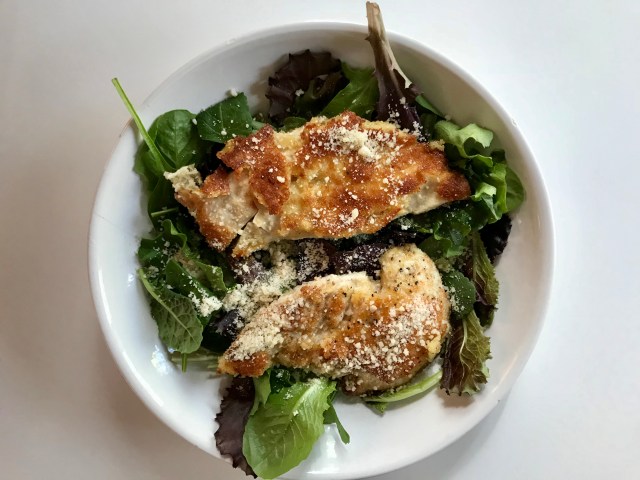
Oh do I have a tasty treat for you today! If you haven’t made Ina Garten’s (aka, Barefoot Contessa) Parmesan Chicken I encourage you do so… you will be oh so thrilled. The chicken coated in parmesan has SUCH fabulous flavor. I like how she puts the salad on top, I usually put the chicken on top of the salad… the light and fresh tasting lemon vinaigrette compliments this nicely. Tasty without being overpowering!
Click HERE to print this recipe!
2 boneless, skinless chicken breasts
1/3 cup unbleached flour
kosher salt
freshly ground black pepper
1 egg
1/2 tablespoon water
1/2 cup seasoned dry bread crumbs
1/4 cup freshly grated Parmesan, plus extra for serving
Unsalted butter
Good olive oil
Salad greens for 2, washed and spun dry
1 recipe Lemon Vinaigrette, recipe follows
Directions
Pound the chicken breasts until they are 1/4-inch thick. You can use either a meat mallet or a rolling pin.
Combine the flour, salt, and pepper on a dinner plate. On a second plate, beat the egg with 1 tablespoon of water. On a third plate, combine the bread crumbs and grated Parmesan. Coat the chicken breasts on both sides with the flour mixture, then dip both sides into the egg mixture and dredge both sides in the bread-crumb mixture, pressing lightly.
Heat 1/2 tablespoon of butter and 1/2 tablespoon of canola oil in a large non-stick sauté pan and cook 2 or 3 chicken breasts on medium-low heat for 2 to 3 minutes on each side, until cooked through. Add more butter and oil and cook the rest of the chicken breasts. Toss the salad greens with lemon vinaigrette. Place a mound of salad on each hot chicken breast. Serve with extra grated Parmesan.
Lemon Vinaigrette:
1/8 cup freshly squeezed lemon juice (1 lemons)
1/4 cup good olive oil
1/4 teaspoon kosher salt
1/8 teaspoon freshly ground black pepper
In a small bowl, whisk together the lemon juice, olive oil, salt, and pepper.
Yield: 2 servings

Ooooowie, here’s a fantastic recipe from Cooking Light(link now goes to the Eating Well website.) and NO you will not know it’s light… THIS is FABULOUS! Having it for dinner tonight, woohoo! It’s a flexible recipe, you can use Shitake mushrooms, or cremini, or button, or whatever you have or can find, it’s all good… don’t get too worried about making sure you have every ingredient… I didn’t have a red pepper or hot pepper flakes and mine was TO. DIE. FOR. Also, I had “Fajita Meat” from Whole Foods which they sliced into stir fry size for me, and whoa… it’s was so tender I absolutely couldn’t believe it! Give this recipe a shot if you like stir fry AND do not be afraid of bok choy, trust me, it’s your friend… it’s mild, has no taste really, the stems are like celery offering you a nice crunch, where the leaves are just fantastic… I used a microplane for the fresh ginger (A MUST!) and garlic, that way you don’t bite into hunks of it. The flavors meld together and are a treat to your tastebuds.
The recipe link is no longer available via Cookinglight.com – sigh…
Lisa Bell, Cooking Light
DECEMBER 2005
Links updated 1.26.25
Sometimes a good comfort food meal can do wonders. I’m thinking of making this recipe one day this week… haven’t had it in quite some time… a GREAT recipe for meatloaf with a super tasty sauce on top, an all time favorite! Sometimes I’ll make it half the size, but keep the same amount of sauce.
Ginny is the lady that lived next door when we were growing up. She had girls my age and around my age (HI DAWN, JACKIE, LINDA, LAURA, GINNY!!) and I had the absolute best time with them. With summer nights spent sleeping on their wonderful screened in porch, making dinner most nights, we just had the best time… and shhhh, keep it a secret, here’s the recipe!
GINNY’S EVERYDAY MEATLOAF
Meatloaf Ingredients:
2/3 cup bread crumbs
1 cup milk
1 1/2 pounds ground beef (nowdays I use the lean stuff)
2 beaten eggs
1/4 cup onion
1 teaspoon salt
1/2 teaspoon sage
dash of pepper
Topping Ingredients:
3 Tablespoons brown sugar
1/4 cup ketchup
1/4 teaspoon nutmeg
1 teaspoon dry mustard
SOAK the breadcrumbs in the milk. ADD the ground beef, eggs, onion, salt, sage and pepper. Form into a loaf and put in an 8″ (I spray with canola oil) loaf pan. BAKE at 350 degrees F for 45 minutes+ (or until almost done – internal temp 160F)
Then I spoon off any fat, and spread on the ketchup mixture topping. Bake 10 more minutes (check temp again), and let rest for 10 minutes before slicing.
You won’t believe how good this is! Trust me… extra tasty with mashed potatoes and some sauteed fresh spinach with olive oil, garlic and lemon!

Ohhhh, a tasty fish-on-Friday treat! This recipe is quick and easy AND it’s delicious! You can use parchment paper or foil, I only had foil onhand so I used it and it worked great! This is a Southern Living magazine recipe, the recipe can be found at MY RECIPES if you would like to be able to print quick and easy, otherwise here it is! ENJOY!
Note… on one occasion this recipe seemed far too lemony, so I don’t use 2 lemons, but that’s up to you!
YIELD: Makes 4 servings
COOK TIME: 25 MINUTES
PREP TIME: 15 MINUTES
Ingredients
4 (5-oz.) fresh tilapia fillets
1 teaspoon salt
1/2 teaspoon pepper
2 lemons, sliced
1/4 cup shredded carrot
2 tablespoons fresh dill (I used dried dill to taste)
2 tablespoons fresh parsley
2 tablespoons butter
Preparation
Preheat oven to 375°. Sprinkle fillets with salt and pepper.
Cut parchment paper (or foil) into 4 (13- x 9-inch) rectangles. Place 3 lemon slices crosswise in center of 1 parchment rectangle. Top with 1 fillet. Repeat with remaining lemon slices, fillets, and parchment paper rectangles. Sprinkle fillets evenly with carrot, dill, and parsley. Top each fillet with 1/2 Tbsp. butter. Fold 1 side of parchment paper over fillets; tuck excess parchment under fillets, pressing folds to form a crease.
Bake at 375° for 20 to 25 minutes or until fish flakes with a fork. Serve immediately.
Southern Living
FEBRUARY 2008
