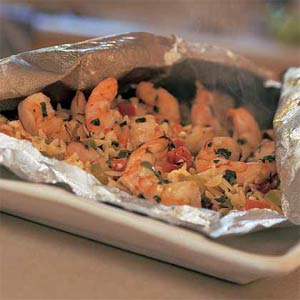
Dinner tonight… CHANA MASALA (Indian dish), out of this world and EASY too!

Dinner at our friends house… 

We recently had dinner at our friends house… Chana Masala… Hmmm? What? Never heard of it… It’s a vegetarian Indian dish, the main star is chickpeas, and let me tell you… this is TASTY! I’ve since read many recipes for different versions, but I really liked that one so much I got the recipe from Alison. She said it was in the Post and Courier Newspaper years ago (5/28/03), she made a few changes and whatever she changed (their archives skip that period) was perfect… try it, it’s easy, healthy and delicious! When I was reading the Smitten Kitchen blog for her version of Chana Masala she made a good comment, she said the spices aren’t cheap, but go ahead and get them, they’re an investment. I don’t know that I would have spent so much on spices if I didn’t read that first. It made sense. You can make it many times with the number of spices we bought. Above all, it’s HEALTHY. So if you can splurge on the spices, do it! Here goes…

CHANA MASALA (recipe from the Post and Courier newspaper, Alison’s adaptation…)

Chop up one large onion and sauté it in olive oil, some recipes say to sauté until brown… I didn’t let mine get quite that far since it was still going to be cooking…

Now add 4 chopped garlic cloves and 1-2” piece grated fresh ginger, and the way to do that the quickest and easiest is to use a microplane tool, they’re awesome! Rachel Ray pointed that out, apparently the smaller garlic is chopped the better it is for you… well you can’t beat doing it this way, it’s more of a paste so you don’t get any big hunk of garlic.

Now toss in one box of Pomi chopped tomatoes and 1/3 box of Pomi tomato sauce.  (If you can’t find POMI, use canned, but canned tomatoes were one of the foods I featured to never eat because of the BPA, click HERE to read the post from 10/19/11…)

Stir in 2 tsp cumin seeds,   1 cinnamon stick,   3 whole green cardamons,  2 whole black cardamons,   2 bay leaves,   2 cloves,   salt to taste,       (I only had green cardamons and I used 5, it was fantastic)

and 1 chopped jalapeño (I left just some of the seeds for a little heat, for less heat remove membrane and seeds) and 1 tsp turmeric…

Add 2 cups water (or a little more),   2 cans chickpeas (or a brand in a carton like FIG), and 1/2 bunch chopped cilantro stems.

Bring to boil and then add 2 tsp coriander powder and 2 tsp Chana masala (or Garam masala seasoning).

Cook until sauce thickens (at least an hour) and serve over basmati.

The salad we had that night went perfectly with the Chana Masala… Quick and easy…

SALAD

Baby lettuce with  salt, pepper, olive oil and rice wine vinegar. Fresh avocado added right before serving. You could toss baby carrots in Madras curry powder, salt, pepper and olive oil and roasted until tender and put on top of salad.

OK… and here ya go… this is what you end up with! This photo was snapped before we all sat down to enjoy this scrumptious dinner! Guess what’s on the menu this week?? You guessed right!

Here’s the recipe minus the photos and my comments in red…

CHANA MASALA

Sauté 1 large chopped onion in olive oil.

Add 4 chopped garlic cloves and 1-2” piece grated fresh ginger

Add one box of Pomi chopped tomatoes and 1/3 box of Pomi tomato sauce.

Stir in 2 tsp cumin seeds,   1 cinnamon stick,   3 whole green cardamons,  

2 whole black cardamons,   2 bay leaves,   2 cloves,   salt to taste,       

1 chopped jalapeño…I removed some of the seeds to control heat.

1 tsp turmeric,   2 cups water,   2 cans (I like FIG brand in box) chickpeas, 

1/2 bunch chopped cilantro stems.

Bring to boil and then add 2 tsp coriander powder and 2 tsp Chana masala or Garam masala seasoning.

Cook until sauce thickens (at least an hour) and serve over basmati.

OKRA BINDI (I have yet to try this, but am looking forward to making it soon!)

Slice okra or use frozen and sauté with chopped onion, garlic, ginger and turmeric. This is good served alongside Chana Masala.

Give it a whirl, let me know how you like it! Catch you back here tomorrow!

Thanks to Alison Brewer for sharing her recipes…


How to make hot chocolate from scratch… Quick and easy!

Have you ever wondered how to make hot chocolate from scratch? Well wonder no longer… here’s the scoop, and you will flip when you see how quick and easy it is! I have fond memories of hot chocolate! Growing up in Michigan as a young kid my mom told us we had to drink something warm before we walked to school (you heard me… back in those days we walked… miles i think it was, over mountains, through streams, in extremely cold temperatures. Ok, so I exaggerate a little but not a lot!) – so it was usually hot chocolate. I didn’t grow up drinking a latte for breakfast while in kindergarten, darn… that would have been nice, ha ha… Anyway, a tasty treat indeed… 

Ingredients include… UNSWEETENED COCOA POWDER (like Ghirardelli or Hershey), Sugar and Milk

Fill your liquid measuring cup with 1 cup of milk (I use organic 1%, but any milk will work). Place it in the microwave until it’s hot (every microwave is different, mine takes 1 minute 30 seconds). (If you prefer not to use a microwave you may certainly use your stove! Heat the milk on low until hot.)

Add 3 tablespoons of unsweetened cocoa powder and 3 tablespoons of sugar (I use unbleached cane sugar, but any will do). [A note on the quantities here… this recipe is from Ghirardelli, from the actual container of unsweetened cocoa, if it’s too chocolately for your taste, cut the amount the next time, same with the sugar…] 

Stir the cocoa powder and sugar together until it’s all mixed up…

Now add the hot milk to the cocoa powder/sugar mixture… 

Stir it well. Get all those hunks of chocolate sweetness mixed in. Give it a taste… if it’s not hot, toss place it back in the microwave for a few seconds till it’s warm again!

Ahhhh, now the best part (and it’s totally optional), give it a good swirl of whipped cream (REAL whipped cream or Redi-Whip, but not that chemical laden “non-dairy” whip stuff that comes in a tub in the freezer section… *GASP!* Just say NO! Friends don’t let friends eat Cool W… oops, sorry, got carried away…

Enjoy, you will be surprised how quick and easy… and remember… cocoa… GOOD FOR YOU!!! Not so much the sugar… if you can wean that down, pat yourself on the back!

Catch you back here tomorrow!

How to make sweet tea (or plain iced tea)…

I realize that knowing how to make tea isn’t difficult. I used to live in Michigan. Iced tea was different there. I live in the South now… have lived here since 1989. When I came to Charleston, one of the most fabulous treats was SWEET TEA! It seems like I could drink it sweeter in my younger days. Syrupy sweet tea is too sweet for my taste, and with all the talk about how you shouldn’t eat sugar, here’s a way to have your sweet tea and be able to drink it too! Making sweet tea isn’t rocket science, really… The way we made tea in Michigan was to put water and teabags in a jar and set it in the sun. And. Wait. And. Wait. And. Wait. Then we would pull out the teabags, pour it over ice, stir in some sugar that went straight to the bottom, and a squeeze of lemon. Ohhhh, how I loved iced tea in the summertime. Since there isn’t a lot of sun in the winter, we never had tea in the winter, something that we in the South have on a daily basis… Here it’s not milk with dinner, it’s tea (for the record, I still drink milk with dinner, but I drink tea during the day). Tea has lots of good stuff going for it. Obviously the more sugar you add the less “good for you” it is, but you will be amazed at how a small amount can be plenty! Trust me on this… If you’ve developed the taste for unsweet tea, follow the directions below and skip the “add sugar” part!

Brewed Sweet Tea – Makes 2 quarts

Ingredents:

Water

2 FAMILY SIZE teabags (good if you can get the ones for iced tea, doesn’t matter what brand…)

Sugar (I buy cane sugar, not granulated sugar, it’s more of a tan color, hasn’t been bleached), but whatever you’ve got will work

First, fill a saucepan with a few inches of water, cook on high until it starts a rolling boil… then…

Turn the burner off. Add two FAMILY SIZE tea bags and dip em around good… then set the timer for 5 minutes… gives em time to get a nice hot soak…

When the timer goes off after 5 minutes. Remove the teabags. Then add 3 tablespoons of sugar. That’s how much I use for 2 quarts. You can start with that and add/subtract until you get it how you like it…

Now give it a good stir, kinda like Jello, need to stir in the sugar… don’t want to crunch! Now let it cool a bit…

Now pour the concentrated mixture into a 2 quart pitcher…

Finally… add cold water to the container until it’s full… (I use cold filtered water from the fridge). Then pop it in the fridge and enjoy whenever you like!

Hope you enjoy! Catch you back here tomorrow!

A granola recipe you will make for the rest of your life!

green bowl with granola, jar of milk, red towel, wood table

Years ago, well, 2002 to be exact my sister was telling me about this wonderful granola recipe she was addicted to. She sent me the recipe, and I made it several times, it was wonderful, I think she got it out of a magazine in a waiting room somewhere… since then I have made a few notes, sometimes I use less sugar, more cinnamon, different nuts, different dried fruit. It’s just granola, so add more of what you like and less of what you don’t! It’s wonderful on top of yogurt, in a bowl with milk (and fruit) or all by itself! I add more cinnamon if I think i’ll be eating it out of hand, less if I think I’ll be topping yogurt and fruit, but it’s up to you my friend, do what you like! This is what I do…

Hint… this is especially good… plain Greek yogurt, a swirl of honey, a few tablespoons of granola and a sliced banana… it will keep you going strong for hours!

INGREDIENTS

ingredients for granola, sour cherries, almonds, oatmeal, olive oil, brown sugar, honey, vanilla, cinnamon

4 cups old fashioned oats (any brand will do, but old fashioned and not the quick cooking, it won’t be the same, I speak from experience!)

1 1/2 cups (or more) slivered almonds (this is key… the thicker crunch, the TASTE of the almond, oh yeah, SLIVERED, not SLICED)

1/2 cup (or less) LOOSELY packed brown sugar

1/2 teaspoon salt

1/2 teaspoon (or less) cinnamon

1/4 cup olive oil

1/4 cup honey

1 teaspoon (real) vanilla

1 1/2 cups (more or less depending on your taste) of dried tart cherries (you can use ANY DRIED FRUIT YOU LIKE, I find cherries to be especially scrumptious, decadent and GOOD FOR YOU!) – Note: dried fruit is optional. Often I skip the dried fruit and opt for fresh berries when I’m ready to eat it…

Preheat the oven to 300 degrees F. If you’re using a dark pan, you might want to bump it down a bit, every oven is different, just keep an eye on it!

almonds, brown sugar, cinnamon, oatmeal, salt, ingredients in a bowl

In a LARGE bowl, mix together the oats, almonds, sugar, salt and cinnamon with a wooden spoon. (This is the pre-stir together pic, go ahead and stir it up good, but gently, don’t want to break up the oatmeal).

Measuring cup with honey being poured into it, olive oil on the counter

HINT: when measuring this mixture, use the measuring cup to measure the OLIVE OIL first, then the honey, it will slide right out!

measuring cup with olive oil and honey, ingredients in the microwave

Warm the olive oil and honey mixture. You warm this mixture by placing it in a small pan on the stove (low), or in the microwave if you PROMISE not to walk away from it, you don’t want it HOT, you just want it warm enough to mix together… it doesn’t take long! Hmmm, sounds like I’ve repeated this step before, doesn’t it?

Once the olive oil and honey mixture is WARM (not hot), add the vanilla… PURE vanilla if you’ve got it.

oatmeal ingredients in bowl, honey and olive oil mixture being poured into it

Now you want to drizzle the warm honey/olive oil/vanilla mixture over the dry oat mixture. You want to drizzle and not pour like I did in this photo… Do what I say, not what I do… ha. I was trying to take a photo and pour, apparently I don’t have those skills down pat… yet! Give me time! Good grief, what part of DRIZZLE didn’t I get?? It’s all good, some quick subtle stirring is needed to coat the oat mixture with the oil mixture… gentle, remember you don’t want it to be the consistency of flour when you’re done…

Granola, Ready for the oven

I know, I know! This looks a tad pale… trust me, after it basks in the warm glow of the oven it will turn a magical color… Now pour this mixture onto an ungreased 9 x 13 cookie sheet. It’s ready for the oven! Bake it at 300 degrees for 40 minutes total… STIR IT AROUND EVERY TEN MINUTES!

After it’s done, pull it out of the oven and let it cool on a wire rack.

Once cooled, go ahead and add the dried fruit. In my batch, I’m adding dried tart cherries.

Store the granola in an airtight container and it will last for 7-10 days(+), or freeze it and it will last 3 months!

Catch you back here tomorrow!

Recipe for a crowd… Chicken Sausage Jambalaya with Shrimp!

Image: WholeFoodsMarket.com

A few years ago I ran across this fantastic recipe at Whole Foods…Chicken Sausage Jambalaya with Shrimp. It made a good bit and it was TASTY with a capital “T”! If you’re having a group over for New Year’s Day, this might want to be something you consider?? Here ya go…

CHICKEN SAUSAGE JAMBALAYA WITH SHRIMP

Serves 12

This one-pot meal is great for feeding a crowd of friends.

Ingredients

2 tablespoons safflower oil, divided
2 (12-ounce) packages pre-cooked spicy Italian chicken sausage, sliced diagonally
2 celery stalks, chopped
1 green bell pepper, chopped
1 large onion, diced
6 garlic cloves, chopped
1 (28-ounce) can diced tomatoes
4 cups low-sodium chicken broth
1 1/2 cups water
2 1/4 cups long-grain brown rice
1 1/2 teaspoons dried thyme
1 teaspoon salt, or to taste
3/4 teaspoon cayenne, or to taste
1 (1-pound) bag frozen okra
1 (1-pound) bag frozen Whole Catch® Tail-On, Peeled & Deveined, 41/50 Cooked Shrimp
Hot sauce for serving

Method

In a large pot, heat 1 tablespoon oil over high heat. Add sausage and cook until lightly browned. Remove from pot and set aside. Add remaining oil, celery, bell pepper, onion and garlic. Cook until softened. Stir in tomatoes, broth, water, rice, thyme, salt and cayenne. Bring to a boil, cover and simmer 35 minutes, stirring now and then. Add frozen okra and reserved sausage. Cook, uncovered, stirring frequently, until rice is tender, 10 to 15 minutes. Add frozen shrimp and continue cooking until heated through. Taste and season with more salt or cayenne if desired. Serve with hot sauce.

Nutrition

Per serving: 320 calories (90 from fat), 10g total fat, 4g saturated fat, 90mg cholesterol, 460mg sodium, 34g total carbohydrate (4g dietary fiber, 4g sugar), 23g protein

THE world’s best Christmas cookies (and most beautiful!)

I don’t lie when I say these are the best tasting cookies ever! These have been a ‘tradition’ in our family since we were little kids… and we make them every year… they make beautiful cookies to hand out as gifts to neighbors and friends. If you’re going to do that then you need to (at least) double the recipe, this makes a fair amount depending upon the size of your cookie cutters…

I featured this recipe back in February as Valentine’s Day cookies… but the recipe came out of a magazine many years ago (1960’s) in an article about the best Christmas cookies… Here’s the recipe…

CHRISTMAS BUTTER COOKIES

Sift 2 3/4 cups of flour, 1 teaspoon baking powder and 1/2 teaspoon of salt.

In mixer bowl add 3/4 cup soft butter, 1 cup sugar, 2 eggs, 1 teaspoon vanilla.

Beat until fluffy and light. Slowly beat in flour mixture. CHILL ONE HOUR.

Flour your work surface and roll out dough. Use cookie cutters to cut into desired shapes.

Place on ungreased cookie sheet. Bake at 375 degrees for 8-10 minutes.

YIELD: 4 dozen (IF you don’t eat the dough… good luck to ya!)

FROSTING

Mix 1/4 cup butter, 4 cups (1 box) confectioner’s sugar, 1/4 cup scalded cream and 1 teaspoon vanilla. Blend until smooth. Scoop into separate bowls and add food coloring (hint: yellow and blue mixed makes an awesome ‘grinch’ green). Scoop colored frosting into Ziplock bag (I use freezer) and snip a little off the corner. Squeeze onto cookie to decorate! If you need the frosting thinned a bit more, I have great luck just using light cream, add a little at a time until it will easily come out of the bag to decorate.

Fred's end of the cookie lineup, LOTS of frosting, his are the ones everyone wants to eat!

The fun part is the decorating!

Catch you back here tomorrow!!

Med Pasta (shrimp, feta, spinach pasta, artichokes) so good it’ll make your eyes roll back in your head!

Med Pasta with Shrimp

My husband and I made THE BEST pasta dish the other night… it came together and it was OUTSTANDING… quick and easy too! We used spinach spaghetti (Whole Foods), you can use fresh spinach pasta, spinach linguine, or I’m sure regular pasta will do just fine… keep in mind there is also the quinoa pasta available… might be tasty? We’ve made this several times and we get between 1/2-3/4# fresh large shrimp. Frozen shrimp will work just fine. Just run them under cold water to thaw. I’ve used both frozen and canned artichokes, both work fine, as long as they’re thawed/drained. The feta and olives add the perfect touch. I made it for the two of us, adapt the recipe below to suite your needs, add anything else that sounds good to you! Hint: I often will buy some of the veggies (red onion and red pepper) at the salad bar or the bulk veggies cut up at Whole Foods if I know I don’t need the entire pepper/onion… Last time I think the red onion/red pepper was sixty five cents!

Click HERE to print just the recipe…

MED PASTA – serves 2

Spinach Spaghetti (or any pasta, spinach is especially good in this recipe)

Olive oil for sautéing

1/2- 3/4 lb. shrimp (I bought fresh, large, deveined shrimp)

Red pepper (about 1/4 of a pepper)

1-2 cloves of garlic, minced

1/4 red onion, chopped

Artichokes, chopped small (I used either one can, or about 8-9 frozen and thawed artichokes) – drain in either case…

Feta (a few spoonfuls for each plate)

Kalamata Olives (a spoonful for each plate)

S&P

Splash of white wine or pasta water

I used a stir fry pan, I heated some olive oil (about 1/2-1 tablespoon, add more if you need it), once the oil got hot and was dancing around I added the shrimp and cooked until pink and they were done, about 3 minutes, then add a few cloves of minced garlic, cook this for one minute. Holy cow does that ever smell good! Then put this shrimp/garlic mixture into a bowl while you do the next step… (Make sure your shrimp is done, but not OVER done… when shrimp turns pink and opaque, or you see the ends curl up, that means its done)…

Add a little more olive oil to your pan (1/2-1 tablespoon), when hot, sauté the onions and red pepper. When onions start getting translucent add the artichokes and cook for a few minutes (until hot), and add the shrimp back in. Now I have brown bits stuck to the bottom of the pan (yippee), time to deglaze the pan. I used a little white wine, but you can use water, broth, etc. Literally a few tablespoons, just enough to be able to stir the brown goodness stuck to the bottom of the pan and turn it into heavenly taste for the pasta dish… Add the cooked and drained spinach pasta to the veggies. Toss to coat, add more olive oil if necessary. Using tongs (to pick up all the little veggie pieces) put some of this fabulous mixture on a plate (we use a low rim soup bowl that works perfectly as a small pasta bowl). Sprinkle feta and olives on top. Grind a little pepper and you’re ready to go!

Your eyes just rolled back in your head didn’t they? Too good! Catch you back here tomorrow!

How to make a perfect soft boiled egg…

The perfect soft boiled egg...

I love a perfectly cooked soft boiled egg. It tastes much like a fried egg without any added fat… I put mine on wheat or sourdough toast. Eggs are good for you, they provide good protein. They’re perfect for breakfast, lunch OR dinner… It’s our “go to” dinner when we’re in a hurry… (sorry Fred!). I like my yolks running and the whites cooked… if that’s the way you like your eggs, it may take a time or two to get it exactly right with your stove, etc., but it is such an easy method… it’s worth a try…

Fill a sauce pan with water that would cover your eggs by about 2″, you want to do this to keep the water hot enough after it comes to a boil and you add cold eggs…

Once the water is boiling, add the eggs, and set a timer for 6 minutes. Now this is the tricky part. Depending upon how cold your eggs are will change the time somewhat. If about 37 degrees it should take about 6 minutes. If you leave them out on the counter for a while, then it will take less time. What I did was took eggs out of the fridge, added to boiling water, and set the timer for 5 minutes the first time (whites too runny), then 5 minutes 30 seconds, whites almost perfect but a little runny, so it was probably 5 minutes 45 seconds – 6 minutes and it was just right… crack them open with a knife and gently scoop the egg out with a spoon (as shown above left). I like to mush around (as shown above right), S&P and ENJOY!

Catch you back here tomorrow!

Quick and delicious! Basil Shrimp with Feta and Orzo by Cooking Light magazine…

Image: MyRecipes.com

I’m sharing with you a great recipe from Cooking Light (link now takes you to Eating Well website)… This is a relatively quick and easy meal. Each recipe makes 2 servings and believe me, the servings are generous. I pretty much followed the recipe, except I like to use grape tomatoes instead of regular tomatoes… If you have dinner for four make two packets then slide it into a pretty dish. Gorgeous, tasty and without the guilt… then you can indulge in dessert! I hope you enjoy this as much as we do! Catch you back here tomorrow!

Basil Shrimp with Feta and Orzo

Ingredients

  • 1 regular-size foil oven bag
  • Cooking spray
  • 1/2 cup uncooked orzo (rice-shaped pasta)
  • 2 teaspoons olive oil, divided 
  • 1 cup diced tomato  (I used grape tomatoes)
  • 3/4 cup sliced green onions
  • 1/2 cup (2 ounces) crumbled feta cheese
  • 1/2 teaspoon grated lemon rind
  • 1 tablespoon fresh lemon juice
  • 1/4 teaspoon salt
  • 1/4 teaspoon black pepper
  • 3/4 pound large shrimp, peeled and deveined
  • 1/4 cup chopped fresh basil

Preparation

  1. Preheat oven to 450°.
  2. Coat inside of oven bag with cooking spray. Place the bag on a large shallow baking pan.
  3. Cook the pasta in boiling water 5 minutes, omitting salt and fat; drain. Place the pasta in a large bowl. Stir in 1 teaspoon oil and next 7 ingredients (1 teaspoon oil through pepper). Place the orzo mixture in prepared oven bag. Combine shrimp and basil. Arrange shrimp mixture on orzo mixture. Fold edge of bag over to seal. Bake at 450° for 25 minutes or until the shrimp are done. Cut open bag with a sharp knife, and peel back the foil. Drizzle with 1 teaspoon oil.

Yield: 2 Servings

Recipe via Cooking Light/Eating Well magazines.

Links updated 1/26/25

A nice warm bowl of comfort food… Cooking Light’s highly rated BAKED POTATO SOUP

Beautiful bowl of potato soup topped with shredded sharp cheddar, crumbled bacon and green onions.
Cooking Light’s Baked Potato Soup

Sometimes I just want a nice hot bowl of comfort food. This is the ticket. It’s one of the best soup recipes from Cooking Light magazine. The taste is out of this world. It’s not terribly time consuming to make. The last time I made this soup I baked the potatoes while I had the oven on for a meal the day before, so it was quite fast to throw together. This is one of those recipes that makes your eyes roll back in your head, ha ha… too tasty! Trust me, you will love it. The only the I did differently is the I halved the amount of flour so it wouldn’t be quite so thick. I think the essential part of the soup is adding cheese (I used 2% Cracker Barrel Extra Sharp), crumbled CRISPY bacon and green onions (or chives). Let me know how you like it! Trust me, it’s a winner… Copied from MyRecipes.com which no longer has a recipe link… sigh.

Baked Potato Soup

Ingredients

  • 4 baking potatoes (about 2 1/2 pounds)
  • 1/4 cup all-purpose flour
  • 6 cups 2% reduced-fat milk
  • 1 cup (4 ounces) reduced-fat shredded extrasharp cheddar cheese, divided
  • 1 teaspoon salt
  • 1/2 teaspoon freshly ground black pepper
  • 1 cup reduced-fat sour cream
  • 3/4 cup chopped green onions, divided
  • 6 bacon slices, cooked and crumbled
  • Cracked black pepper (optional)

Preparation

  • Preheat oven to 400°.
  • Pierce potatoes with a fork; bake at 400° for 1 hour or until tender. Cool. Peel potatoes; coarsely mash. Refrigerate if not using same day.
  • Lightly spoon flour into dry measuring cups; level with a knife. Place flour in a large Dutch oven; gradually add milk, stirring with a whisk until blended. Cook over medium heat until thick and bubbly (about 8 minutes). Add mashed potatoes, 3/4 cup cheese, salt, and 1/2 teaspoon pepper, stirring until cheese melts. Remove from heat.
  • Stir in sour cream and 1/2 cup green onions. Cook over low heat 10 minutes or until thoroughly heated (do not boil). Ladle 1 1/2 cups soup into each of 8 bowls. Sprinkle each serving with cheese, green onions, and crispy bacon. Garnish with cracked pepper, if desired.

This is a delight and makes quite a bit. Oh, do I miss the Cooking Light magazine…

Enjoy!

Catch you back here next time!

Paula Deen’s Healthier Macaroni and Cheese recipe…

Image: DoctorOz.com

Healthier Mac and Cheese recipe… hmmm. I know right now you’re thinking well how good can THAT be? Low fat cheese, yuck. Well, actually I’ve been making mac and cheese for years with Cracker Barrel 2% Extra Sharp cheese and it has FLA-VOR! I don’t quite have it down pat when it comes to making a rue and adding the cheese, it curdles, from what I’ve read I need to use a combination of different cheeses to prevent that from happening, and that’s exactly what she does. So give it a whirl! Thanks to the Doctor Oz Newsletter that sent this out and of course, thanks to Paula for another fabulous recipe!

Paula Deen’s Healthier Mac and Cheese

Dr. Oz challenged celebrity chef Paula Deen to transform her favorite dishes by cutting the calories and fat in half. By using low-fat cheese and milk, Paula Deen’s Healthier Mac and Cheese keeps all the cheesy flavor of the original recipe without destroying your diet.

 | Print |

Ingredients

Makes 4-6 servings

2 cups whole wheat or regular elbow macaroni (8 oz)

2 cups shredded reduced-fat cheddar cheese (8 oz)

1/2 cup low-fat evaporated milk

2 large eggs, lightly beaten

1/4 cup reduced fat sour cream

1 tbsp Dijon mustard

1/2 tsp salt

1/4 tsp cayenne pepper

1/3 cup grated parmesan cheese

Directions

Preheat the oven to 350°F. Coat a 13×9-inch baking dish with cooking spray.

In a large pot of boiling, salted water, cook the macaroni according to the package directions. Drain well and transfer the pasta to a large bowl. Add the cheddar and stir until the pasta is coated and the cheese has melted.

In a medium bowl, whisk together the evaporated milk, eggs, sour cream, mustard, salt and cayenne pepper. Add the milk-egg mixture to the macaroni and cheese and stir well to combine. Scrape the mixture into the prepared baking dish and sprinkle the parmesan evenly over the top. Bake until golden brown and crispy around the edges, 35 to 40 minutes.

From PAULA DEEN’S SOUTHERN COOKING BIBLE by Paula Deen with Melissa Clark. Copyright © 2011 by Paula Deen.

Reprinted by permission of Simon & Schuster, Inc, NY.

Catch you back here tomorrow!

Meatless Monday: Giada’s Pasta Ponza!!

Image: GiadaDeLaurentiis.com

If you’re on the Meatless Monday bandwagon, you don’t have to feel deprived. LOOK at this dish. This recipe is all good! Fresh simple ingredients, quick to throw together, not using many pots/pans. You’re simply roasting the tomatoes, cooking the pasta and mixing! This pasta paired with a nice fresh salad sounds TASTY! I’m going to serve mine on a salad plate to help trim calories. Our dinner plates these days I swear used to be platters back when I was young. You can load a lot of food on a modern plate… back to the salad plate for me! This recipe came directly from Giada’s website. ENJOY!

Pasta Ponza

Total Time:  23 min 
Yield: 4 to 6 servings
Level: Easy

Ingredients

  • Butter for greasing
  • 2 cups (12 ounces) red cherry or grape tomatoes, halved
  • 2 cups (12 ounces) yellow cherry or grape tomatoes, halved
  • 1/4 cup capers, rinsed and drained
  • 1 tablespoon extra-virgin olive oil, plus extra for drizzling
  • 1/2 teaspoon kosher salt, plus extra for seasoning
  • 1/4 teaspoon freshly ground black pepper, plus extra for seasoning
  • 1/2 cup Italian-style seasoned breadcrumbs
  • 1 pound ziti or other short tube-shaped pasta
  • 1 1/4 cups (2 1/2 ounces) Pecorino Romano cheese, grated
  • 1/4 cup chopped fresh flat-leaf parsley

Directions

Place an oven rack in the center of the oven. Preheat the oven to 375 degrees F. Butter an 8 by 8-inch glass baking dish. Set aside.

Place the tomatoes, capers, 1 tablespoon olive oil, 1/2 teaspoon salt, and 1/4 teaspoon pepper in the prepared baking dish. Toss to coat. Sprinkle the breadcrumbs over the tomato mixture. Drizzle the top with olive oil and bake for 30 to 35 minutes until the top is golden. Cool for 5 minutes.

Bring a large pot of salted water to a boil over high heat. Add the pasta and cook until tender but still firm to the bite, stirring occasionally, about 8 to 10 minutes. Drain and reserve about 1 cup of the pasta water.

Place the pasta in a large serving bowl. Spoon the tomato mixture onto the pasta. Add the cheese and toss well. Thin out the sauce with a little pasta water, if needed. Season with salt and pepper, to taste. Sprinkle with the chopped parsley and serve immediately.

Print Recipe

Pasta Ponza is from Giada’s cookbook “Giada at Home: Family Recipes from Italy and California” available at booksellers everywhere! She’s got an amazing website as well, click HERE to check it out!

Catch you back here tomorrow!

Can’t get a good dinner quicker than this!

A quick and easy dinner - ready in no time!

Ooooh, Wild Alaskan Coho Salmon, Shells with Brie and Asparagus along with Martha’s Tomato, Basil and White Bean Salad. A delicious dinner that was quick to prepare. I had made the bean salad a little earlier in the day. It’s so easy and the taste is beyond belief (as I mentioned in Monday’s post), but the longer it sits the tastier it is! The salmon and the shells with brie/asparagus came directly from Trader Joe’s freezer section. AND the salmon is boneless and skinless as well. Fred cooked the salmon. I know a lot of people like it rare’ish… I like mine crispy with no chance of flipping around… this just had a little butter on it, then was sautéed in olive oil, with salt and pepper and a little squeeze of lemon juice toward the end. The frozen shells with brie I wasn’t sure about. It sounded good at the time, but hmmm, you never know. It was good! It’s a small package and says serving size is 2 and it was PLENTY! This is an example of a good dinner put together in no time! What are some of your favorite “quick to throw together” meals?? I’d love to know!

Catch you back here tomorrow!

Meatless Monday: Martha’s Tomato, Basil and White Bean Salad

Image: MarthaStewart.com

Let me start by saying. This. Is. Awesome. AND more importantly, I’m not really a bean eater. Some beans are OK, black beans, chili beans, but I don’t seek them out… this recipe changed my outlook on beans. This is one quick dish that is out of this world good. This tastes like it came straight from Italy. The only thing you heat is the oil and mainly to infuse the garlic into it. Trust me, this recipe will quickly become a family favorite!

Click HERE to go directly to Martha Stewart’s site to easily print the recipe, or see below… either way… ENJOY!

MARTHA’S TOMATO, BASIL and WHITE BEAN SALAD

Prep/10 min.  Total Time/35 min.  Serves: 4

Ingredients

  • 2 cans (19 ounces each) cannellini beans, drained and rinsed
  • 1/2 pound small roma (plum) tomatoes, cut into 1-inch pieces
  • 1/2 cup fresh basil leaves, torn into 1/2-inch pieces
  • 1 teaspoon coarse salt
  • Freshly ground pepper
  • 1/4 cup extra-virgin olive oil
  • 3 small garlic cloves, minced

Directions

  1. Combine beans, tomatoes, basil, and salt in a bowl, and season with pepper.
  2. Heat oil in a skillet over medium heat. Add garlic, and cook, stirring, until fragrant but not browned, 1 1/2 to 2 minutes. Pour over bean mixture, and gently toss. Let stand 30 minutes before serving to allow the flavors to meld. Salad can be covered and kept at room temperature up to 4 hours.

A five star fall dessert… Cinnamon Apple Cake – from Cooking Light Magazine!

Cooling Cake – It’s not easy to wait!

Fall is in the air… or at least in Charleston, SC it will be soon! What do you think of when you think of fall? I think of apple cider, I think of Yate’s Cider Mill in Rochester, MI. One of my all time favorite places to grab some great crisp, sweet apples, a cup of apple cider, aaaaahhhhhh, and one of those sinful cider mill doughnuts rolled in granulated sugar and cinnamon. Ah, wish they were right around the corner, but its probably a good thing they are far away… VERY far away. If you want a dessert that isn’t too bad for you and has the bonus of making your house smell FAN-TAS-TIC! This is the recipe for you!

Continue reading “A five star fall dessert… Cinnamon Apple Cake – from Cooking Light Magazine!”