How To Make Lasagna… Step-by-step!

fullsizeoutput_2457

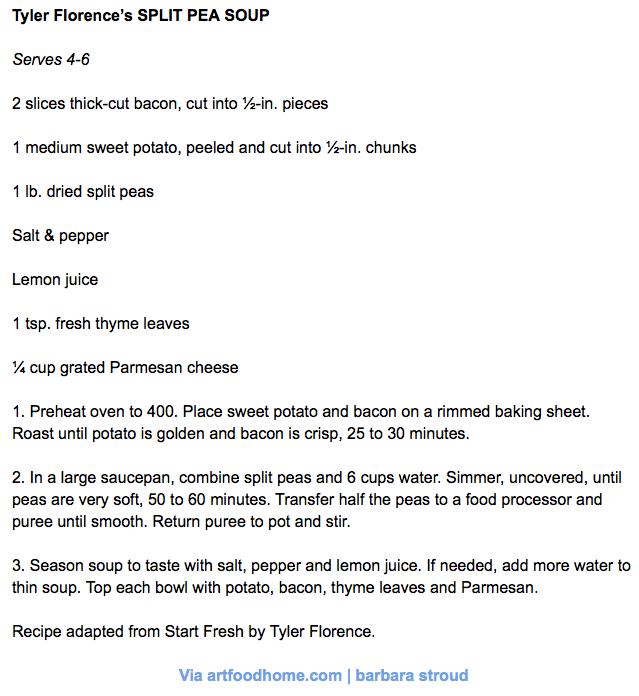
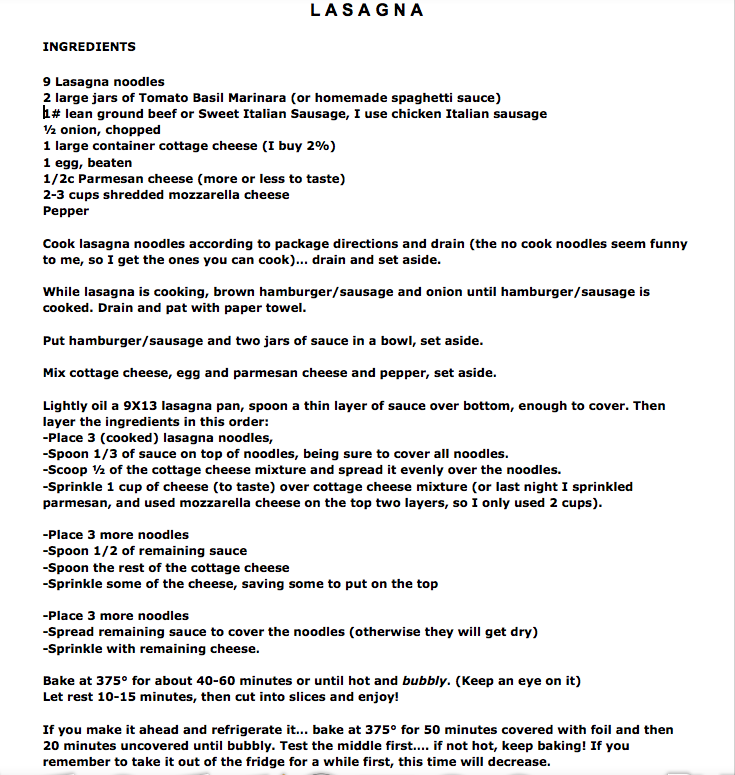
Lasagna. One of my favorites! I can remember my mom making this when I was a kid. It was my all time favorite! Everyone thinks Lasagna is so time consuming, BUT, it doesn’t have to be! It makes quite a bit, and leftovers, ahhh, yum! You can click on the link below to print the recipe, and then jump down and check out the quick recap so you can see for yourself, it’s not hard!

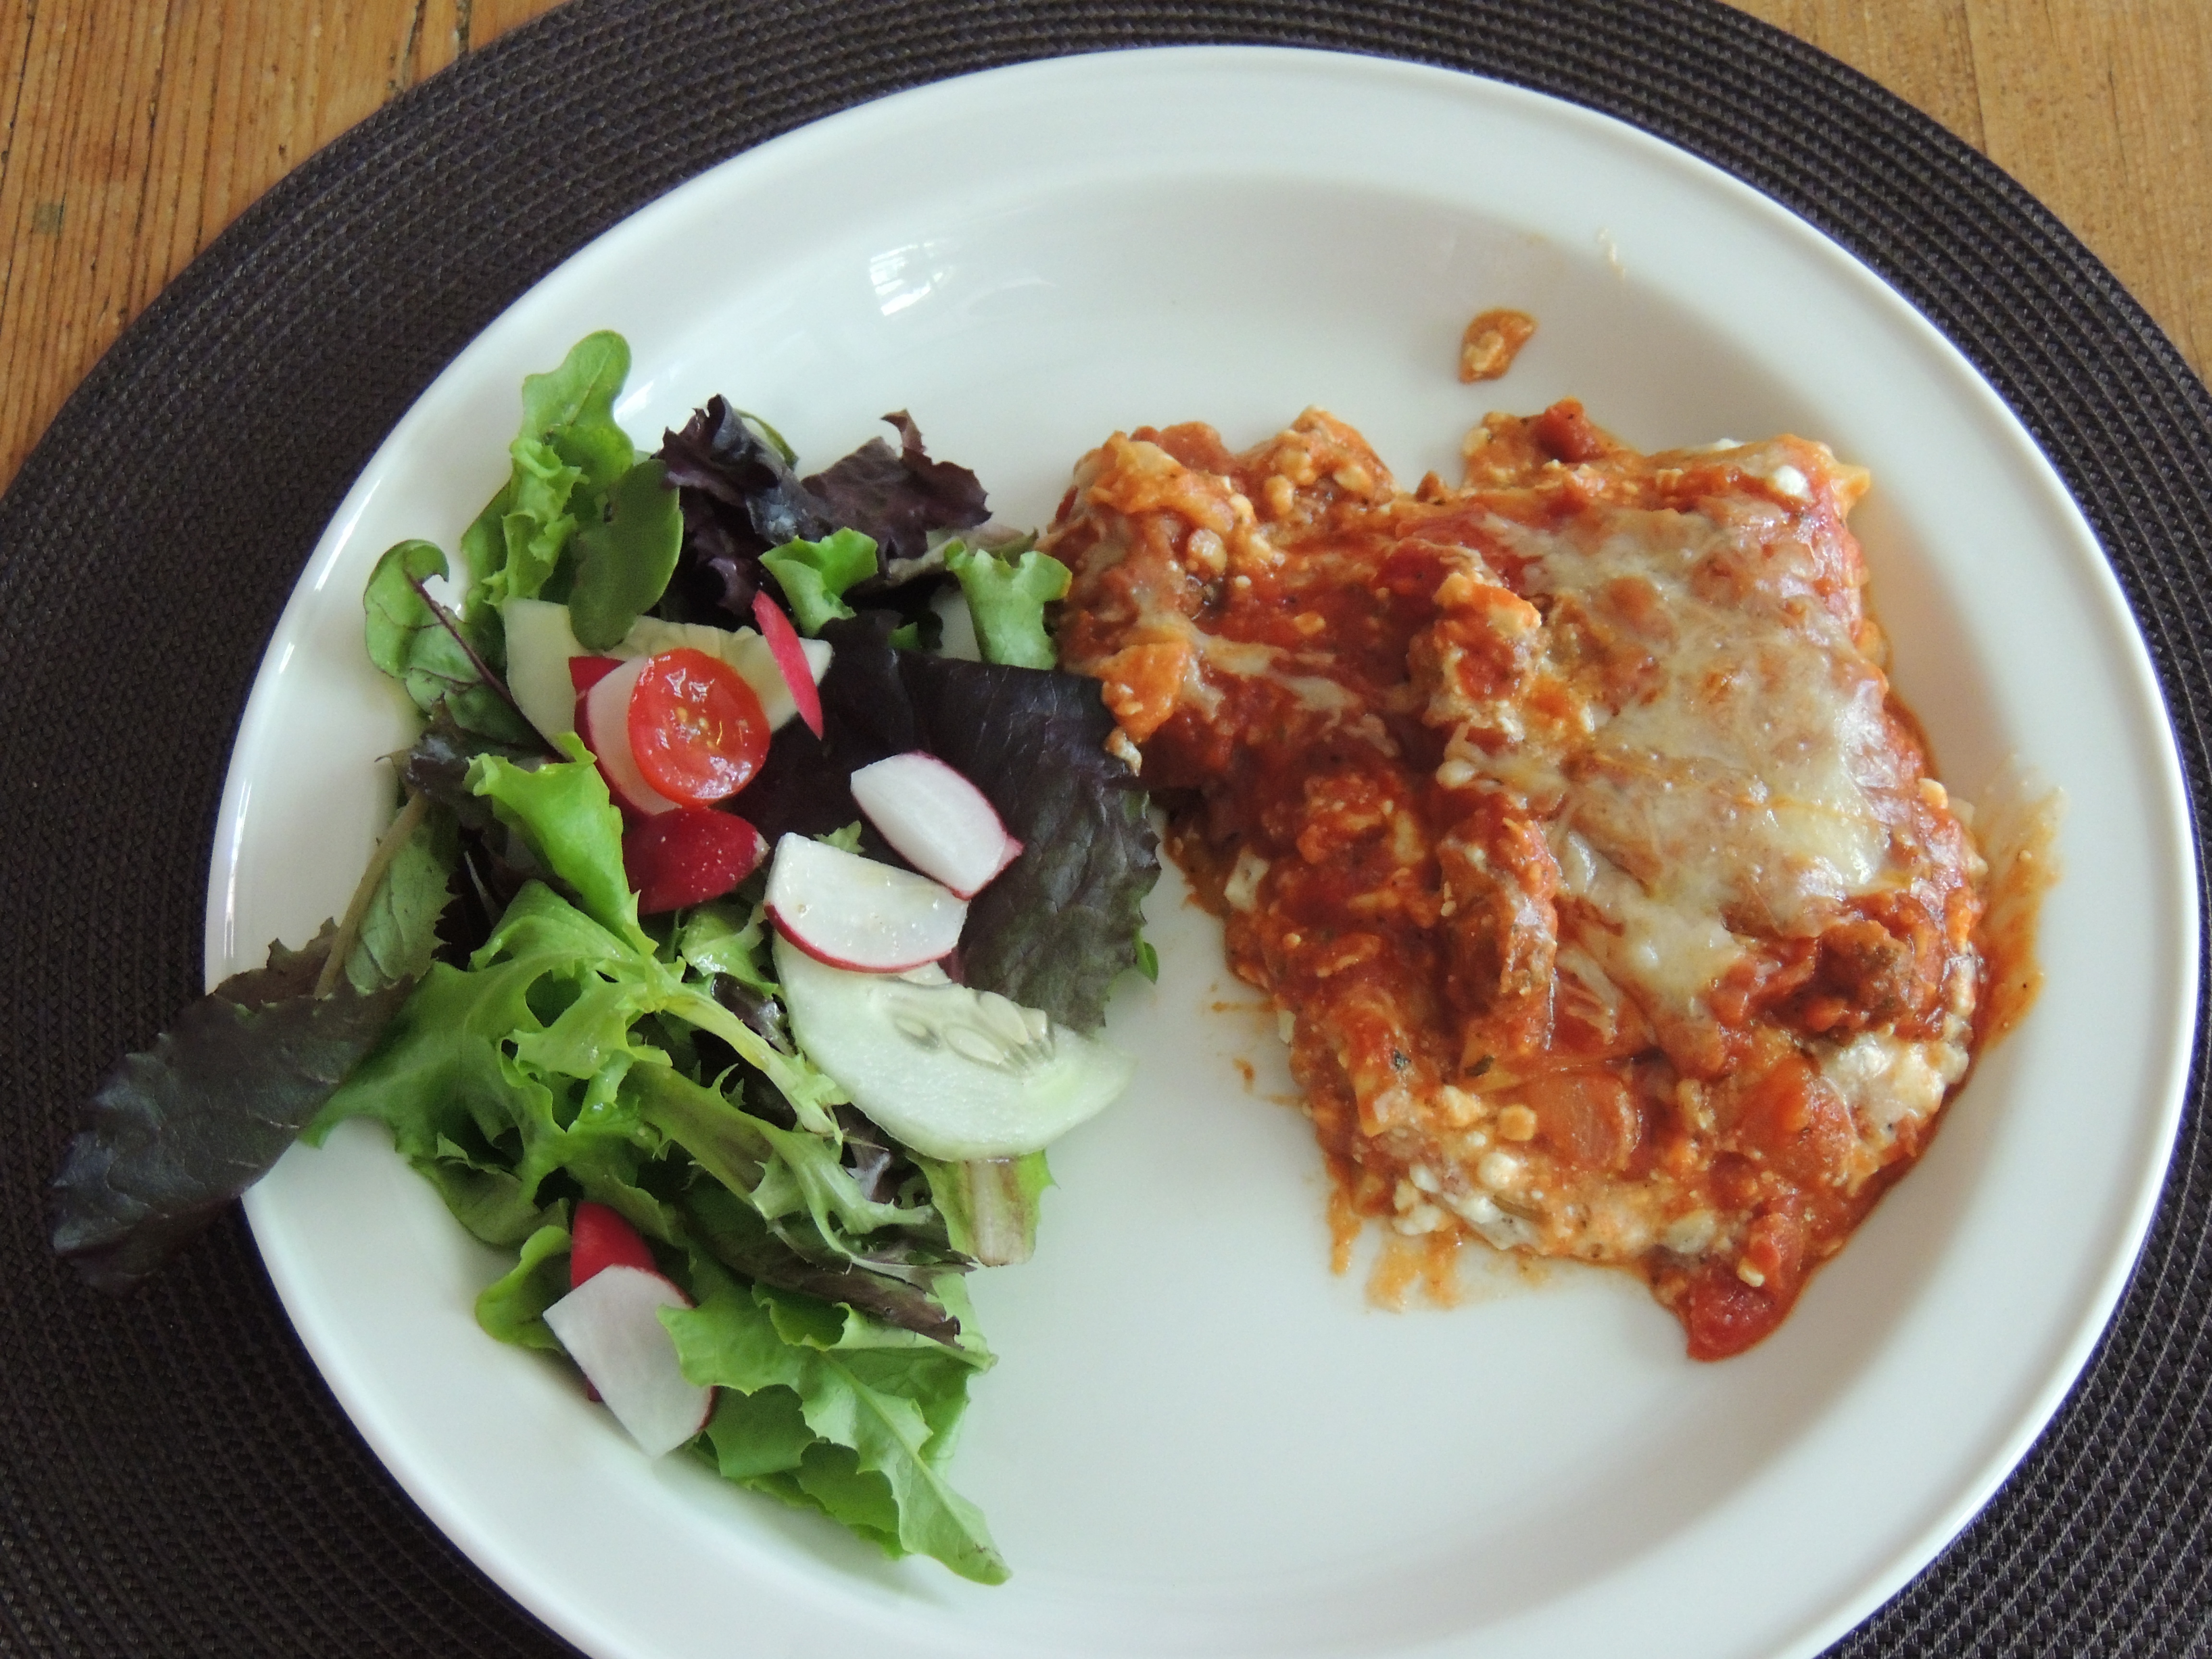
I tried to post this back in the winter, however… it came out of the oven, it rested and WE ATE IT! NO. PHOTO. Sigh…  therefore the time lapse ;)

Click HERE to print just the recipe as shown below (no photos and all my blah, blah, blah)

ArtFoodHome.com | barbara stroud

A quick run through with photos…

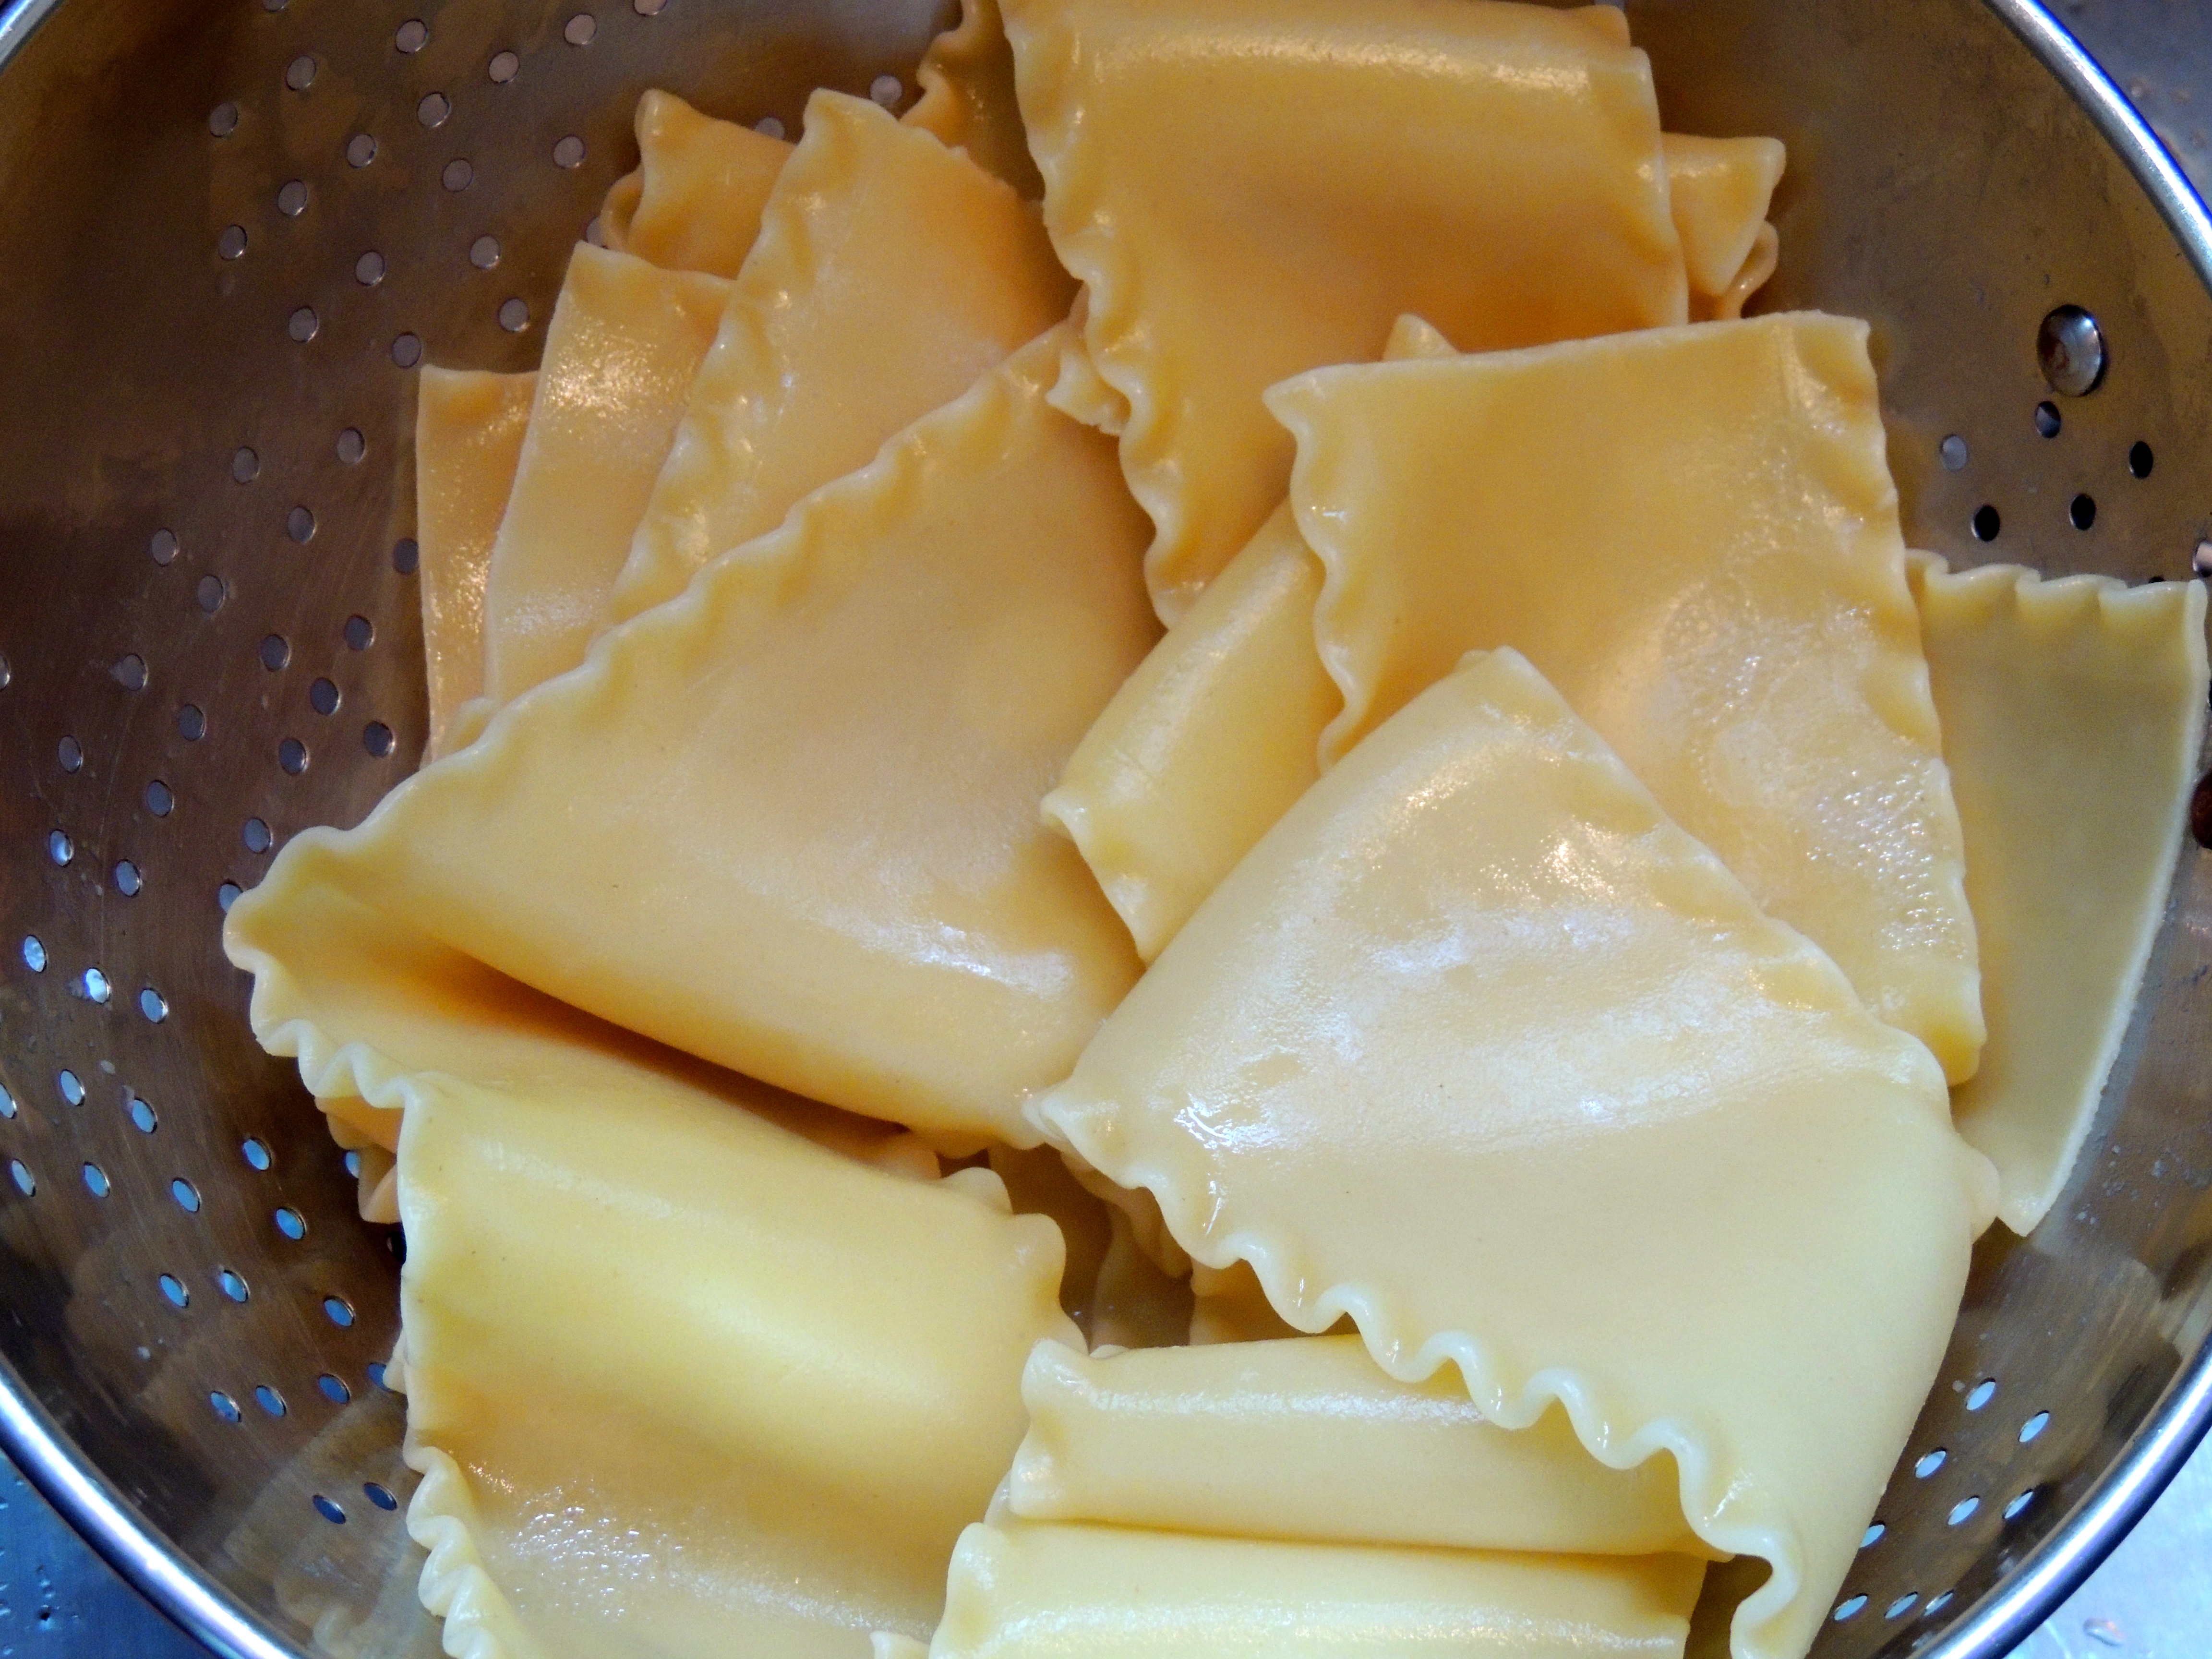
You can buy no boil lasagna noodles or the regular kind that you boil… I tried the no boil but they were weird (to me), so I stick with the regular kind. Boil the lasagna noodles and let them drain…

I buy the kind you cook...
I buy the kind you cook…

Add cooked Ground Beef or Italian Sausage/Onion to the two jars of marinara sauce (I use tomato basil flavor)… (and I use chicken Italian Sausage). You can also use homemade sauce, which I have done, but it’s hard to tell the difference, so… make it easy on yourself!

Use Ground Beef or Italian Sausage

Mix up the Cottage Cheese (not as rich as Ricotta, I like Cottage Cheese much better, but you can use the other, really it’s whatever you like!), Egg and Parmesan…

This is what makes it so special!

Begin layering, start by putting a small amount of sauce (so noodles don’t stick) to bottom of lasagna pan, spread it around, then top with Lasagna Noodles, Cottage Cheese mixture, Mozzarella Cheese, then (as shown below) start layer two, Lasagna, Cottage Cheese, etc.

Begin layer two...
Begin layer two…

You’ll end up with this! Owie! The fabulous smell of this baking is enough to drive you crazy. Bake it, then be sure to let it rest 10-15 minutes – good luck with that part, it’s not easy!

Ready for the oven!
Ready for the oven!

ENJOY!

blog51915

Catch you back here tomorrow!

Recipe! Superfast Crispy Chicken Thighs – a Cooking Light Recipe!

Superfast Crispy Chicken Thighs | Cooking Light

Superfast Crispy Chicken Thighs. I am now a chicken thigh convert! I never thought I liked dark meat, until… try this, I bet you will change your ways! Just look at these chicken thighs… crispy, but moist and tender. One little bone, and that’s it! Great with fresh corn on the cob!

Just LOOK at that crispy skin! All with 1 tablespoon of oil! The trick is cooking skin side down in a cast iron skillet for a certain time and then moving that pan into the oven to finish. Incredible.

My only concern (what could we have done wrong?) is that despite the exceptional (and I do mean OUT OF THIS WORLD, BEST FRIED CHICKEN YOU EVER PUT IN YOUR MOUTH) taste of this chicken, the oven was a disaster. I don’t mean a little disaster, I mean while the pan was in the oven, black smoke started coming out of the oven. All windows open, fans going at high speed, oven cleaned, and it took a few days to get over it. The oven has almost fully recovered, so it may be time to try again. One thing we forgot to do is trim the extra fat from the skin. I would say this is key. We also had 4 thighs (not 6) and a 9″ (not 10″) pan, yet I used 1 tablespoon of oil. Next time I will try half that and see what happens. I really want to make this again!

Suggestions?

  • Print Recipe (takes you directly to this recipe on the MyRecipes.com website for Cooking Light recipes)…

SUPERFAST CRISPY CHICKEN THIGHS

Start by preheating your oven to 500°. While the oven is heating up, place the chicken thighs skin side UP on a cutting board (ideally, one you can put in the dishwasher), trim extra fat. Cover chicken with plastic wrap, and pound it to about 3/4″ thickness. This will help it cook quickly. You can use either a meat mallet or a heavy pan, I used the cast iron skillet, but was very careful to not hit the countertop. Pat the thighs dry with a paper towel and salt and pepper.

Heat a 12″ cast iron skillet over medium heat, and add the 1 tablespoon of canola oil. Swirl to coat the pan, then add the chicken SKIN SIDE DOWN. Cook 8 minutes without disturbing it (or until you see edges get a nice golden brown). We cooked it outside on the burner of the grill. We didn’t trim the excess fat (oops!) and it spit like you wouldn’t believe. If you cook it part way outside and then bring it in to put in the oven, be VERY careful. I put a piece of foil over the top, because it was really splattering. Then transfer the pan just like it is to the hot oven. Bake at 500° for 7 minutes, then turn the chicken over, and bake an additional 4 minutes (or until the chicken is done).

What you will end up with is THE crispiest fried chicken ever!

My oven was a mess, but hey, it needed to be cleaned anyway!

I highly recommend this recipe!

I think one of the tricks is not touching it while it’s cooking on top of the stove, or this case, the burner on the grill… Which I highly suggest!

IMG_3282

Recipe via MyRecipes.com (Cooking Light, and other magazine’s recipes are on this site).

Catch you back here tomorrow!

Recipe: How to make a great wrap!

ArtFoodHome.com | barbara stroud

I am hooked on wraps right now. I’ve made so many different version, each as wonderful as the next. None of my wraps have included meat, but you certainly could!

Start by buying good tortilla’s. Read the ingredients. Many of the grocery store brands have horrible ingredients, (if you’re trying to be healthy) like one of the top three (listed by quantity) ingredients being Interesterified Soybean Oil, Hydrogenated Soybean Oil and/or Palm Oil. What? Yep, if you can’t say it DON’T EAT IT!

I found some wraps at EarthFare the healthy grocery store near us Maria & Ricardo’s tortillas... they’re amazing. I’ve tried the flour tortilla and the spinach, both are fabulous. NO INTERESTEREFIED anything in these tortilla’s… organic, non GMO, etc.

ArtFoodHome.com | barbara stroud

Step 1: I set out a tortilla on a piece of wax paper. Let it sit and come to room temperature while you prepare the ingredients.

Step 2: Spread your “base” (a bit off center, you want it to be more to one side), and add a little to the side of the tortilla to help hold it after you roll it.

Two options that I’ve tried are hummus and avocado (or guacamole)! Both are fabulous, they’re different, but oh so good!

Step 3: Add a slice of cheese (I have been using Havarti, sliced thin, and set out for a few minutes to be more pliable so it will bend when the wrap is rolled).

Step 4: Add some veggies. I like some crunch so I’ve used radishes and cucumber. But whatever you like would work perfectly here. I’ve also added sliced avocado, tomatoes, etc.

Step 5: Add greens. I’ve used arugula, bean sprouts and kale micro greens. All are fabulous! You could also use lettuce. Whatever you like!

Step 6: Optional: you can add some leftover chicken, turkey or whatever else you’ve got.

W O R D   O F   C A U T I O N . . .

Do not pack too much onto this tortilla or you won’t be able to roll it. Sounds like I might have done that, huh? Oh yeah. Fred made a wrap the other day, and it was hilarious. He stuck a knife through it to hold it together because there was so much in it, ha ha… wish I would have taken a photo of that!

To roll the tortilla, fold up a little at the bottom, (in photo above, fold up to cucumber slice at bottom. Then fold the left side over the pile of wonderful ingredients, try to roll it kind of tight so it doesn’t fall apart. Roll until the “glue” (hummus) has been rolled over. Now just tuck in the top portion of the wrap. Sometimes it’s easier to eat if you roll the wrap lightly in wax paper and put in fridge for a minute.

There is no wrong way to roll a wrap, I’ve Google’d it and read many different versions, use whatever is easiest for you. Some just roll it up, and tuck in the sides.

Owie! You’re going to love this!

What do you put in your wrap? Let me know! Catch you back here tomorrow!

Time for a little break and an iced coffee… hold the ice please!

IMG_3147

I love iced coffee once the weather starts to get warmer. Have you noticed that most places where you buy it charge you MORE for iced coffee. Here’s how to make it at home. It couldn’t be easier…

ArtFoodHome.com | barbara stroud

I make a pot of coffee in the morning. I make mine rather strong anyway, so if you make yours weak, and you use ice, try making a pot with a little more coffee added to it, then it won’t get watered down so easily. If you like yours sweetened, add the sugar while the coffee is still warm, stir until it dissolves. I take the lid off the pot and let it cool completely. Then pour it into a glass container, and store it in the fridge.

Mine keeps for several days, not that it typically sits around that long! Go pour yourself a glass, add cream (if you like) – Oowie, nothing better!

Catch you back here tomorrow!

The most delicious cake ever – made with ingredients you probably have on hand RIGHT NOW!

Delicious Chocolate Cake!

Let me start by saying, this is a hell of a photo, isn’t it? You may have gathered from my other posts, I’m so excited once I finish a recipe that we sit down and eat… bite one… then it hits me… P H O T O ! !  I wish I would have thought of taking a photo of the cake prior to cutting, but this is it… see how dark this cake is? Very moist and light. Not too chocolatey and not too sweet. I opted for some whipped cream instead of confectioner’s sugar or frosting. It was PERFECT! Just scroll down and look at the list of ingredients… you probably have all of them don’t you? Well then, why are you sitting there?!

I saw this recipe in an email from FOOD52.com. When I saw that it was a one layer chocolate cake, with no frosting, I was intrigued. You can make it and sprinkle powdered sugar, make frosting, or top with whipped cream.

Best of all you don’t need a mixer, you simply need two bowls and a 9″ cake pan.

Get. Out!

No butter or eggs…

Get. Outta. Here!

OK, I had to try it. I was skeptical, because… well, I never made a cake without essential ingredients. Turns out they aren’t essential at all! This cake was light, fluffy, and not too sweet. It came together quickly. Dry ingredients in one bowl, wet ingredients in the other. Mix then get the air bubbles out by tapping several times and BAM! Best cake ever!

Is there anything better than the smell of a chocolate cake wafting through your house? N. O. There truly is not.

I would also like to take this opportunity to mention that now is your chance to preorder the new cookbook by Food52 called Genius Recipes. It looks like a beautiful book, and it will be jam-packed with fabulous recipes!

Note: I used Hershey’s Cocoa – Special Dark. I’m not sure if that’s why it’s so dark, but it’s fabulous!

Click HERE to print the recipe by itself without all my blah, blah, blah…

Food52

Catch you back here tomorrow, after your cake ;)

Shrimp Fried Rice – Quick and Tasty

IMG_3875

Don’t you just love when you have a recipe that can be a favorite week in/week out? This is one of those recipes! Out of this world good comes to mind! This recipe was in Roper Hospital’s HOUSE CALLS magazine back in the Fall of 2013. I made it the other day and let me tell you… IT’S A KEEPER! All their recipes are fabulous, and this is one more! It comes together quickly, so be sure to have everything measured and ready!

I used Trader Joe’s frozen organic brown rice, which is fabulous, just defrost it! You want the rice cold for this recipe. I used the frozen peas and carrots from Whole Foods, they were fabulous! The carrots were shredded, which I like better than cubed.

Note, I personally don’t care for Sesame Oil, so I used olive oil, I also didn’t use Fish Sauce or a lime wedge… but that’s me ;) – I also don’t eat soy, so I skipped the soy sauce and replaced it with coconut aminos (Trader Joe’s) – my husband then uses soy and I don’t… this is delish!

Click HERE to print the recipe!

SHRIMP FRIED RICE

Via House Calls Magazine – Roper Saint Francis Hospital, Charleston, SC – Fall 2013

Serves 4

1 Tablespoon Sesame Oil

3 cups cooked, cold Brown Rice (defrost if frozen)*

12 oz. Shrimp, shelled

1 Tablespoon Low-Sodium Soy Sauce

1 Tablespoon Canola Oil

2 Teaspoons Fish Sauce (optional)

2 Green Onions, sliced thinly

2 eggs, beaten

¾ cup frozen Peas and Carrot mix, defrosted

Fresh Lime Wedge

*Chef’s Note: Rice should be cold when you sauté it. Try a frozen cooked brown rice, defrosted, such as Trader Joe’s brand, with this, there is no need to cook it according to package directions in advance. (This worked perfectly!!)

HEAT the sesame oil over medium-high heat in a large nonstick skillet. Add the shrimp (original recipe called for raw baby shrimp, I used regular large shrimp and they were wonderful). Add the shrimp and cook for three minutes, turning once, until just opaque in center. Transfer to a plate and set aside.

REDUCE heat to medium and add the canola oil. Once oil is hot add the defrosted pea/carrot mix and green onions. Fry stirring frequently, for one to two minutes. Transfer to the same plate with the shrimp. Increase the heat to medium-high. Once pan is hot again, spread the rice in an even layer on the surface of the pan.

DRIZZLE with soy sauce (and fish sauce if using, I didn’t). Let the rice fry, untouched for 30 to 60 seconds before stirring to allow browning. Toss the rice and cook until crisp and browned, about 2 minutes. Push rice to one side of skillet; add eggs to the other side and quickly stir to scramble the eggs, then work into the rice mixture, about two minutes.

FOLD in cooked veggies and shrimp. Continue stirring until all ingredients are heated through (won’t take long). Serve immediately with a lime wedge for squeezing (we didn’t do this either).

Catch you back here tomorrow!


Salmon Recipe – Perfect for those of you who don’t think you like salmon!

ArtFoodHome.com | barbara stroudThis is a Bobby Flay recipe (from Bobby Flay’s Boy Gets Grill) – I first read about this recipe when I Googled “Salmon Recipes for Non Salmon Lovers”. A blog called FoodCrave featured this recipe – and I really liked the info they gave. They cooked it longer than the original recipe called for, which I liked (5 minutes on each side) AND they used a cast iron skillet! Perfect, since I don’t have a grill pan.

The original recipe was posted on Epicurious, this is where you can print the recipe without all my blah, blah blah…

Fred cooked it 5 minutes on each side like I mentioned, then we put the topping on, and stuck it under the broiler for less than a minute – wow! And I didn’t think I liked salmon :) He got the pan nice and hot, and had coated the salmon with olive oil and WOW what a nice crispy top that made!

Catch you back here tomorrow!

How to make Spaghetti Sauce!

Homemade Spaghetti Sauce with Italian Sausage

Homemade Spaghetti Sauce. Is there anything better? I make a pot of spaghetti sauce and we have it for dinner one night and then I freeze it in containers that will hold the amount we use for one night. It makes dinner so quick and easy. I have even taken it straight from freezer to stove and cooking it on low, and breaking it up, it defrosts quickly.

I usually use chicken Italian sausage (sweet or hot), but have also used grass-fed beef – tasty either way! Easy prep (cut up onion/garlic) – sauté veggies and sausage or hamburger and then add tomatoes and cook on low. Couldn’t be easier!

Click HERE to print the recipe below!


Homemade Spaghetti Sauce with Italian Sausage

Catch you back here tomorrow!

Radek’s Radicchio Salad – To. Die. For.

Radek's Radicchio Salad, Brown rice with spinach and tomatoes and Salmon!
Radek’s Radicchio Salad, Brown rice with spinach and tomatoes and Salmon!

I have to tell you about this salad that a friend made a few weeks ago. It was amazing. Well, to be honest EVERYTHING was amazing, but this was so unexpected and delicious that I think I’m addicted to this salad… yep… addicted to SALAD!

Let it soak - that's the secret!
Let it soak – that’s the secret!

Radicchio, by nature, is bitter – BUT there is a way to tame the beast and Radek did it! Soaking it in cold water takes away the bitterness… then when you toss it in a nice balsamic vinaigrette and toss in some parmesan… BAM! You have yourself one delicious salad! You’ve got to try it!

Radek's Radicchio Salad
Radek’s Radicchio Salad

Click HERE to print just the recipe…

ArtFoodHome.com | barbara stroud

A special thank you to Radek (& Melissa!) Dudek for sharing this wonderful recipe!

Update: I’ve made this salad four times in the last week… Correction to the above “3 Tablespoons Vinegar to 9 Tablespoons Olive Oil” – since I made a smaller quantity I used less. Eyeball it and use 1 part vinegar to 3 parts olive oil and a drizzle of honey. You really don’t need much to coat the salad.

Catch you back here tomorrow!

How to make Turkey Burgers…

ArtFoodHome.com

I would say its been close to a year now that we stopped grilling hamburgers and started grilling turkey burgers. We can buy them already made up in the warmer months at Whole Foods and EarthFare (healthy grocery stores), but in the off months we just make them ourselves and eat them twice in a week (not sure how freezing them would be)? That alongside the fresh vinegar coleslaw, wow! It tickles your senses, and is an utterly fabulous meal!

I’m a little freaky about big hamburger buns. Growing up, my mom always used only a portion of the bun. Now I do the same thing, which results in a scary looking burger. REMEDY? Ahhh yeah! SLIDER BUNS! I buy wheat slider buns and keep them in the freezer. When it’s time to grill I pull them out and stick them in the microwave for about 15 seconds and they’re nicely steamed. I top my turkey burger like I do my hamburger, pickles and mustard. That’s it. I love the crunch of the pickles :)

ArtFoodHome.com

If you’re making your own turkey burgers, take 1 pound of ground turkey (white or mix), and some crumbled feta (however much you like) and a handful or two of torn baby spinach. Make into patties and grill until done! You will not believe how good they are! The feta makes them super special!

Catch you back here tomorrow!

New England Spider Cake – you’ve got to try this!

Art Food Home | barbara stroud
New England Spider Cake

I received an email from Food52 the other day. Have you heard of it? Wonderful recipes, GORGEOUS photos (the one above is mine, sigh…) and once I saw this recipe for New England Spider cake I was intrigued. Interesting name. Cornmeal?! Doesn’t sound too sweet… and by pouring heavy cream on top of the batter you create the most wonderful custard-like layer to the cake. To. Die. For. (Well, not literally).

IMG_2483

You start by combining milk and vinegar in a bowl and set it aside for 5-10 minutes until it gets lumpy. Then you mix the dry ingredients: cornmeal, sugar, flour, salt, baking soda… Heat butter in a cast iron skillet – I swirled and got butter on the sides of the pan as well (cast iron skillet is key!), then pour the milk mixture into the dry ingredients and combine and pour into the skillet!

New England Spider CakeNow comes the magic… you pour HEAVY WHIPPING CREAM in the center of the batter and place it in the oven…

New England Spider Cake

Mine wasn’t quite as “spidery” as some I’ve seen. This cake cut like a dream. All it took was a tiny drizzle of real maple syrup. WOW!!! But it’s best eaten warm! So that first night is the best. Invite some friends over and make this quick and easy cake!

Here’s the recipe! Thank you Food 52.com and Jonathan Reynolds at the New York Times (Jonathan’s link below) (the link to the recipe on Food 52 where you can easily print) – if you just need to look at your screen, well, here you go…

NEW ENGLAND SPIDER CAKE

I N G R E D I E N T S 

2 cups milk

4 teaspoons white vinegar

1 cup all purpose flour

3/4 cups yellow cornmeal

3/4 cups sugar

1/2 teaspoon baking soda

1/2 teaspoon salt

2 eggs

2 tablespoons butter

1 cup heavy cream

Maple syrup, for serving…

I N S T R U C T I O N S

Preheat oven to 350F. Combine milk and vinegar in a bowl and set aside to sour (wait 5 to 10 minutes, you’ll see the milk get lumpy).

In another bowl, combine flour, cornmeal, sugar, baking soda and salt.

Whisk eggs into the soured milk. Stir into dry ingredients and set batter aside.

Melt butter in a 10 or 12 inch cast iron skillet. Pour in the batter. Pour cream into center, then slide the skillet into the oven and bake until golden brown on top, about 45 minutes.

Slice into wedges and serve warm, with maple syrup if you’d like.

Recipe comes from Jonathan Reynolds at the New York Times 

Catch you back here tomorrow!

Recipe: Quiche Lorraine – and YES, real men eat quiche!

Quiche | artfoodhome.com

Quiche Lorraine. This is one of my favorite recipes, because you can change it so that you use what ingredients you have on hand. Although, I have to say, I always go back to the bacon and swiss… the combination is out of this world. Serve this with a side salad, some wonderful baby greens, avocado, and a drizzle of olive oil/rice wine vinegar and oh la la!

I found this recipe on allrecipes.com and changed just a few things… originally it called for onion… My mom took French cooking classes when I was young, so we ate a lot of Quiche Lorraine, it never had onions that I can recall… so it just seemed odd to me. Probably tasty, I put them in everything else, but this seemed like it would be better without. I also used less bacon, about 3-4 slices instead of the original 6 and it worked fine.

I’m thrilled that a quiche can be made with milk instead of cream, woohoo!

Here is the link to the original recipe… I did not make my crust. I used a pie crust by Wholly Wholesome (in the freezer section at Whole Foods).

Here is the link to my version (where you can print minus all these words and photo)… and here, my friends, is what you’ve been waiting to see!

Quiche Lorraine | artfoodhome.com

Catch you back here tomorrow!

Recipe Flashback! Grandma’s Fruitcake recipe… this one is TASTY!

Fruitcake!
Fruitcake!

RECIPE FLASHBACK for the holidays!

[Oops! Just realized (thanks dad!) that I didn’t have the entire recipe showing yesterday… this is fixed now (and has always been accessible via the “Click HERE to print the recipe minus the photos” link :)]

I’m here to set the record straight. FRUIT CAKE IS NOT BORING. It’s lively and cool and oh so wonderful. It also makes your house smell soooo good when it’s baking… check out the original post HERE (with step by step photos)…  Click HERE to print the recipe minus the photos…

**My grandma made a note on her version… she placed a pie dish with water in the oven at the same time as the fruitcake to keep it moist, good thinking!

Fruitcake - ArtFoodHome.com | barbara stroud

It’s nice to start a family tradition, or to give a fruitcake to friends and neighbors.

Catch you back here tomorrow!

Recipe Flashback! Best Christmas Cookies Ever!

artfoodhome.com | barbara stroud

These are the tastiest Christmas cookies in all the land. THE ONES that put the biggest smile on Santa’s face! Perfect for those of you who are uber creative! Each cookie is a blank canvas and you can get as fancy as you like… or you can just squeeze on the colorful frosting, and that’s beautiful as well! The recipe has been in our family since I was teeny tiny and has become a yearly tradition! My parents found it in a magazine… wonder which one? Click here to read the last post about these wonderful cookies!

Click HERE to print the recipe as shown below…

artfoodhome.com | barbara stroud

Catch you back here tomorrow!

Split Pea Soup Recipe with Sweet Potato and Bacon Garnish!

Tyler Florence's Split Pea Soup with Sweet Potato and Bacon Garnish
Tyler Florence’s Split Pea Soup with Sweet Potato and Bacon Garnish

I ran across the best recipe for Split Pea Soup with Sweet Potato & Bacon Garnish in People magazine! Tyler Florence‘s recipes are always fabulous and this is no exception. We had a bag of organic split peas from Whole Foods, yet hadn’t used them… actually, I have never used split peas. Neither of us are big on thick soups. So the one thing I changed? I didn’t blend part of the peas after cooking (which thickens the soup), it still thickened itself somewhat, it was just perfect! The garnish made it over the top good. Cutting up a few slices of good bacon and putting it on a baking sheet along with sweet potatoes cut up small… oooowie, magic happens I’m telling you! It is unbelievable to me how much taste is in split peas! As you see below, in the actual soup part of the recipe, there are split peas, salt, pepper, lemon juice, (I didn’t have thyme leaves, so I did not use, and I only used parmesan once, could barely tell a difference). Yet those pretty green peas are TASTY with a capital “T”!

There aren’t a lot of ingredients – this is simply too easy! There is no soaking of the peas before hand. Another step that makes it that much easier! ✨Just be sure to give the split peas a good rinse right before adding to the pot (rinses away any dirt)…

Click HERE to print the recipe (as shown below!)

artfoodhome.com | barbara stroud

Catch you back here tomorrow!