Nachos Recipe: An easy and decidedly decadent quick dinner (while being heathy at the same time!)…

Healthier nachos | ArtFoodHome.com

We were trying to come up with something for dinner. Something different. We all get stuck in a rut of making the same thing. We wanted fresh, tasty, healthy, and fast!

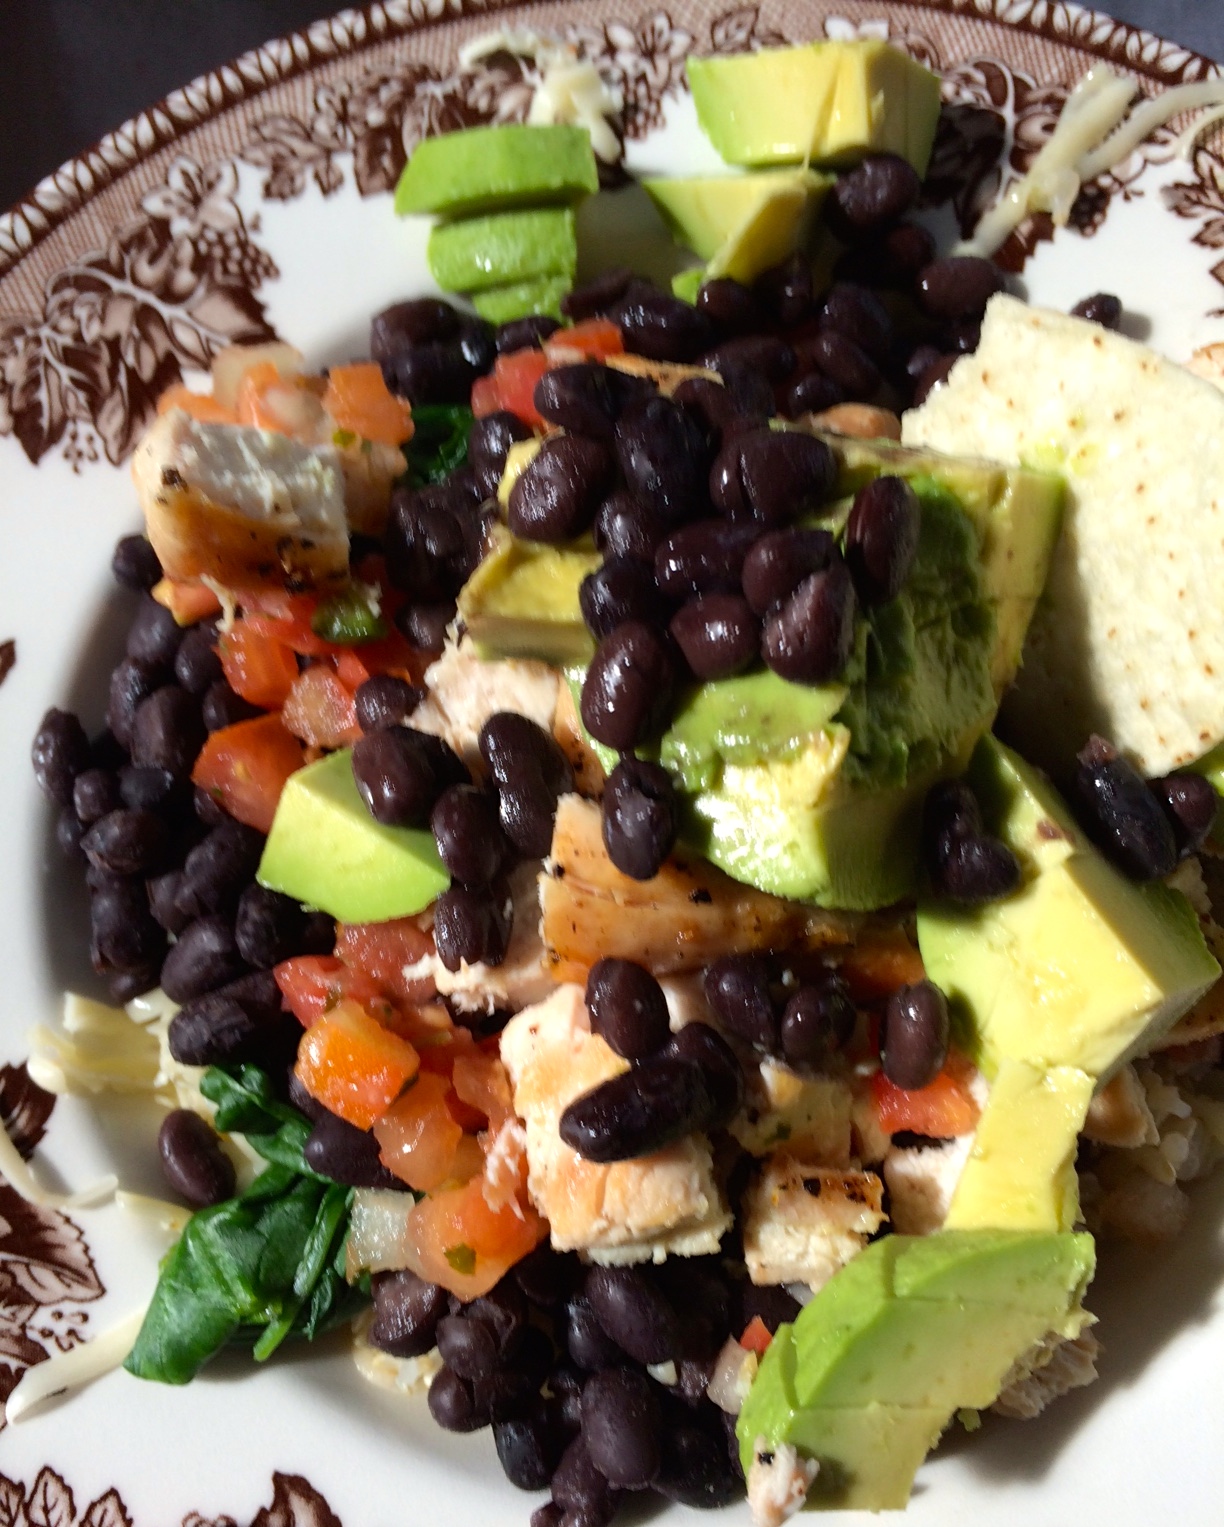
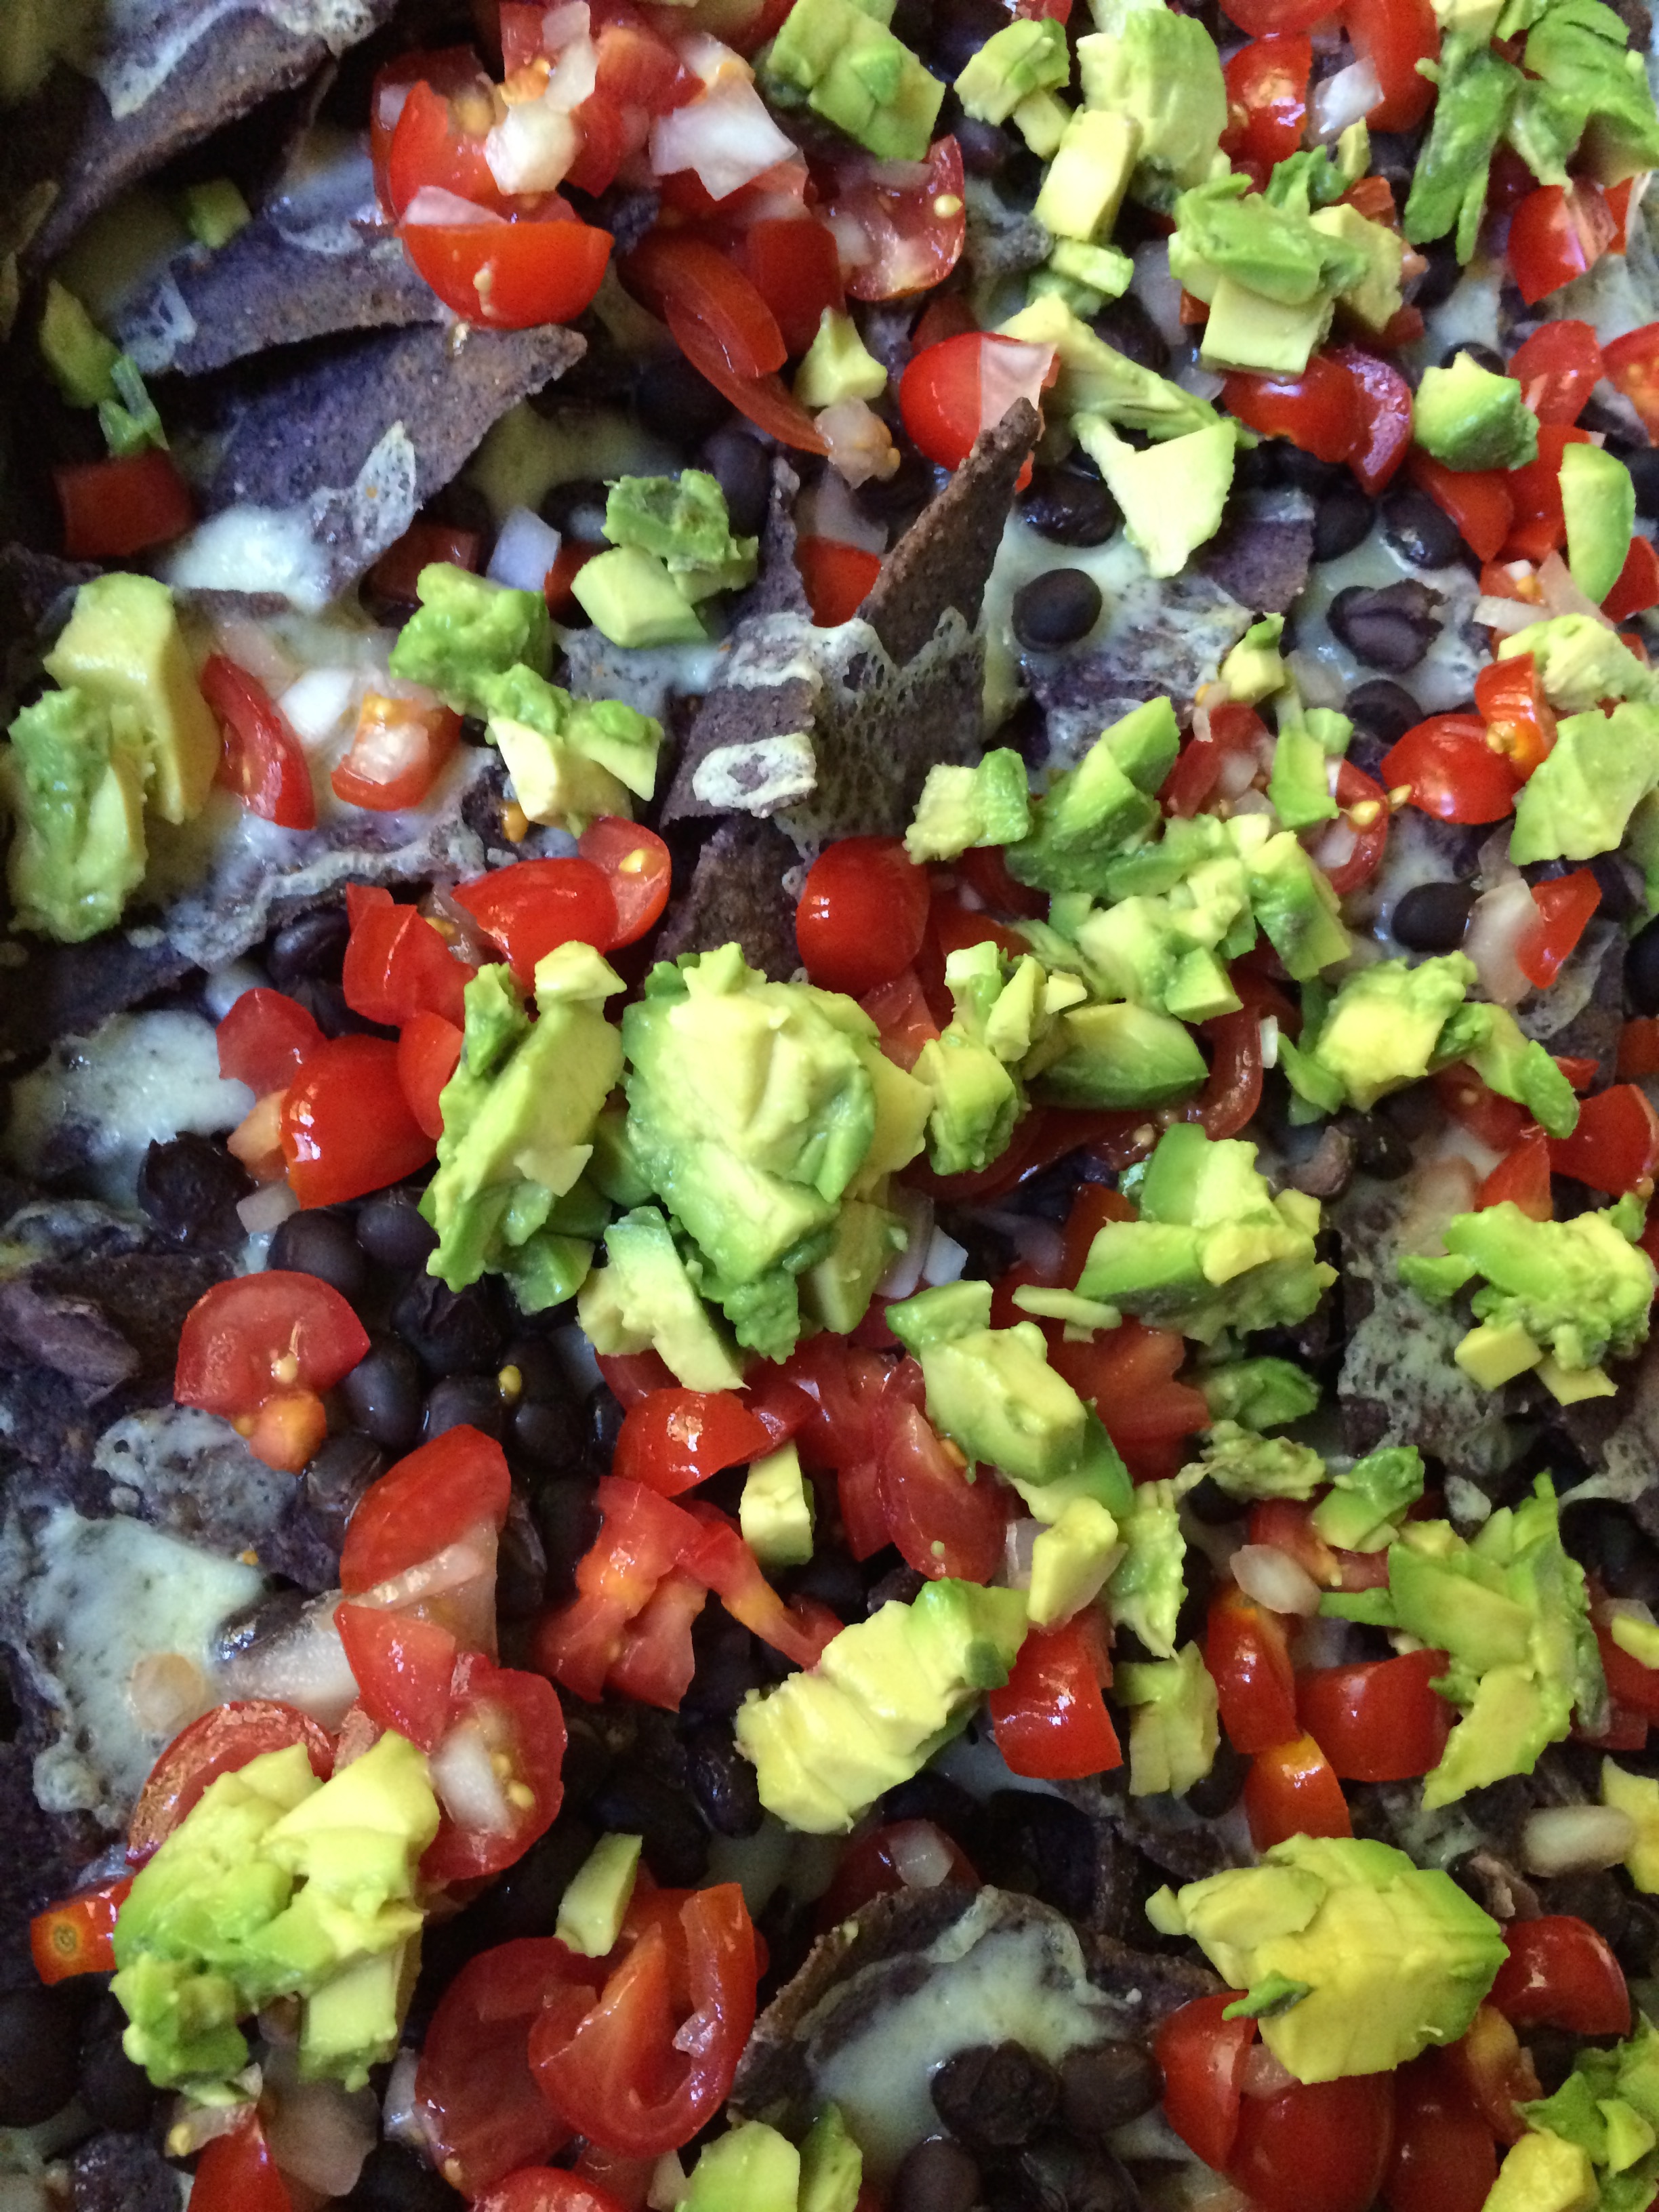
I threw these together, put the pan under the broiler until the cheese melted and then added the tomato mixture and fresh avocado – This was a roll your eyes back in your head kind of dinner :)

Here’s what I did – Click HERE to print:

N A C H O   M A M A ‘ S  N A C H O S – Healthier version

i n g r e d i e n t s 

Whole Foods 365 Brand Organic Blue Corn Chips (or whatever brand you like)

Container of grape tomatoes, sliced thin

Onion, sliced thin (however much you like)

Lime, wedge, squeezed

1 Avocado, peeled, de-seeded and cut into small chunks – Wait to do this until you need it.

1 box of 365 (Whole Foods) brand Black Beans, rinsed, and lightly patted dry – use however much you like  I used 1/2 box.

365 (Whole Foods) brand Organic Pepper Jack Cheese, grated (however much you like). I could have used more but was trying to be “good”… and it was delicious!

Jalopeno’s, diced (or buy the diced ones in a jar near pickle section at grocery store)… I didn’t have these, but will use next time!

Cilantro, chopped (didn’t have it this time, but will next time)…

d i r e c t i o n s

Mix the chopped grape tomatoes and diced/minced onion. Then squeeze the wedge of lime over. Stir to mix the flavors. Can add cilantro and jalepenos if you like.

I used a rectangular metal roasting pan, but use whatever you’ve got. Spread the chips out evenly. Top with black beans and grated cheese. But under broiler until cheese melts (and if you use more cheese than I did, wait until it starts to get a bit bubbly) – be sure to WATCH IT! It never takes long under a broiler, sometimes just a minute or two…

When it comes out of the oven, top with the tomato salsa mixture, and the fresh avocado. You can also have a side of Greek yogurt, but I kept it simple.

This will make your tastebuds smile… seriously!

Catch you back here tomorrow!

Blueberry Cobbler recipe… The PERFECT, quick and easy to make (one bowl) dessert!

IMG_3285

Blueberry Cobbler. A sign that summer has arrived! Blueberries are full of antioxidants, and this is the perfect recipe to showcase them in all their juiciness! A small scoop of vanilla ice cream makes this dessert absolute perfection!

BLUEBERRY COBBLER 

Ingredients

  • 4 – 5 cups blueberries (I used a little more)
  • 1  cups sugar (for the cobbler topping)
  • 1-2 tablespoons sugar (to add to the blueberries to sweeten)
  • 1 cup self rising flour (or 1 cup regular flour + 1 1/2 tsp baking powder + 1/4 tsp salt)
  • 1 egg, beaten
  • 4 tablespoons butter, melted

Directions

Put the blueberries in a buttered casserole dish. Sprinkle 1-2 tablespoons of sugar over the blueberries. Mix the flour, egg and remaining 1 cup of sugar in a bowl. Mix with a whisk until crumbly. Spread this mixture over the blueberries. Melt the butter and pour it over the crumb mixture. Bake in a 350 degree oven for 25-30 minutes or until golden brown.

Recipe adapted from recipe in the Post & Courier many years ago

I had a blog a few years ago ALMOST DAILY PICS where I would post photos a few days a week. I have re-blogged that post below… Enjoy, I know we are! :)

From August 2010:

Today, I got up, made coffee and was reading the local paper… There was a recipe for Blueberry Cobbler… hmmm, that sure sounded good, thinking about making it… maybe… after all, blueberries are a healthfood, right??

Running errands with the usual stop at Whole Foods. What’s on sale? BLUEBERRIES… 2lbs of Michigan blueberries for $5.99. Whhhaaaaaaaaaat???!!! Ok, so it’s a sign, MAKE THE COBBLER! Got home and forgot to buy self rising flour, so (thanks to Google) that was easily remedied… here’s the recipe from Charleston’s Post & Courier if you are interested (I included the substitution to use if you don’t have self-rising flour). This was so quick and easy to make and absolutely sinful!

Click HERE to print the recipe below (minus all the words above)…

🫐 Catch you back here tomorrow!

Green Smoothie – Recipes!

ARTFOODHOME.com | barbara stroud
ARTFOODHOME.com | Barbara Stroud

Smoothies are an amazing way to get blasts of nutrition with great taste, and in this heat, they really help you cool down! They’re so quick to throw together, and you really can’t go wrong!

For those of you who don’t like “green”… I read where if you keep the ratio at 60% fruit to 40% greens you cannot taste them. I can attest to that… my husband said he would make a smoothie… I was rushing around to get ready and I was thinking… ahhhh, he won’t add spinach! But I didn’t say anything… he handed it to me, and I guzzled it down without even really seeing it (we were in the midst of talking about something else), I was almost done when I noticed his glass was GREEN! What?! I swear I thought it was his regular banana smoothie (which is awesome  in itself)! No evidence of anything “green” as my sister would say :)

Here are a few to get you started:

Fred’s Spinach Banana Smoothie

2 BIG handfuls baby spinach

2 cups unsweetened vanilla flavored almond milk

2 frozen bananas

Ice to the consistency you like

Start out by blending the spinach and almond milk until the spinach is liquified. Then add the frozen bananas and a few ice cubes to get it to the consistency that you like.

Uh huh! I KNEW you would like it! You don’t even taste the spinach do you?? Amazing!

Another good recipe from Simple Green Smoothie’s, I bought the large container of organic baby spinach, and large bags of frozen fruit (make sure it’s unsweetened!) from Costco:

Simple Green Smoothie

2 cups spinach

2 cups water, coconut water (we use almond milk sometimes), etc.

1 cup frozen pineapple chunks (unsweet!)

1 cup mango chunks

Same process as above, first blend water/spinach until smooth, then add frozen fruit (or fresh + ice cubes).

Catch you back here tomorrow!

A healthy dinner idea… quick too!

Healthy Dinner Idea

Do you ever have trouble coming up with something to make for dinner? Are you running short on time, but still want something healthy and fresh. POOF! Here’s an idea, and you can customize it how you like…

Boneless/skinless chicken, coat in olive oil and toss it on the grill… yum!

Skewers with sliced (thick) zucchini, mushrooms, and sweet onion. Brushed with olive oil, tiny bit of sea salt and pepper, set on the grill (upper rack).

Corn on the cob (I heat a large pan with about 1/2″ of water, once it comes to a boil, put the corn in, and COVER, cook only a few minutes and it’ll be done)!

Slice a tomato and some fresh basil, drizzle with a wee bit of olive oil, salt and pepper.

To switch things up you could use BBQ Sauce on the chicken (homemade is so much tastier), or Tzatziki sauce, or a nice pineapple/mango salsa? Switch up the veggies, add some fresh mozzarella to the tomato and make it a caprese salad. Oh, the possibilities with a simple dinner!

Catch you back here tomorrow!

Excited for the challenge…

Givin' it a try...
Givin’ it a try…

Fred and I signed up to do the 30-day Green Smoothie Challenge. This is going to be big fun. Get healthier and have more energy, woohoo! Started with our own concoction this morning… hmmm, arugula I knew would be a bit weird and it was, but it was doable. They say if you keep to 60% fruit/40% veggies, you won’t taste the “green” – arugula is kind of hard to miss… Spinach next time!

Check out the Beginner’s Luck recipe (SimpleGreenSmoothies.com) – sounds tasty! The next 30-day challenge begins July 1, 2015!

Catch you back here tomorrow!

A Quick Weekday Dinner!

ArtFoodHome.com | barbara stroud

We’re all looking for a quick, but healthy, weekday dinner… something we can throw together in the blink of an eye. Yet… something that will taste like we really spent time preparing…

I’m going to let you in on a little secret (thanks Mom!)… Bell & Evans Breaded Chicken Tenders.

ArtFoodHome.com | barbara stroud

Let me start by saying that I do not normally purchase processed food. Processed food is basically anything that makes it quick and easy. If you pick up breaded chicken strips in a regular grocery store, you will see a lot of ingredients that are chemicals and not food. This is good chicken, it’s quick, (from freezer to oven it takes 25 minutes, or less if you sauté on the stove!).

We put the chicken on top of some nice butter lettuce, and made a dressing of EVOO + Lemon + Pepper. (2 parts oil to 1 part lemon).

It was delicious! I sprinkled maybe a teaspoon of parmesan on mine, it added a nice flavor.

ArtFoodHome.com | barbara stroud
Happy Birthday Max (very old photo… getting in the ice cold river!) 


I have to give a quick shout to our uber cool nephew, Maxwell! Today is his birthday – hope you have the best birthday ever kiddo! I call him a kid, HA… he’s taller than all of us! This is a very old photo, but one I love!

h a p p y b i r t h d a y m a x w e l l ! ! ! ! we love you, barbara, fred & charlie too!

Catch you back here tomorrow!

5 Star Recipe: Pasta with Kale, Pecorino, Toasted Walnuts and Lemon!

Whole Wheat Pasta with Kale, Pecorino & Toasted Walnuts

Today, I am sharing one of my all time favorite recipes. It’s quick, healthy, and tastes so good you will be blown away! This recipe has whole wheat (or multigrain) pasta, toasted walnuts, pecorino cheese, garlic and lemon… it’s quick to toss together and it tastes like 5-star dining! Thank you Anne Blair Brown for sharing this recipe!

Continue reading “5 Star Recipe: Pasta with Kale, Pecorino, Toasted Walnuts and Lemon!”

How To Make Lasagna… Step-by-step!

fullsizeoutput_2457

Lasagna. One of my favorites! I can remember my mom making this when I was a kid. It was my all time favorite! Everyone thinks Lasagna is so time consuming, BUT, it doesn’t have to be! It makes quite a bit, and leftovers, ahhh, yum! You can click on the link below to print the recipe, and then jump down and check out the quick recap so you can see for yourself, it’s not hard!

I tried to post this back in the winter, however… it came out of the oven, it rested and WE ATE IT! NO. PHOTO. Sigh…  therefore the time lapse ;)

Click HERE to print just the recipe as shown below (no photos and all my blah, blah, blah)

ArtFoodHome.com | barbara stroud

A quick run through with photos…

You can buy no boil lasagna noodles or the regular kind that you boil… I tried the no boil but they were weird (to me), so I stick with the regular kind. Boil the lasagna noodles and let them drain…

I buy the kind you cook...
I buy the kind you cook…

Add cooked Ground Beef or Italian Sausage/Onion to the two jars of marinara sauce (I use tomato basil flavor)… (and I use chicken Italian Sausage). You can also use homemade sauce, which I have done, but it’s hard to tell the difference, so… make it easy on yourself!

Use Ground Beef or Italian Sausage

Mix up the Cottage Cheese (not as rich as Ricotta, I like Cottage Cheese much better, but you can use the other, really it’s whatever you like!), Egg and Parmesan…

This is what makes it so special!

Begin layering, start by putting a small amount of sauce (so noodles don’t stick) to bottom of lasagna pan, spread it around, then top with Lasagna Noodles, Cottage Cheese mixture, Mozzarella Cheese, then (as shown below) start layer two, Lasagna, Cottage Cheese, etc.

Begin layer two...
Begin layer two…

You’ll end up with this! Owie! The fabulous smell of this baking is enough to drive you crazy. Bake it, then be sure to let it rest 10-15 minutes – good luck with that part, it’s not easy!

Ready for the oven!
Ready for the oven!

ENJOY!

blog51915

Catch you back here tomorrow!

Recipe! Superfast Crispy Chicken Thighs – a Cooking Light Recipe!

Superfast Crispy Chicken Thighs | Cooking Light

Superfast Crispy Chicken Thighs. I am now a chicken thigh convert! I never thought I liked dark meat, until… try this, I bet you will change your ways! Just look at these chicken thighs… crispy, but moist and tender. One little bone, and that’s it! Great with fresh corn on the cob!

Just LOOK at that crispy skin! All with 1 tablespoon of oil! The trick is cooking skin side down in a cast iron skillet for a certain time and then moving that pan into the oven to finish. Incredible.

My only concern (what could we have done wrong?) is that despite the exceptional (and I do mean OUT OF THIS WORLD, BEST FRIED CHICKEN YOU EVER PUT IN YOUR MOUTH) taste of this chicken, the oven was a disaster. I don’t mean a little disaster, I mean while the pan was in the oven, black smoke started coming out of the oven. All windows open, fans going at high speed, oven cleaned, and it took a few days to get over it. The oven has almost fully recovered, so it may be time to try again. One thing we forgot to do is trim the extra fat from the skin. I would say this is key. We also had 4 thighs (not 6) and a 9″ (not 10″) pan, yet I used 1 tablespoon of oil. Next time I will try half that and see what happens. I really want to make this again!

Suggestions?

  • Print Recipe (takes you directly to this recipe on the MyRecipes.com website for Cooking Light recipes)…

SUPERFAST CRISPY CHICKEN THIGHS

Start by preheating your oven to 500°. While the oven is heating up, place the chicken thighs skin side UP on a cutting board (ideally, one you can put in the dishwasher), trim extra fat. Cover chicken with plastic wrap, and pound it to about 3/4″ thickness. This will help it cook quickly. You can use either a meat mallet or a heavy pan, I used the cast iron skillet, but was very careful to not hit the countertop. Pat the thighs dry with a paper towel and salt and pepper.

Heat a 12″ cast iron skillet over medium heat, and add the 1 tablespoon of canola oil. Swirl to coat the pan, then add the chicken SKIN SIDE DOWN. Cook 8 minutes without disturbing it (or until you see edges get a nice golden brown). We cooked it outside on the burner of the grill. We didn’t trim the excess fat (oops!) and it spit like you wouldn’t believe. If you cook it part way outside and then bring it in to put in the oven, be VERY careful. I put a piece of foil over the top, because it was really splattering. Then transfer the pan just like it is to the hot oven. Bake at 500° for 7 minutes, then turn the chicken over, and bake an additional 4 minutes (or until the chicken is done).

What you will end up with is THE crispiest fried chicken ever!

My oven was a mess, but hey, it needed to be cleaned anyway!

I highly recommend this recipe!

I think one of the tricks is not touching it while it’s cooking on top of the stove, or this case, the burner on the grill… Which I highly suggest!

IMG_3282

Recipe via MyRecipes.com (Cooking Light, and other magazine’s recipes are on this site).

Catch you back here tomorrow!

Recipe: How to make a great wrap!

ArtFoodHome.com | barbara stroud

I am hooked on wraps right now. I’ve made so many different version, each as wonderful as the next. None of my wraps have included meat, but you certainly could!

Start by buying good tortilla’s. Read the ingredients. Many of the grocery store brands have horrible ingredients, (if you’re trying to be healthy) like one of the top three (listed by quantity) ingredients being Interesterified Soybean Oil, Hydrogenated Soybean Oil and/or Palm Oil. What? Yep, if you can’t say it DON’T EAT IT!

I found some wraps at EarthFare the healthy grocery store near us Maria & Ricardo’s tortillas... they’re amazing. I’ve tried the flour tortilla and the spinach, both are fabulous. NO INTERESTEREFIED anything in these tortilla’s… organic, non GMO, etc.

ArtFoodHome.com | barbara stroud

Step 1: I set out a tortilla on a piece of wax paper. Let it sit and come to room temperature while you prepare the ingredients.

Step 2: Spread your “base” (a bit off center, you want it to be more to one side), and add a little to the side of the tortilla to help hold it after you roll it.

Two options that I’ve tried are hummus and avocado (or guacamole)! Both are fabulous, they’re different, but oh so good!

Step 3: Add a slice of cheese (I have been using Havarti, sliced thin, and set out for a few minutes to be more pliable so it will bend when the wrap is rolled).

Step 4: Add some veggies. I like some crunch so I’ve used radishes and cucumber. But whatever you like would work perfectly here. I’ve also added sliced avocado, tomatoes, etc.

Step 5: Add greens. I’ve used arugula, bean sprouts and kale micro greens. All are fabulous! You could also use lettuce. Whatever you like!

Step 6: Optional: you can add some leftover chicken, turkey or whatever else you’ve got.

W O R D   O F   C A U T I O N . . .

Do not pack too much onto this tortilla or you won’t be able to roll it. Sounds like I might have done that, huh? Oh yeah. Fred made a wrap the other day, and it was hilarious. He stuck a knife through it to hold it together because there was so much in it, ha ha… wish I would have taken a photo of that!

To roll the tortilla, fold up a little at the bottom, (in photo above, fold up to cucumber slice at bottom. Then fold the left side over the pile of wonderful ingredients, try to roll it kind of tight so it doesn’t fall apart. Roll until the “glue” (hummus) has been rolled over. Now just tuck in the top portion of the wrap. Sometimes it’s easier to eat if you roll the wrap lightly in wax paper and put in fridge for a minute.

There is no wrong way to roll a wrap, I’ve Google’d it and read many different versions, use whatever is easiest for you. Some just roll it up, and tuck in the sides.

Owie! You’re going to love this!

What do you put in your wrap? Let me know! Catch you back here tomorrow!

Time for a little break and an iced coffee… hold the ice please!

IMG_3147

I love iced coffee once the weather starts to get warmer. Have you noticed that most places where you buy it charge you MORE for iced coffee. Here’s how to make it at home. It couldn’t be easier…

ArtFoodHome.com | barbara stroud

I make a pot of coffee in the morning. I make mine rather strong anyway, so if you make yours weak, and you use ice, try making a pot with a little more coffee added to it, then it won’t get watered down so easily. If you like yours sweetened, add the sugar while the coffee is still warm, stir until it dissolves. I take the lid off the pot and let it cool completely. Then pour it into a glass container, and store it in the fridge.

Mine keeps for several days, not that it typically sits around that long! Go pour yourself a glass, add cream (if you like) – Oowie, nothing better!

Catch you back here tomorrow!

Something quick to make for dinner – I love this!


ArtFoodHome.com | barbara stroud

Blurry photo… we were hungry, ha ha…

What happens when you plan on having something for dinner, but it doesn’t work out for whatever reason?

You throw a chicken breast on the grill (rub the chicken with olive oil first). Cook some brown rice (YAY Trader Joe’s Organic Brown Rice in the freezer section – takes 3 MINUTES in the microwave)! Drain and heat some black beans, cut up tomato and onion (or we used Pico de gallo, so nice and fresh!), a few shreds of Pepper Jack cheese, some steamed spinach, a healthy dose of lime and a tortilla chip or two (or three) for a little crunch, and the grand finale… sliced avocado – which totally makes this heavenly… and BAM! Dinner. Is. Ready! Let me tell you… this is so good, you’ll want it the next day! We had it the day before with shrimp instead of chicken. That was great too!

Catch you back here tomorrow!

Queen Street Grocery – Breakfast all day and an impressive menu…

artfoodhome.com | barbara stroud

Queen Street Grocery in Charleston, SC. This photo looks like a painting to me. Great reflections and all kinds of things going on. You’ll be happy to know it was voted “Best Corner Store” – and from what I heard they serve some pretty tasty food… check out their menu!

Options… lots of different options and breakfast all day, woohoo!

Catch you back here tomorrow!

The most delicious cake ever – made with ingredients you probably have on hand RIGHT NOW!

Delicious Chocolate Cake!

Let me start by saying, this is a hell of a photo, isn’t it? You may have gathered from my other posts, I’m so excited once I finish a recipe that we sit down and eat… bite one… then it hits me… P H O T O ! !  I wish I would have thought of taking a photo of the cake prior to cutting, but this is it… see how dark this cake is? Very moist and light. Not too chocolatey and not too sweet. I opted for some whipped cream instead of confectioner’s sugar or frosting. It was PERFECT! Just scroll down and look at the list of ingredients… you probably have all of them don’t you? Well then, why are you sitting there?!

I saw this recipe in an email from FOOD52.com. When I saw that it was a one layer chocolate cake, with no frosting, I was intrigued. You can make it and sprinkle powdered sugar, make frosting, or top with whipped cream.

Best of all you don’t need a mixer, you simply need two bowls and a 9″ cake pan.

Get. Out!

No butter or eggs…

Get. Outta. Here!

OK, I had to try it. I was skeptical, because… well, I never made a cake without essential ingredients. Turns out they aren’t essential at all! This cake was light, fluffy, and not too sweet. It came together quickly. Dry ingredients in one bowl, wet ingredients in the other. Mix then get the air bubbles out by tapping several times and BAM! Best cake ever!

Is there anything better than the smell of a chocolate cake wafting through your house? N. O. There truly is not.

I would also like to take this opportunity to mention that now is your chance to preorder the new cookbook by Food52 called Genius Recipes. It looks like a beautiful book, and it will be jam-packed with fabulous recipes!

Note: I used Hershey’s Cocoa – Special Dark. I’m not sure if that’s why it’s so dark, but it’s fabulous!

Click HERE to print the recipe by itself without all my blah, blah, blah…

Food52

Catch you back here tomorrow, after your cake ;)

Shrimp Fried Rice – Quick and Tasty

IMG_3875

Don’t you just love when you have a recipe that can be a favorite week in/week out? This is one of those recipes! Out of this world good comes to mind! This recipe was in Roper Hospital’s HOUSE CALLS magazine back in the Fall of 2013. I made it the other day and let me tell you… IT’S A KEEPER! All their recipes are fabulous, and this is one more! It comes together quickly, so be sure to have everything measured and ready!

I used Trader Joe’s frozen organic brown rice, which is fabulous, just defrost it! You want the rice cold for this recipe. I used the frozen peas and carrots from Whole Foods, they were fabulous! The carrots were shredded, which I like better than cubed.

Note, I personally don’t care for Sesame Oil, so I used olive oil, I also didn’t use Fish Sauce or a lime wedge… but that’s me ;) – I also don’t eat soy, so I skipped the soy sauce and replaced it with coconut aminos (Trader Joe’s) – my husband then uses soy and I don’t… this is delish!

Click HERE to print the recipe!

SHRIMP FRIED RICE

Via House Calls Magazine – Roper Saint Francis Hospital, Charleston, SC – Fall 2013

Serves 4

1 Tablespoon Sesame Oil

3 cups cooked, cold Brown Rice (defrost if frozen)*

12 oz. Shrimp, shelled

1 Tablespoon Low-Sodium Soy Sauce

1 Tablespoon Canola Oil

2 Teaspoons Fish Sauce (optional)

2 Green Onions, sliced thinly

2 eggs, beaten

¾ cup frozen Peas and Carrot mix, defrosted

Fresh Lime Wedge

*Chef’s Note: Rice should be cold when you sauté it. Try a frozen cooked brown rice, defrosted, such as Trader Joe’s brand, with this, there is no need to cook it according to package directions in advance. (This worked perfectly!!)

HEAT the sesame oil over medium-high heat in a large nonstick skillet. Add the shrimp (original recipe called for raw baby shrimp, I used regular large shrimp and they were wonderful). Add the shrimp and cook for three minutes, turning once, until just opaque in center. Transfer to a plate and set aside.

REDUCE heat to medium and add the canola oil. Once oil is hot add the defrosted pea/carrot mix and green onions. Fry stirring frequently, for one to two minutes. Transfer to the same plate with the shrimp. Increase the heat to medium-high. Once pan is hot again, spread the rice in an even layer on the surface of the pan.

DRIZZLE with soy sauce (and fish sauce if using, I didn’t). Let the rice fry, untouched for 30 to 60 seconds before stirring to allow browning. Toss the rice and cook until crisp and browned, about 2 minutes. Push rice to one side of skillet; add eggs to the other side and quickly stir to scramble the eggs, then work into the rice mixture, about two minutes.

FOLD in cooked veggies and shrimp. Continue stirring until all ingredients are heated through (won’t take long). Serve immediately with a lime wedge for squeezing (we didn’t do this either).

Catch you back here tomorrow!