This weeks cancer prevention tip… GREEN TEA. WHO KNEW IT COULD DO THIS MUCH? This information is from a fantastic article I read in Prevention magazine, “Edible Healing: Food Cures for Cancer “. An absolutely fantastic article and one that everyone should read. If you don’t subscribe to Prevention magazine, you may want to consider it. It’s inexpensive and provides so much useful information… click HERE to subscribe (this isn’t a paid advertisement… wish it was, but they have no idea who I am).
While researching for this post I ran across this neat glass mug with infuser by TEAVANA, it’s called “JOLI”. If interested HERE is the link… also sold at Amazon.com.
A Health-Boosting Beverage
Green tea is rich in compounds called polyphenols, including catechins (and particularly EGCG), which reduce the growth of new blood vessels that feed tumors. It’s also a powerful antioxidant and detoxifier (activating enzymes in the liver that eliminate toxins from the body), and it encourages cancer cell death. In the laboratory, it has even been shown to increase the effect of radiation on cancer cells.
Japanese green tea (sencha, gyokuro, matcha, etc.) contains more EGCG than common varieties of Chinese green tea, making it the most potent source on the market; look in Asian groceries and tea shops. Black and oolong teas, commonly used to produce popular tea blends such as Earl Grey, are less effective because they’ve been fermented, which destroys a large proportion of their polyphenols. Decaffeinated green teas, which retain the polyphenols despite the process of decaffeination, are also an option if you’re sensitive to caffeine.
How to Drink It: Sip 2 to 3 cups a day within an hour of brewing. Green tea must be steeped for at least 5 to 8 minutes–ideally 10–to release its catechins, but it loses its beneficial polyphenols after an hour or two.
OK mom, 2 treatments down and 10 to go… you can do it! Whoot whoot!
Sometimes you need a quick and satisfying breakfast, not something that takes too long… it’s nice to be able to grab something and head out the door! These muffins are good alone, or paired with a fruit smoothie or a greek yogurt, mmmmm. They are filled with good things BUT they don’t taste “healthy”. The good thing about this recipe is that you can put whatever fruit you like in it… I made it pretty much as the recipe indicated. I used greek yogurt because it’s what I had (which boosts the protein a weee bit), I didn’t have wheat germ so I just added more flax. Next time I’ll probably use dried apricots or cherries instead of pineapple since the pineapple is so sweet… fresh blueberries would also be good! We eat some and freeze some, they’re great heated in the microwave for a few seconds!
This is a recipe from Cooking Light Magazine… and it’s a winner, I’ve made it several times. If you want to get to the MyRecipes.com website click HERE where you can print it quick and easy, otherwise… here’s the recipe…
Place 18 muffin cups liners in muffin cups; coat liners with cooking spray.
Lightly spoon flours into dry measuring cups, and level with a knife. Combine flours and next 5 ingredients (through salt) in a large bowl; stir with a whisk. Make a well in center of mixture. Combine yogurt, banana, and egg; add to flour mixture, stirring just until moist. Fold in dates, walnuts, and pineapple. Spoon batter into prepared muffin cups. Sprinkle evenly with flaxseed. Bake at 350° for 20 minutes or until muffins spring back when touched lightly in center. Remove muffins from pans immediately; cool on a wire rack.
It’s funny when you look at this picture. If this were anywhere else on earth it would be deemed a catastrophe. But for some reason it just WORKS and works perfectly at Bowen’s Island seafood restaurant… (I guess that’s why it’s in so many magazines!) where the motto is something like YOU EITHER LIKE IT OR YOU DON’T… ha ha… no kidding. This isn’t where we ate this year, they built a new building, where you can still write on the walls, but it is a little more refined… no paint or anything, but it’s big and the food is delicious! I noticed since my last Bowen’s Island post that the link to their menu no longer works… hmmm. I’ll have to see what I can do about that! This is the building closest to the water (right on the water) where I believe they have parties, charity functions, as well as other functions. It’s very “Bowen’s”… unique, likeFolly Beach. Nothing dressy, but hey, the food is beyond fantastic and you see people there who have just woken up (quite possibly after a looooong winters nap?), dressed for church and everything in between. Someone sent me a comment asking if they serve oysters in months that don’t have an “R”. We were there in May and YEP, they were serving oysters. Another commenter mentioned that things have changed since that rule was in place long ago… who knew? Thanks to those of you who keep me up on things! Catch you back here tomorrow!
Whenever I make these cookies and take them somewhere, people go nuts! Seriously… These are too good, and when I give out the recipe, NO ONE can believe they’re “light”. This recipe is from Cooking Light magazine. Make no mistake, part of what makes them so light is the serving size (one). With 81 calories, 3 grams of fat, 1.4 gm saturated fat, and 0.5gm fiber you have to be careful to not eat more than one (or two), but if you exercise a lot and can burn off what you eat… by all means, have at it! I love the cookie dough (I’m aware of the safety issues… to me, the dough is worth risking my life for taking a wee bit of a risk… I’m happy to report that in my little world there is no calorie content in the dough UNTIL IT IS BAKED… (and if you believe that I have swamp land, I mean a deep water lot for sale, hee hee).
I do make a few modifications, ALTHOUGH they’re perfectly fine as the recipe indicates. Here are some of the changes I’ve made throughout the years.Leave out the brown sugar. OOPS… it happened once and I thought they turned out BETTER. But the difference between it being there and NOT being there is barely noticeable (therefore why waste the extra calories?).I use regular chocolate chips instead of mini. I didn’t care for the mini chips, they were, ahhhh, TOO MINI… I like a hefty bite of chocolate not a tiny smear where you THINK you may have just gotten chocolate (or maybe not)…I usually use walnuts and I don’t always toast them. One reason, I’m almost always in a hurry. Another reason, I forget about them until I smell them burning. Soooo, since nuts are good for you I use a generous amount, usually a few handfuls. Same with chocolate chips… I put a few handfuls… I buy good chocolate chips, free of allergy causing soy and other miscellaneous ingredients that takes away from the flavor of the chocolate. I also use dark chocolate chips…I usually (not always) make the cookies SMALLER. I like them bite size. No crumbs that way, boy do I have things figured out or what? You just have to watch them closely because they won’t always take as long to bake. I think you tend to eat less when you think, HAVE I JUST EATEN FIVE COOKIES? When in reality it was probably 2.5… a way I mess with myself, ha ha…Lastly, I use a Silpat cookie sheet liner instead of parchment, but either way it’ll work just fine! Give these a whirl, I do believe they’ll quickly become your favorite! Click HERE for the recipe from MyRecipes.com where you can easily print (as well as see the full info on nutritional info) or see below…
Oatmeal, Chocolate Chip, and Pecan Cookies
These easy drop cookies are crisp on the outside and slightly chewy on the inside. Chocolate minichips disperse better in the batter, but you can use regular chips.
YIELD: 3 dozen (serving size: 1 cookie)
Ingredients
1 1/4 cups all-purpose flour (about 5 1/2 ounces)
1 cup regular oats
3/4 teaspoon baking powder
1/2 teaspoon baking soda
1/2 teaspoon salt
3/4 cup granulated sugar
1/2 cup packed brown sugar
1/3 cup butter, softened
1 1/2 teaspoons vanilla extract
1 large egg
1/4 cup chopped pecans, toasted
1/4 cup semisweet chocolate minichips
Preparation
Preheat oven to 350°.
Lightly spoon flour into dry measuring cups; level with a knife. Combine flour and next 4 ingredients (through salt), stirring with a whisk; set aside.
Place sugars and butter in a large bowl; beat with a mixer at medium speed until well blended. Add vanilla and egg; beat until blended. Gradually add flour mixture, beating at low speed just until combined. Stir in pecans and minichips. Drop dough by tablespoonfuls 2 inches apart onto baking sheets lined with parchment paper. Bake at 350° for 12 minutes or until edges of cookies are lightly browned. Cool on pans 2 minutes. Remove cookies from pans; cool on wire racks.
Julianna Grimes and Ann Taylor Pittman, Cooking Light
DECEMBER 2007
Owwiiieeee… Chobani Greek yogurt! Have you tried it? You’ve heard the hoopla, better for you, more protein, yada yada… but have you TASTED IT? Absolutely delicious. Even the plain (especially when mixed with a cut up cucumber and some green onion… oh heavens!)… give it a try if you haven’t already! They have lots of flavors to choose from!
The Kitchen Aid Artisan mixer is a biscotti-makers dream come true… no kidding! The first few times I made biscotti I only had a hand mixer, so that worked for the first part of the recipe. Then it says to stir by hand… What?! It’s like stirring glue mixed with cement, are you serious? Then I had to call in the big guns… well, ahem, he does have a name… “HEY FRED… PLEASE COME AND STIR THIS FOR ME“… ha… it was kind of like having a nice mixer BUT one that talked back… hmmm… then came the Kitchen Aid mixer… throw the ingredients in and hear it roar… I love this thing! I like my counters clean and cleared off, however this mixer gets used enough that it has the privilege of staying put! Did I mention how great this mixer is, ha ha??
Of course it’s good for everything, not just biscotti, it was just necessary for biscotti!Hey, enjoy your day! Catch you back here tomorrow! Image via Google.com
I made a few changes, one reason was that I was cooking for two and didn’t want leftovers… the other, I didn’t have any sesame oil… I made this a few times before I feel it was perfected. The first time I halved everything, BUT I kept the amounts for the sauce the same. There wasn’t enough. It was a tad dry… I didn’t measure the broccoli, so perhaps I had too much AND I had more shrimp… For two, I made these changes: 3/4# shrimp, and however much broccoli you want, it’s awesome so we ate quite a bit, probably close to 4cups… I used 1/3 cup of low sodium chicken broth, 2 1/2 Tablespoons rice wine vinegar and 2 1/2 Tablespoons soy sauce and 2 1/2 teaspoons of cornstarch.
If this sounds tasty to you, view the recipe below, or click HERE to go to their website for easy printing… NOTE: start your rice long before you start the stir fry because it goes quickly. I start the rice, and then start getting the other ingredients ready. Once the rice is almost done (or is done) THAT is when I start tossing ingredients into the wok!Enjoy!
Shrimp and Broccoli Stir-Fry
Stir-fry a zesty shrimp dish for a quick weeknight dinner. Spoon over basmati or jasmine rice. Try the recipe with chicken or steak, too.
YIELD: 4 servings (serving size: 1 cup)
COURSE: Main Dishes
Ingredients
1/4 cup fat-free, less-sodium chicken broth
2 tablespoons rice vinegar
2 tablespoons low-sodium soy sauce
2 teaspoons cornstarch
1/2 teaspoon dark sesame oil
1/4 teaspoon crushed red pepper
1 tablespoon canola oil, divided
1 tablespoon minced peeled fresh ginger
1 tablespoon bottled minced garlic
1 pound peeled and deveined large shrimp
1/4 teaspoon salt
4 cups small broccoli florets
1 cup vertically sliced onion
Preparation
Combine first 6 ingredients in a small bowl, stirring with a whisk.
Heat 2 teaspoons canola oil in a large nonstick skillet over medium-high heat. Add ginger and garlic to pan; stir-fry 30 seconds. Sprinkle shrimp with salt. Add shrimp to pan, and stir-fry 3 minutes or until done. Remove shrimp mixture from the pan.
Add remaining 1 teaspoon canola oil to pan. Add broccoli and onion to pan; stir-fry 4 minutes or until broccoli is crisp-tender. Add shrimp mixture and broth mixture to pan; cook 1 minute or until thickened, stirring constantly.
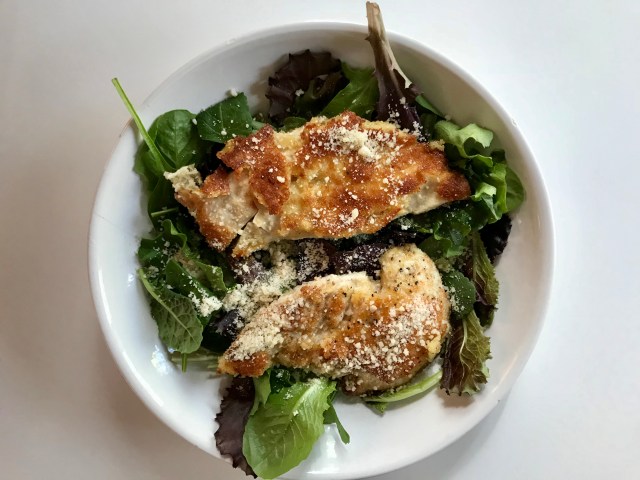
Oh do I have a tasty treat for you today! If you haven’t made Ina Garten’s (aka, Barefoot Contessa) Parmesan Chicken I encourage you do so… you will be oh so thrilled. The chicken coated in parmesan has SUCH fabulous flavor. I like how she puts the salad on top, I usually put the chicken on top of the salad… the light and fresh tasting lemon vinaigrette compliments this nicely. Tasty without being overpowering!
Click HERE to print this recipe!
2 boneless, skinless chicken breasts
1/3 cup unbleached flour
kosher salt
freshly ground black pepper
1 egg
1/2 tablespoon water
1/2 cup seasoned dry bread crumbs
1/4 cup freshly grated Parmesan, plus extra for serving
Unsalted butter
Good olive oil
Salad greens for 2, washed and spun dry
1 recipe Lemon Vinaigrette, recipe follows
Directions
Pound the chicken breasts until they are 1/4-inch thick. You can use either a meat mallet or a rolling pin.
Combine the flour, salt, and pepper on a dinner plate. On a second plate, beat the egg with 1 tablespoon of water. On a third plate, combine the bread crumbs and grated Parmesan. Coat the chicken breasts on both sides with the flour mixture, then dip both sides into the egg mixture and dredge both sides in the bread-crumb mixture, pressing lightly.
Heat 1/2 tablespoon of butter and 1/2 tablespoon of canola oil in a large non-stick sauté pan and cook 2 or 3 chicken breasts on medium-low heat for 2 to 3 minutes on each side, until cooked through. Add more butter and oil and cook the rest of the chicken breasts. Toss the salad greens with lemon vinaigrette. Place a mound of salad on each hot chicken breast. Serve with extra grated Parmesan.
Lemon Vinaigrette:
1/8 cup freshly squeezed lemon juice (1 lemons)
1/4 cup good olive oil
1/4 teaspoon kosher salt
1/8 teaspoon freshly ground black pepper
In a small bowl, whisk together the lemon juice, olive oil, salt, and pepper.
Ooooowie, here’s a fantastic recipe from Cooking Light(link now goes to the Eating Well website.) and NO you will not know it’s light… THIS is FABULOUS! Having it for dinner tonight, woohoo! It’s a flexible recipe, you can use Shitake mushrooms, or cremini, or button, or whatever you have or can find, it’s all good… don’t get too worried about making sure you have every ingredient… I didn’t have a red pepper or hot pepper flakes and mine was TO. DIE. FOR. Also, I had “Fajita Meat” from Whole Foods which they sliced into stir fry size for me, and whoa… it’s was so tender I absolutely couldn’t believe it! Give this recipe a shot if you like stir fry AND do not be afraid of bok choy, trust me, it’s your friend… it’s mild, has no taste really, the stems are like celery offering you a nice crunch, where the leaves are just fantastic… I used a microplane for the fresh ginger (A MUST!) and garlic, that way you don’t bite into hunks of it. The flavors meld together and are a treat to your tastebuds.
The recipe link is no longer available via Cookinglight.com – sigh…
Next time you’re out, grab the ingredients and give it a whirl. Just have everything measured out before hand, the cooking goes quickly! Also, have your rice done, or almost done, otherwise you’ll be waiting on it… hmmm, how would I know that? ha ha… Enjoy and I’ll catch you back here tomorrow!
Hey, check out my photo blog at http://almostdailypic.wordpress.com for a special birthday wish for someone very dear to us… Fred’s Dad! Happy Birthday DC!
And now… for the recipe…
STEAK, SHIITAKE and BOK CHOY STIR FRY
Ingredients
2 tablespoons grated fresh ginger
1 tablespoon minced fresh garlic
3 tablespoons low-sodium soy sauce
4 teaspoons cornstarch, divided
1 teaspoon toasted sesame oil (I need to buy, had to use olive oil)
Combine ginger, garlic, soy sauce, 2 teaspoons cornstarch, oil, and crushed red pepper in a large zip-top bag; add steak to bag. Seal and marinate in refrigerator 20 minutes.
Heat a large nonstick skillet over medium-high heat. Coat pan with cooking spray, and add mushrooms, onion, and bell pepper to pan. Cook 3 minutes or until crisp-tender; transfer to a large bowl. Add bok choy to pan; sauté 2 minutes or until slightly wilted; add to bowl; keep warm.
Recoat pan with cooking spray. Add half of steak mixture to pan; cook 3 minutes or until browned, stirring occasionally. Transfer to a large bowl; keep warm. Coat pan with cooking spray. Add remaining steak mixture to pan; cook 3 minutes or until browned, stirring occasionally. Add to bowl; keep warm.
Combine broth and remaining 2 teaspoons cornstarch, stirring with a whisk. Add to pan, scraping pan to loosen browned bits. Bring to a boil; cook 1 minute or until mixture thickens, stirring constantly. Return steak and vegetables to pan; toss gently to coat.
Sometimes a good comfort food meal can do wonders. I’m thinking of making this recipe one day this week… haven’t had it in quite some time… a GREAT recipe for meatloaf with a super tasty sauce on top, an all time favorite! Sometimes I’ll make it half the size, but keep the same amount of sauce.
Ginny is the lady that lived next door when we were growing up. She had girls my age and around my age (HI DAWN, JACKIE, LINDA, LAURA, GINNY!!) and I had the absolute best time with them. With summer nights spent sleeping on their wonderful screened in porch, making dinner most nights, we just had the best time… and shhhh, keep it a secret, here’s the recipe!
GINNY’S EVERYDAY MEATLOAF
Meatloaf Ingredients:
2/3 cup bread crumbs
1 cup milk
1 1/2 pounds ground beef (nowdays I use the lean stuff)
2 beaten eggs
1/4 cup onion
1 teaspoon salt
1/2 teaspoon sage
dash of pepper
Topping Ingredients:
3 Tablespoons brown sugar
1/4 cup ketchup
1/4 teaspoon nutmeg
1 teaspoon dry mustard
SOAK the breadcrumbs in the milk. ADD the ground beef, eggs, onion, salt, sage and pepper. Form into a loaf and put in an 8″ (I spray with canola oil) loaf pan. BAKE at 350 degrees F for 45 minutes+ (or until almost done – internal temp 160F)
Then I spoon off any fat, and spread on the ketchup mixture topping. Bake 10 more minutes (check temp again), and let rest for 10 minutes before slicing.
You won’t believe how good this is! Trust me… extra tasty with mashed potatoes and some sauteed fresh spinach with olive oil, garlic and lemon!
While in Maine we had several friends tell us of a wonderful Italian place to visit for dinner. FINALLY we got around to trying it and I swear we will be back each and every year we’re in Rockland! It was absolutely unreal! The pasta was TO. DIE. FOR. Specifically this one… via the Rustica website:
Sausage and Broccoli Rabe ~ Penne with House made hot Italian sausage, broccoli rabe, caramelized onion and marinara.
The restaurant is kind of kitty corner from the Farnsworth Museum if you’re familiar with it… Check it out, give it a try!
Ohhhh, a tasty fish-on-Friday treat! This recipe is quick and easy AND it’s delicious! You can use parchment paper or foil, I only had foil onhand so I used it and it worked great! This is a Southern Living magazine recipe, the recipe can be found at MY RECIPES if you would like to be able to print quick and easy, otherwise here it is! ENJOY!
Note… on one occasion this recipe seemed far too lemony, so I don’t use 2 lemons, but that’s up to you!
Lemon-Dill Tilapia
Note: Aluminum foil can be substituted for parchment paper.
YIELD: Makes 4 servings
COOK TIME: 25 MINUTES
PREP TIME: 15 MINUTES
Ingredients
4 (5-oz.) fresh tilapia fillets
1 teaspoon salt
1/2 teaspoon pepper
2 lemons, sliced
1/4 cup shredded carrot
2 tablespoons fresh dill (I used dried dill to taste)
2 tablespoons fresh parsley
2 tablespoons butter
Preparation
Preheat oven to 375°. Sprinkle fillets with salt and pepper.
Cut parchment paper (or foil) into 4 (13- x 9-inch) rectangles. Place 3 lemon slices crosswise in center of 1 parchment rectangle. Top with 1 fillet. Repeat with remaining lemon slices, fillets, and parchment paper rectangles. Sprinkle fillets evenly with carrot, dill, and parsley. Top each fillet with 1/2 Tbsp. butter. Fold 1 side of parchment paper over fillets; tuck excess parchment under fillets, pressing folds to form a crease.
Bake at 375° for 20 to 25 minutes or until fish flakes with a fork. Serve immediately.
Some refer to this restaurant as Fast and French, others as G&M and the rest of you as Gaulart et Maliclet Cafe. It’s the cool little restaurant on Broad Street in Charleston where you see many of the locals as well as some visitors. It’s a great place to meet people. It has to do with the seating, there aren’t separate tables and chairs, there is a long bar area and a few shorter wider bars where you sit across from people. It’s perfect for dining alone, or meeting new people. You can always find someone interesting to talk to at G&M. Thursdays is fondue night, a popular night for many. I happen to love their cold cucumber soup especially on a hot summer day when anything heavier than that just doesn’t sound good. They have wonderful sandwiches among many other dishes at night. Great coffee and desserts too… check out their MENU.
Mellow Mushroom restaurant opened a few weeks ago in Charleston. More specifically, West Ashley/Avondale area, which is mighty convenient and within walking distance… woohoo! We treated ourselves to pizza for dinner last night and a spinach salad… it was too good! They did a great job renovating the space that started as the Ashley Theater, which opened 2/20/1950! They kept the overall theater feel, they removed the drop down ceilings that the shop before them had and now you see the gorgeous wood ceilings, they have the huge movie projector in the center like a piece of art, very cool. I have to say everyone was uuber friendly… there was a nice vibe to the restaurant, not to mention good pizza. So if pizza is sounding good to you head on over there!
A brilliant concept I do believe. Have you ever bought a pepper grinder and it works beautifully UNTIL you have to fill it up. Either it’s nearly impossible to refill or once you refill it things go haywire… and you’re stuck with a bunch of peppercorns and no way to grind. The inexpensive solution? The McCormick pepper grinder, use it then recycle it… you have control over how coarse you want the pepper to come out… we like them chef size; the big coarse grind where you really taste the pepper…