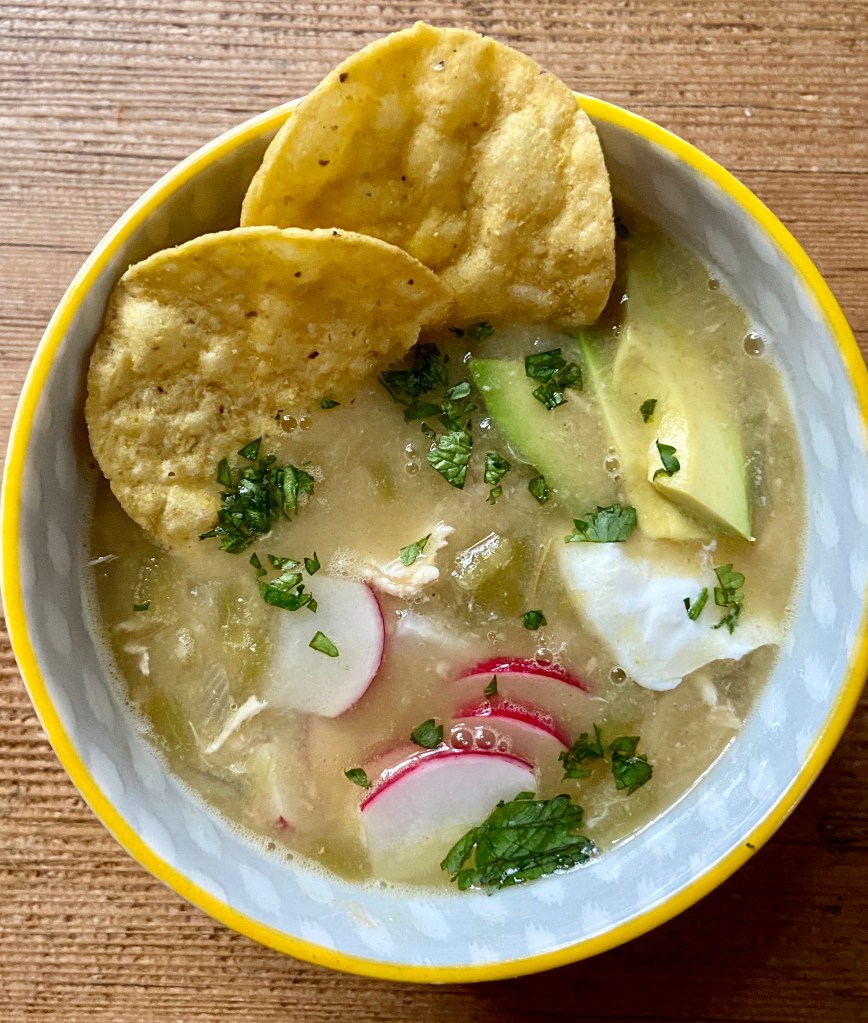
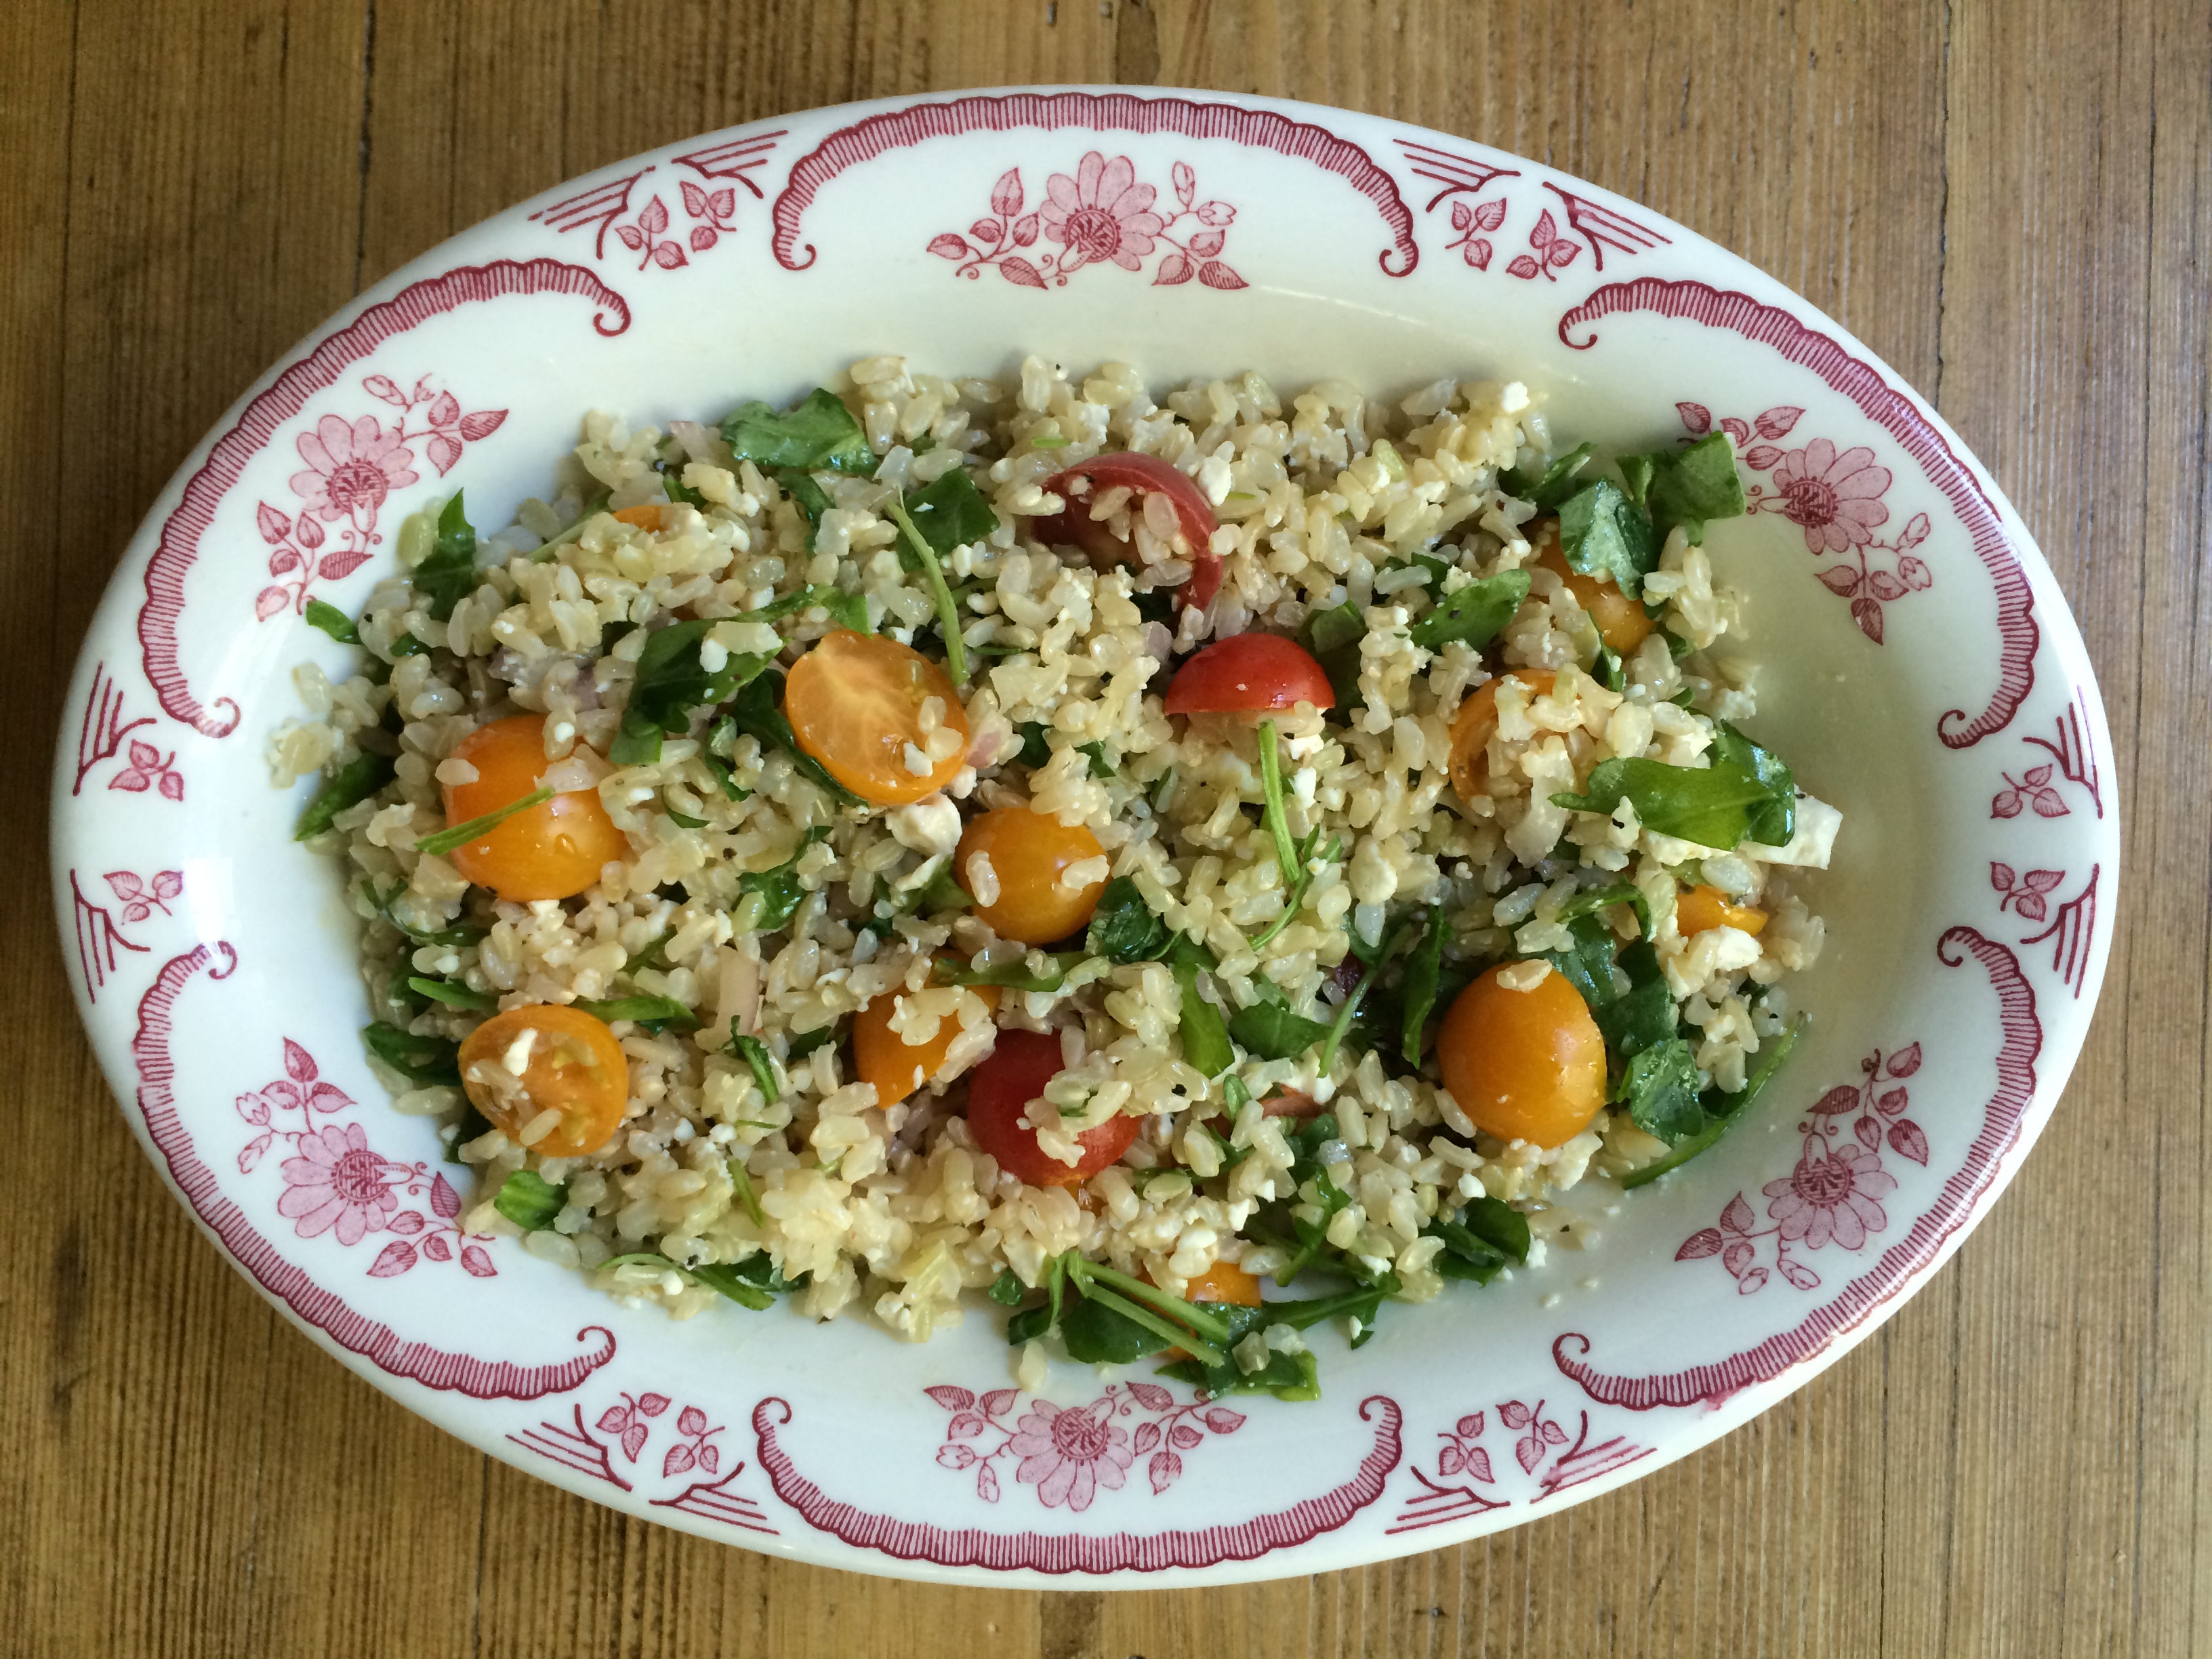
Curry Chicken Salad with Walnuts and Dried Cherries- Healthy & Outstanding!!

Chicken salad. A tasty lunch, served alone, on top of lettuce, inside a pita or between two pieces of bread. However you like it – this is a fabulous recipe. It’s so quick and easy, especially if you bake an extra chicken breast. One night a week we have baked/roasted chicken, we split one chicken breast and make another for a recipe, such as Quick Green Chicken Chili or Chicken Salad.

This is a curry chicken salad – which adds a nice sweetness. I shred one large chicken breast with two forks.  Add celery, green onion, walnuts, dried cherries or cranberries, several shakes of curry powder, salt, pepper, about a tablespoon of canola mayonnaise and a big blob of Greek yogurt.

That’s it! Stir it around – it will taste like something you got at a nice restaurant for lunch! This day I had it on one half of a whole wheat pita with apple slices (apple slices were good tucked into the pita too)! Make it your own, add more of what you like and don’t add what you don’t like. This is so flexible. I have omitted the mayo entirely and it was still good, just a little less creamy and a wee bit more tart. Having a teeny bit of mayo seemed to take care of that!

Catch you back here tomorrow!

Baked Chicken to the rescue!

Baked Chicken. So easy. So delicious. So many sides to serve it with AND recipes for any that may be leftover (I always bake extra). One weekend night we usually have baked chicken, the sides vary – then I use the leftover chicken for chicken salad, soups, salads, Quick Green Chicken Chili that I’ve posted here before.

I use chicken breasts with bone and skin. Chicken skin used to be touted as unhealthy, but studies now show that it’s pretty good for you (in moderation!) – We buy chicken breasts (no hormones/no antibiotics) from Whole Foods. It’s our preference… They are large. We split one for dinner, save one for soup (and it’s plenty after you pull off the skin, pull off the bones and shred) or chicken salad, or another recipe…

To make baked chicken…

OVEN 350 degrees F. (Use convection setting if you have it – makes the skin like fried chicken, no lie!)

Pat the chicken dry and then spread a little olive oil on the chicken, S&P. 

Pop into the oven approximately 1 hour – insert meat thermometer – 180 degrees F and it’s done! Let it get nice and golden. 

That’s it. End of “recipe”… How can you beat it? When I store the leftover chicken breast we do take it off the bone, seems to come of easier when warm, but we leave the skin on to keep the meat moist.

In this photo we had the chicken with a baked sweet potato (wrapped in foil baked along with the chicken right on the rack, not next to the chicken) and a bunch of lacinato kale, sautéed very briefly, and then left to steam with lid on.

We also have chicken with roasted vegetables (this is what we usually have) – then we can reheat veggies for the week! There is nothing better than roasted veggies!

A few minutes of prep and you have a good bit of your meals for during the week!

Catch you back here tomorrow!

Quick Green Chicken Chili – My version…

Green chicken chili | artfoodhome.com

This flavorful chicken chili recipe originated from Cooking Light magazine. I’ve been a subscriber of CL for decades, it’s a great magazine full of healthy recipes that actually taste fabulous! This is a favorite recipe – I don’t think I’ll be making beef chili ever again!

We like our soups and chili’s on the brothier side – so I added more chicken broth and less flour (matter of fact I used so little that you could just leave it out entirely). I also forgot to drain the green chiles – it was pretty spicy, but so excellent – not sure that I would change it next time! A happy mistake!

I was leary of cold radishes and fresh avocado on top of hot chili – seemed a bit odd. It’s so wonderful, especially the crunch from the radishes!! I will be (and have been) making this recipe often!

Click HERE to print my version of the Cooking Light recipe for Quick Green Chicken Chili as shown below:

Catch you back here tomorrow!!

This dog loves the sun…

Charlie – he loves the sun, even when it’s hotter than H-E-!-! outside! I snapped this photo of Charlie and was trying to capture the fern but not the house so I tilted my phone slightly and the result was a black background WHICH I LOVE – it looks so mysterious. Not sure I could duplicate, but hey, I’ll take it!

Happy Columbus Day! If you have today off, ENJOY!

Tomorrow’s feature is a FABULOUS, life changing recipe! Woohoo! I love to find something new!

Catch you back here tomorrow!

GUEST POST: Mini Nachos by Brennen McElhaney!

Today I’m featuring a guest post written by an artist I have featured in the past. He sent me this tasty sounding recipe – and what a perfect idea – to have those of you with good ideas – recipes, art, thoughts, etc. submit something to be featured.

If interested, contact me via my blog (or click on the CONTACT ME page at the top of my website) – send me what you would like to say, include an original image if you like…

For those of you who give this recipe a whirl – be sure to comment on this blog!

Be sure to check out Brennen’s fabulous paintings:

Website  |  Facebook

Here is the post by Brennen – catch you back here tomorrow!

GUEST POST by BRENNEN McELHANEY

Mini Nachos by Brennen McElhaney

Nothing beats a big plate of nachos (and margaritas) shared with friends. But sometimes a smaller “fiesta” is more appropriate. Here is a scaled-back version of the traditional Mexican appetizer.
  • Nacho chips (10)
  • Refried beans (heated)
  • Shredded cheddar cheese
  • Chopped lettuce
  • Minced fresh onion
  • Diced tomatoes
  • Sour cream
  • Fresh guacamole
  • Fresh cilantro
  • Lime wedge

Spoon a small portion of heated refried beans onto each chip and line the chips up in a row. Add toppings (in this order): Shredded cheddar cheese, chopped lettuce, minced onions, tomatoes. Top with sour cream, guacamole and garnish with freshly chopped cilantro and lime wedge. (Best served with margaritas or your favorite Mexican beer!)

Brown Rice with Tomato, Feta, Spinach

IMG_7426

Sometimes you need to whip up a quick side dish. Fred was grilling chicken, so I tossed together this little side dish.

I started with a pack of Trader Joe’s Organic Brown Rice (freezer section)- zap it in the microwave 3 minutes. Then put into a bowl on top of a few handfuls of grape tomatoes sliced, and some chopped spinach. Let the heat from the rice wilt the spinach a bit as well as the tomatoes. Then add feta and pepper, drizzle some olive oil (can also add a little red wine vinegar) and give it a stir… This takes virtually no time, yet is quite heavenly!

Catch you back here tomorrow!

How To Make Cocktail Sauce (Pair With Boiled Shrimp)!

During the hot summer months we have boiled shrimp with homemade cocktail sauce, corn on the grill, cucumbers and Greek yogurt with dill quite often. It’s a quick mostly do ahead meal that is as pretty as it is delicious.

It’s so quick and easy to make your own cocktail sauce and you can tailor it to your tastebuds (i.e. I like a lot of horseradish).

HOMEMADE COCKTAIL SAUCE

Ingredients:

Ketchup, Lemon and Prepared Horseradish

In a small bowl add ketchup, (the amount of cocktail sauce you think you’ll need – for just the two of us I would guess about 1/3- 1/2 cup for 1 pound of shrimp – more if you use a lot of it. Squeeze in a wedge of lemon (again, more if you like it lemony, less if you do not), this will brighten the flavor, and finally add a teaspoon or two of prepared horseradish (to your taste). Give it a good stir and it’s ready!

I know, right? WHY did you ever buy it in a jar when it literally only takes 2 minutes to whip up and tastes far fresher! Enjoy!

BOILED SHRIMP

We boil the shrimp 3-4 minutes (don’t boil too long!), then into an ice bath, drain when cool and into the fridge until ready to eat!

Catch you back here tomorrow!

Recipe Favorites For Hot Weather!

Hot weather. Hmmm. Sometimes it’s just hard to turn the oven on or stand over the stove when it’s sweltering outside. Pair any of these with a refreshing cold drink, lately cucumber water has been a hit – lime water is also nice – great thirst quenchers!

Here are a few of our favorites – from the archives…

Submarine Salad

Cold and refreshing – the little bit of thyme gives it the “submarine” taste without the carbs. Tasty and fresh! Click HERE for recipe…

Summer Med Pasta Salad with Arugula and Feta

Pasta salads are a big hit in the summer months. They can be made ahead and are great for lunch or dinner. To cut back on the pasta I add half arugula or spinach to my bowl and then mix it together. This keeps the greens fresh and allows each person to choose how much they would like. Click HERE for recipe…

Roasted Shrimp and Tomato Orzo with Feta

I have GOT to update this photo, why did I use such a tiny bowl? Anyway, trust me, this is an excellent recipe full of flavor. The feta makes it come alive. I like the grape tomatoes and shrimp best when they’re roasted, but you can always just cut up the tomatoes and give the shrimp a quick boil and then into a bowl of ice water for a few minutes before draining and adding to salad. Good with a slice or two of crusty bread. Click HERE for recipe…

Pasta with Italian Sausage, Tomato, Basil and Spinach

Another cold pasta salad, much like a caprese salad (oh! don’t you just love!) but with the addition of pasta (seeing this photo, I’m going to use bowtie next time). I put half a bowl of spinach, top with this salad and oh boy, fabulous!! Click HERE for recipe…

Roasted Corn Salad

Those are a few of our favorites, along with anything grilled (chicken, corn and veggies mostly) – yesterday I made a fabulous roasted corn salad that we will have for a few meals. (Click HERE for recipe) – I cannot wait! Although you do use the oven for a short time with this recipe, it makes enough to have a few meals (for two), so it’s the ticket! I try to make it earlier when it’s not quite so hot outside.

Catch you back here tomorrow!


Quick & Easy Red Sauce for Pasta!

I had a handful of Campari tomatoes leftover and didn’t want them to go bad. A red sauce sounded good. Something simple and fresh. I didn’t have enough Campari tomatoes to make enough for two servings, so I added a large can of tomatoes. I also added minced onion, because I like it and a wee bit of minced garlic towards the end. The last few minutes I threw in some fresh basil. What resulted was heavenly. I always thought you had to simmer sauce for a long time for it to be wonderful. NOT TRUE. I simmered this 25-30 minutes, until the tomatoes broke up and looked “saucy”. Topped with some parmesan atop penne pasta it was AH-MAZING!

I will make this with all fresh tomatoes soon, while they’re so good. Sometimes I will toss the tomatoes in boiling water for a minute then into an ice bath so that they peel easily, but usually I leave the skin on.

Click HERE to print the recipe!

Quick & Simple Red Sauce

Ingredients:

Olive oil

Slice of onion, minced

1-2 cloves Garlic, minced

1 – 28 oz. can tomatoes (I use petite diced or whole, peeled – then break up)

(OPTIONAL): Handful of fresh tomatoes (or more) – I used Campari

Small pinch of sugar (⅛ teaspoon)

S & P

Fresh basil, chopped

Directions:

Heat olive oil in medium – large saucepan on medium high heat.

Saute minced onion, after a minute or so, add the garlic and stir for 30 seconds.

Add the can of tomatoes and fresh tomatoes (and their juice!).

Sprinkle in the pinch of sugar, S&P.

Simmer for approximately 25-30 minutes, or until tomatoes are broken up.

You can add the chopped basil right before the sauce is done cooking, or you can add it and remove it if you just want a little taste. Another option is to use dried basil, but if you can use fresh, that’s the best!

Cook your desired pasta and drain, top with the red sauce and top with a sprinkle (or two!) of parmesan.

Freezes well.

This makes enough for 2 servings + a little left over for a lunch the next day (or freeze for a lunch later on).

Enjoy!

Catch you back here tomorrow!

Caprese Chicken Recipe – too good!!

I remember the first time I had Caprese salad… it was at Carmine’s Italian restaurant in NYC. I couldn’t believe how fabulous. I wanted to eat there every single meal.

This chicken dish has the fabulous freshness from the tomatoes and basil and the added deliciousness of the mozzarella. I used fresh mozzarella, a favorite of mine. This is good served with pasta or rice, or a good salad. I’m thinking that’s what we had with it, a salad.

The recipe is from DELISH.com, click HERE to print the recipe (or save to Pinterest, etc.)

Caprese Chicken – Serves 4

Ingredients:

1 tablespoon olive oil

1 lb. boneless skinless chicken breasts

S & P (I used Himalayan Sea Salt)

1/4 cup balsamic vinegar

2 cloves garlic, minced

1 pint grape tomatoes, halved

4 slices of mozzarella (or shredded, whatever you’ve got)

Directions:

In large skillet over medium high heat, heat the oil.

Then season the chicken with S&P and cook until golden and cooked through, about 6 minutes per side – transfer to a plate.

Add balsamic vinegar to skillet to deglaze, then add garlic and stir until fragrant, 1 minute. Add tomatoes and season with salt. Let simmer until soft, 5-7 minutes.

Stir in fresh basil.

Return chicken to skillet and nestle in the tomatoes. Top with mozzarella and cover with a lid until the cheese melts.

Spoon tomatoes over chicken and serve.

Catch you back here tomorrow!

Banana-Oatmeal Bread – Good and good for you!

I always like to try a recipe as is the first time, then make alterations based on what we like/don’t like. This recipe was excellent as is. I lightened it up by using less oil and substituting applesauce for 1/2 the oil. (I’ve also substituted applesauce when I’m a wee bit short on bananas – I’ve made banana bread with extra banana in the past and it’s tricky getting the middle to cook, so keep that in mind… I also added walnuts – I think they add so much!

I didn’t use a mixer, so this was quick and easy to toss together and is quite excellent as a hearty breakfast with yogurt and fruit or a midday snack to get you through until dinner!

Click HERE to print this recipe – or click HERE to see original Cooking Light recipe.

This recipe is a favorite that you will likely make again and again – Recipe inspired from a recipe in Cooking Light magazine!

Catch you back here tomorrow!

No Bake Oatmeal, Peanut Butter & Chocolate Cookies

Are you looking for a quick and easy recipe no-bake cookie recipe? I didn’t think I was a fan of the no-bake chocolate, peanut butter, oatmeal cookies – but after I made them (I’m not sure if this recipe was different, but let me tell you…) OUT OF THIS WORLD! Bonus… you don’t even bake them!

Once you mix up the batter, you spoon onto a cookie sheet with parchment paper (or silicone baking sheet), let sit 30 minutes and they are done!

Continue reading “No Bake Oatmeal, Peanut Butter & Chocolate Cookies”

Beef & Green Bean Stir Fry!

This is one of my very favorite recipes from Chinese restaurants. It often ends up being quite unhealthy, mostly due to the fact that there is a lot of soy sauce and oil… Although I did splurge and use Jasmine rice instead of brown rice (Trader Joe’s freezer section – already cooked, microwave 3 minutes – it’s fabulous), the rest of this recipe is pretty healthy.

I took bits and pieces from different recipes, and in the end LEFT OUT THE SOY SAUCE (recipe includes it, with an *, to remind you that you can omit) and ended up with this. Quick, easy and beyond favorite recipe!

Click HERE to print the recipe…

BEEF & GREEN BEAN STIR FRY

2 SERVINGS

Sauce

1/3 cup beef broth

*1 Tablespoon organic soy sauce low sodium

1 teaspoon rice wine vinegar

pinch of red pepper flakes if you like

Stir Fry

Canola oil

fresh green beans (two big handfuls of fresh with ends snipped – I used between 1/4-1/3 pound) – dry them so they don’t spit when hit oil.

1/2# stir fry meat (I used sirloin steak, or flank steak)

3-4 scallions (green onions) OR regular onion, sliced thin

Ginger (to your taste, use microplane to grate it – I used about a 1” piece)

Garlic (as much as you like)

Cooked Rice, enough for two servings.

Sesame Seeds (optional) – can toast them or use plain

Directions

The beef and green bean portion cooks quickly, so start it once your rice is almost ready.

Mix ingredients for the broth, set aside.

Heat 1/2 tablespoon of oil in large skillet over high heat. Add green beans, saute for 4 minutes. Then set aside.

Heat 1/2 tablespoon oil in same skillet, add beef. Cook 1 minute WITHOUT MOVING over fairly high heat. Then cook another 3-4 minutes stirring.

Set aside with green beans.

Add a little more oil, add the scallions, ginger and garlic. Saute, stirring, for 30 seconds.

Add the beef and green bean mixture back to the hot skillet.

Add the broth, stir until thickened, about 1 minute, spoon on top of rice.

*I don’t use soy sauce because of an allergy – and I cannot tell a difference without it, woohoo!

Enjoy and I’ll catch you back here tomorrow!

Stew Beef & Mushrooms Over Egg Noodles!

I adapted this recipe from a Beef Stew recipe from Once Upon A Chef. The recipe was so tasty, but while eating it, I was thinking how good it would be minus the potatoes and carrots on top of egg noodles.

Let me tell you. This is an excellent recipe. It’s easy, makes the house smell amazing, and is so good. It’s one of those recipes that you will make over and over. Perfect for cooler weather! It would be pretty topped with fresh parsley. I just topped with salt and pepper. That little dollop of sour cream adds such a nice touch! I have also used Greek yogurt (plain) and it was equally as good!

Click HERE to print the recipe…

Stew Beef & Mushrooms Over Egg Noodles

Preheat oven to 325 degrees F.

1 pound stew beef (I used lean)

Salt & Pepper to taste

1 tablespoon olive oil

~Dry stew beef pieces, sprinkle with S&P. In large heavy pot, heat 1 tablespoon of olive oil over medium high heat until hot and you can see it shimmering. Add the stew beef pieces and brown, turning with tongs (be careful not to overcrowd the pan, or the beef won’t brown. It’s OK to get brown crusty bits on the bottom of the pot, they will enhance the flavor once you add the beef stock).  Browning usually takes 5-8 minutes (browning, not cooking through). Remove from pan and set aside.

1 small yellow onion, chopped

1 garlic clove (I use microplane), chopped small

1 Tablespoon Balsamic Vinegar

~Add ingredients to pan and cook for 5 minutes.

1 ½ teaspoons tomato paste

~Add tomato paste and cook 2 minutes.

1 ½ teaspoon all purpose flour

~Add browned stew beef back into pan, sprinkle with flour, cook 1-2 minutes or until flour dissolves.

3 cups(+) beef stock

1 cup water

~Add stock and water to pan, loosen the brown bits on the bottom of the pan. 

1 small bay leaf

Dried thyme (a sprinkle)

1 pinch of sugar

Mushrooms, washed and cut in chunks (I used an 8 oz pkg. of Cremini)

~Add to the pan, the cover and transfer to preheated oven for 2 hours.

Serve on top of Egg Noodles, cooked using directions on package. (I used ½ package) 

Topped with a little dollop of sour cream – Perfection!

Fresh parsley would be pretty sprinkled on top, if you have it.

My recipes are a guide… add more of what you like, and less of what you don’t – or substitute for something that appeals to you!

Catch you back here tomorrow!

Grandma’s Homemade Butterscotch Pie!

gma-butterscotch-pie

Growing up, this pie was a treasure that you could barely wait to come out of the oven, let alone cool. It is absolute perfection. This was another of my grandma’s recipes. I shared her Chocolate Pie recipe with you, and this Butterscotch Pie is just as amazing. To print the recipe, minus photos, click HERE!

Butterscotch Pie

I don’t make these pies often, but when I do, it takes me back to being a kid. My dad’s mom made the very best pies!

NOTE: A better photo is needed, I believe I snapped this on the second day right before it was getting ready to be eaten… 

File this one away for a special occasion, save it to Pinterest – I keep a “Recipes to Try” board, that’s helpful when I tire of the same old thing and need something new!

Catch you back here tomorrow!