Roasted Grape Tomatoes with Pasta, Shrimp and Feta

Shrimp and roasted tomatoes with pasta and feta

Oh, a vision of beauty, isn’t it? Toss it around, then top with some good feta. Owie! Life is good!

Have you ever roasted grape tomatoes? Like everything roasted, it brings out a wonderful sweetness.

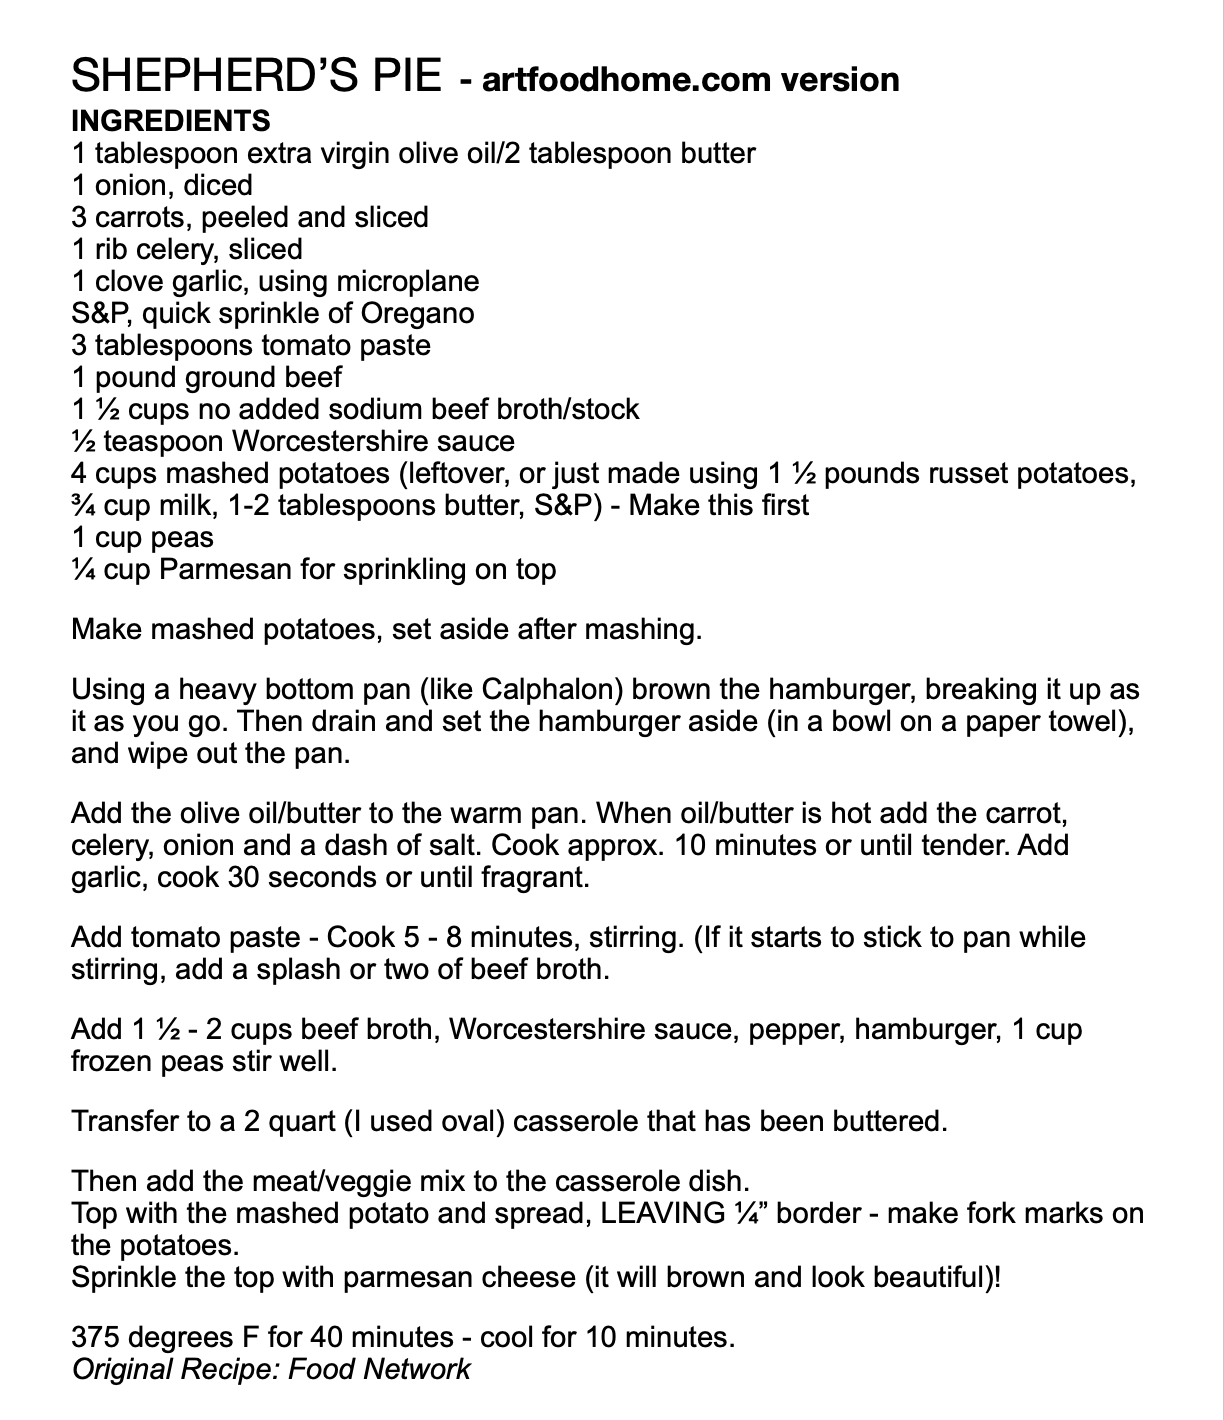
This recipe comes together quickly – which is really nice on busy nights! Click HERE to print the recipe only…

Roasted Grape Tomatoes with Pasta, Shrimp and Feta

Start water boiling for pasta.

Oven at 400 degrees F. I usually cover a cookie sheet with foil, and put a thin coat of  olive oil.  Then I cut the grape tomatoes in half (longways) and put them into a bowl with a little olive oil (just enough to coat them) – swirl them around with your hands to coat the tomatoes and then put on foil lined baking sheet. Pop into the oven for 5-10 minutes, until they look wrinkly and look like they’ve cooked down a bit.

Boil pasta so that it’s ready to add to the skillet once the shrimp is done – about 4 minutes.

Meanwhile, mince a clove or two of garlic (or use Microplane!) – in a nonstick skillet add a small amount of butter and olive oil (enough to cook the shrimp in, you don’t need a lot). Start out by sautéing the garlic for 30 seconds (once the butter/oil is hot) – stir it the entire time. Then add the shrimp. Keep tossing it around as well, so that it soaks up the garlic while it’s cooking. Cook until opaque (depending upon the size of your shrimp, cooking times vary, our fresh shrimp takes about 4 minutes give or take). Turn stove off.

Then toss the roasted tomatoes into the skillet with the shrimp, then add the hot pasta (I scoop it out and put directly into skillet, the water off of the pasta makes everything better.

Top with feta. Oh, la la! So quick and easy and oh so good!

The icing on the cake... Feta

ENJOY! Catch you back here tomorrow!

Easy and Elegant Dog Treats!

A Sampling...

Frozen Yogurt “Cookies” for Fido

Our dog has a history of Pancreatitis. Therefore he is on a strict diet of very, very low fat food and no “normal treats”. His treats are frozen green beans, carrots, crunchy lettuce, cucumbers, zucchini, pumpkin “cookies” (frozen pumpkin), an occasional piece of pasta or two or brown rice. About a tablespoon, he loves!

Yogurt "Cookies" for Fido

To make these very easy cookies, just cover a cookie sheet with wax paper. Then spoon little spoonfuls of 0% Plain Greek yogurt (I used Fage) onto the tray. You can “decorate” with anything they can eat, for Charlie, peas and carrots are his #1 choice. Some I have made very fancy, ha ha…

Pop them into the freezer (NOT the oven!) until frozen solid, several hours or overnight, usually. Then pull out the cookie sheet and working quickly, put them into a container that can go into the fridge, I separate the layers with wax paper.

It helps to have another “treat” to offer! It makes me feel better, ha ha…

Catch you back here tomorrow!

Flashback Valentine’s Day Recipe!

Valentines day cookies 021411

Flashback recipe… and a reminder that Valentine’s Day is NEXT WEEK! You can make a batch of these beautiful cookies and share with those you love!

It makes plenty, so you can pass them out as Valentine’s! WHO wouldn’t love that?? Decorate them however you like. I just had white, then tinted with a little red which made a pretty pink, then more red food coloring to get the deeper red color. Three colors and endless possibilities! You will have so much fun doing this! You can bake the cookies the night before and decorate the day of. There is no tastier cookie, it’s not just a pretty face!

Click for a link to the original post: Valentine’s Day Butter Cookies!

Catch you back here tomorrow!

…Images are my own unless stated otherwise, please contact me if interested…

My Grandma’s Chocolate Pie Recipe!

My Grandma's Chocolate Pie Recipe

I was so fortunate growing up. I had one grandma that made wonderful cakes and another that made pies that were so outstanding. I’m not a big cake fan. Pie on the other hand, whew… Delightful! I haven’t made my grandma’s pie in years (making = eating). But we gave in for New Year’s (or around that time).

This pie is still made by my parents, sister, aunts, cousins, etc. Funny how a recipe from long ago can become such a tradition. A very welcome tradition!

Simply bake the crust, cook the filling, poor it into the baked shell, make meringue, top the filling with the meringue and pop it in the oven for a bit until the peaks are golden. What you are left with is absolute perfection!

Oh! This is a deep, dark chocolate that is so satisfying, especially with a cup of coffee.

My Grandma's Chocolate Pie Recipe

Look at that dark chocolate!!! It makes my heart sing!! 🎶

Click HERE to print the recipe below! This will quickly become a favorite!

Screen Shot 2021-11-29 at 1.47.05 PM

Catch you back here tomorrow!

Tips for Making a Fabulous Tuna Melt!

fullsizeoutput_1f75

Sometimes it’s nice to have a quick and uncomplicated meal – this is great for lunch or for dinner! A tuna melt has flavors that meld together and create the ultimate eating experience!

Of course anyone can make a tuna melt, but sometimes you’ll read one tip that will change your life (OK, that may be a bit dramatic). I rarely make it the same way twice, add what you like!

Tuna Melt Tips

“Use good bread” as Ina Garten would say. The better your ingredients, the better your result. I don’t think a tuna melt comes out quite right with grocery store bread. It’s too soft. Find a good rustic bread (Semolina, Sourdough, Farm bread, etc.). Toast it lightly.

Make your tuna salad. I use a can of tuna, drained (for two of us), diced celery or red onion, or both, and a plop of Hellman’s Canola Mayo. I add a few shakes of dill, and pepper.

Here’s where you can get creative.

We have had an amazing tuna melt at Dean & Deluca, and they spread the bread with Dijon mustard before they add the tuna. Sometimes I use it and sometimes I don’t.

Cheese – oh yeah, can’t have a MELT if there is nothing to melt! I’ve used sharp cheddar and pepper jack. Love them both, depends on my mood.

Sliced tomato, if they’re in season, GO FOR IT! I put the tomato on top of the tuna and then top with cheese.

Turn your broiler on (I have a high/low setting, I use HIGH). Place the tuna melt on a cookie sheet to put under the broiler, be careful if you use the top rack, it can be too close, I have used it, but prefer the second rack from the top.

👁KEEP AN EYE ON IT. It can go from almost done to burnt to a crisp in no time, it’s easy to get distracted… Don’t do it!

Owie! ENJOY, and I’ll catch you back here tomorrow!

Shepherd’s Pie – Great recipe for a cold day!

fullsizeoutput_3e79Shepherd’s Pie = Comfort food with a capital “C”! 

I have always seen recipes for Shepherd’s Pie, but have never made one. Meat and potatoes, hmmmm… cold weather prompted me to try this. I used a recipe from Food Network that sounded delicious, I made a few changes, I didn’t have mushrooms, so I omitted. I didn’t use as much oil/butter as it called for, and it wasn’t missed. Finally, I upped the amount of beef broth and changed the order of how I prepared this, based on comments that I had read. One detail I left out, is that when you spread the mashed potatoes, you can make fork marks that give ridges that will end up browning nicely. In the images above, I added parmesan to one half in case Fred didn’t like… Next time, Parmesan on both sides, without a doubt. It also made it brown, and I would probably leave it until it browned a wee bit more, although it was absolutely done and so delicious!

UPDATE: THERE IS NOW AN IMAGE, ha ha… I remembered to take a photo this time. Chilly weather is THE PERFECT TIME to make this dish. It warms your very soul!

We were so anxious to try this that I forgot to take a photo of it plated 😳 – wasn’t the first time that happened and I’m sure it won’t be the last. Might have to try to make this again soon to update the images! Corrected :)

Click HERE to print the recipe as I made it (as shown below), or click HERE for the original recipe (Food Network) to print! Enjoy!

Are you wondering what to do with the leftover tomato paste? I have a solution! Read HERE!

Enjoy, and I’ll catch you back here tomorrow!

A SUBMARINE SALAD – fabulous, fresh and quick salad!

Submarine Salad

How many of you love eating a submarine sandwich? Well, this salad TASTES like a submarine without the bread – it’s amazing!! We have this for dinner quite often with a small baguette (so much for no bread, but it’s much less bread!) and some olive oil for dipping… What makes this salad taste like a submarine? A few things, the lettuce being chopped, the salami and provolone and THE OREGANO. Don’t leave it out! I put very little compared to the original recipe and it was plenty, if you want just put a few shakes, but to get that oregano flavor in with everything else it’s just fabulous!

I first saw this in an email from Smitten Kitchen – Love her recipes and her blog – highly recommend!

The original recipe (PRINT HERE) makes 6 meal-size salads or 12 side portions. Make it however you like! The first photo shows only iceberg lettuce, the second photo shows both iceberg and radicchio, but no chickpeas. Good any way – the texture is fabulous, the crunch, with bits of salami and provolone. Owie, I needed this after an indulgent New Year…

Sub Salad


I make it for just the two of us and there are no leftovers, BUT, my quantities are much smaller and there are a few things that I change, because it’s our preference.  Click HERE to print my version (as seen below) – this is a recipe we will be making summer and winter!

Another note… I had a hard time finding a good looking head of Iceberg the other day, and ended up buying shredded lettuce (like for tacos, etc.) it was AWESOME! I always buy organic, but this time bought regular, and having it already shredded was nice!

submarine-salad

📸 IMAGES ARE MY OWN UNLESS STATED OTHERWISE, PLEASE CONTACT ME IF INTERESTED…

Catch you back here tomorrow!

Beef Stew with Turnip Root, Potato and Carrots!

Beef Stew

Beef Stew… fabulous when the weather turns cooler! This recipe uses one pan, a Dutch oven preferably, and cooks it low and slow. This beef stew was delicious! I made it a day ahead and served the next day so the flavors had time to meld and OH! Was it ever worth the wait! Trust me on that… The meat was so tender you could easily cut it with a fork.

This original recipe is from Once Upon A Chef. The original recipe uses 3 pounds of beef chuck, in the recipe below I changed things a bit, and made it for 2 servings with leftovers… Click HERE to print the original recipe as it or click HERE to print as shown below!  Either way, you cannot go wrong. Tweak it to make it how you like it best!

beef-stew-with-carrots-turnips-and-potatoes

Catch you back here tomorrow!

Cream Cheese & Pepper Jelly – is there anything easier, prettier and more tasty?

Cream Cheese and Pepper Jelly

Cream cheese topped with pepper jelly. That’s it. As much or as little as you like. LOOK at how beautiful! Perfect for the Christmas holiday’s since it comes red or green. I adore the red. This was a little snack. If you have a few more people use an entire block of cream cheese (I use Neufchâtel – low fat cream cheese) – I serve with Hint of Salt Wheat Thins.

Recently I had the opportunity to taste HOMEMADE RED PEPPER JELLY (thank you JW!!) – it was the best I HAVE EVER TASTED! It’s even prettier than what is pictured above, it has little flakes of peppers, it’s as beautiful as it is delicious! A treat of the very best kind. Home grown red peppers and homemade pepper jelly. WOW! ❤️ There is no better gift!

Catch you back here tomorrow!

Roasted Brussels Sprouts!

Roasted Brussels Sprouts are quick to make and even those of you out there who don’t care for brussels sprouts on a typical day may find yourself loving them! Especially the outer crispy leaves – what a treat!!

Here’s how:

Preheat your oven to 350 degrees F.

Wash and dry the brussels sprouts then toss in olive oil, salt and pepper. I take my hand with the leftover olive oil in the bowl and spread it on a cookie sheet. Then add the brussels sprouts, sprinkle with a little salt and pepper.

Roast them in your oven, I usually use confection, but it’s not necessary, if they get too brown too quickly just lower the heat.

They take about 30 minutes, but you can taste test or pierce with a fork to see if tender.

I them sprinkle them with Parmesan, because I love it and it goes so well with brussels sprouts.

Tada! You’re done!

You will be fighting over those crispy outer leaves that fall off – oh my!

There are different variations, some use lemon juice, some use a little red pepper flakes – you can’t go wrong, add what you like!

Catch you back here tomorrow!


Hamburger Steaks with Mushroom Gravy – Cooking Light!

Hamburger Steaks with Mushroom Gravy - Cooking Light

I ran across this recipe for “Burger Steaks with Mushroom Gravy, Sweet Potatoes and Haricots Verts” in Cooking Light magazine. It looked like pure comfort food. It was a quick and easy dish to prepare. I had a few Yukon Gold potatoes, so I opted for mashed potatoes, and we had a bag of Trader Joe’s Haricots Verts in the freezer (our dogs favorite snack of all time, he loves them frozen).

Decadent and delightful! Give it a whirl, this recipe serves 4. You used to be able to click to go to the myrecipes.com website where you could view/print this Cooking Light recipe! Unfortunately they broke the link, so I’m on a quest to see if I can find a paper version and I will update this post.

If you are one of the few who hasn’t perused Cooking Light magazine, check it out! I’ve subscribed for around 20 years now – I look forward to that magazine each and every month! Update: they only do special feature magazines now, no longer the wonderful magazine that I looked so forward to, ugh.

Catch you back here tomorrow!

Cheddar and Spinach Quiche made with puff pastry!

Quiche with Puff Pastry

A quiche with dramatic presentation! Puff pastry gives quiche a little life! Almost like a piece of art.

Why puff pastry instead of a pie crust? Well, we were expecting a hurricane last month, and when you know it could possibly be on its way, well, that’s a really good time to start eating out of your freezer. Use up what you have stored. I had one sheet of puff pastry, and I had two dozen eggs in the fridge, so, what to do? That sounded like a quiche to me, but how? Well after a little research I found recipes with the ingredients that I had on hand, or at least roughly, so I made it. It turned out both beautiful and delicious, this would be a perfect brunch dish, I served it with a pretty salad (had to use up the remaining lettuce, cucumbers, tomatoes, etc.).

This was so easy, it can hardly be called a recipe! – Click HERE to print this recipe from Bon Appetit!

My notes to the original recipe below… I was trying to use up what I had, so I made a few changes. I only had 1 tablespoon of cream cheese, so I used it, I used part milk and part half and half, I used a bag of fresh spinach that I sautéed until it wilted, and I used more than 1/2 cup of cheddar cheese. – everything else was done as shown below and it was divine! I think next time I make it I will still use fresh spinach, or maybe crispy bacon and gruyere cheese??

Spinach Puff Pastry Quiche

Yield: Serves 6

Ingredients

 1 sheet frozen puff pastry, thawed (1/2 (of a) 17 1/4-ounce package)

1 3-ounce package cream cheese, room temperature

1/3 cup half and half

3 eggs

1 10-ounce package frozen chopped spinach, thawed drained

1/2 cup grated cheddar

1/4 cup grated Parmesan

2 green onions, sliced

1/4 teaspoon salt

1/4 teaspoon pepper

Preparation

Preheat oven to 425°F. Roll puff pastry to 11-inch square. Transfer to 9-inch diameter glass pie plate. Trim edges. Beat cream cheese in medium bowl until smooth. Gradually beat in half and half and eggs. Mix in remaining ingredients. Pour mixture into prepared crust. Bake until crust is golden brown and filling is set, about 25 minutes. Cool 10 minutes before serving.

And THIS is the beauty that you will pull out of the oven, almost hard to cut into, it’s just so pretty! PS, Fred said it heated up great the next day!

Quiche with Puff Pastry

Catch you back here tomorrow!

[Recipe]: Grilled Chicken & Pesto Pasta with Tomatoes and Toasted Walnuts

The beginning of something wonderful!

The beginning of something wonderful…

Oh! Looks like art doesn’t it? I love beautiful food! To start this recipe I use a large pasta bowl (serving dish) and put a few tablespoons of pesto in the bottom, add some grape tomatoes cut in half… let it sit while you’re getting things ready, you don’t want cold pesto…

Oh! Yes!

What dreams are made of…

This is such a quick recipe to throw together. Fred usually grills the chicken while I get the rest of it ready and whip up a small salad. This dinner will be as good as your pesto, so if you have pesto that isn’t very tasty, it’s not going to be the best that it can be. There are many prepared pesto’s on the market, I used Bear Pond Farm Premium Basil Pesto – bought at Whole Foods. It was nice! Really nice!

This recipe doesn’t involve a lot, boiling your pasta, toasting some walnuts, grilling the chicken, and mixing basil pesto into the pasta. Top with a little parmesan and you are set!

Click HERE to print the recipe as shown below:

Grilled Chicken Pesto Pasta with Tomatoes and Walnuts

Catch you back here tomorrow!

Baked Ziti Recipe – OH MY!

Baked Ziti

This is an all time favorite and a definite crowd pleaser! This makes a good 8 servings, it also freezes well! This is one of those recipes to keep around because you can throw it together pretty quickly and have a meal fit for a king! In parenthesis I noted the brands that I used, pretty much Whole Foods everything, but… it makes a difference, especially when it comes to sauce. If you use a sauce that you don’t know that you love then it can turn out completely different… make sure you like the sauce! I believe I used one jar of tomato basil and one jar of marinara.

To print the recipe below, click HERE:

Baked Ziti Recipe

ENJOY!

Dinner is Ready!


Catch you back here tomorrow!

Quick Lunch Idea: Pita with Hummus, Cheese, Cuc, Tomato – an addiction!

Pita with Hummus, Cheese & Tomatoes

This quick and healthy meal has become an addiction. It’s so fresh and tasty and hold you for quite a while.

Super easy, this is what I did, tailor it to fit what you like…

INGREDIENTS

Pita

Cheese, sliced (Havarti is what I used)

Cucumbers, sliced (I slice long pieces without seeds)

Grape tomatoes, slice length wise

Hummus (I use regular)

Dry Dill (fresh would be good too) and Pepper

DIRECTIONS (well, kind of)

Pita, sliced in half (as shown above) or about 3/4 of the way, then use the small piece smear hummus and place a pretty grape tomato half on.

I put the pita on a plate, cover with a paper towel that I have gotten wet and wrung out completely, then I cover the pita with the moist paper towel, in the microwave for 15 seconds, then take off the paper towel.

Insert cheese (I use Havarti), then spread hummus (I put it fairly thick), then sliced cucumbers (I slice long ways with no seeds, but to each his own…), add some grape tomatoes cut in half (length-wise), sprinkle with dill and pepper. Serve with a handful of blue chips.

Ok, ya ready? Take a bite! I KNOW! I KNOW! It’s a mixture of the fabulous crunch from the cucumber, the oh so wonderful creaminess of the cheese and the hummus, the freshness of the dill, and the juice of the grape tomato! Get outta here!

Catch you back here tomorrow!