Recipe! Superfast Crispy Chicken Thighs – a Cooking Light Recipe!

Superfast Crispy Chicken Thighs | Cooking Light

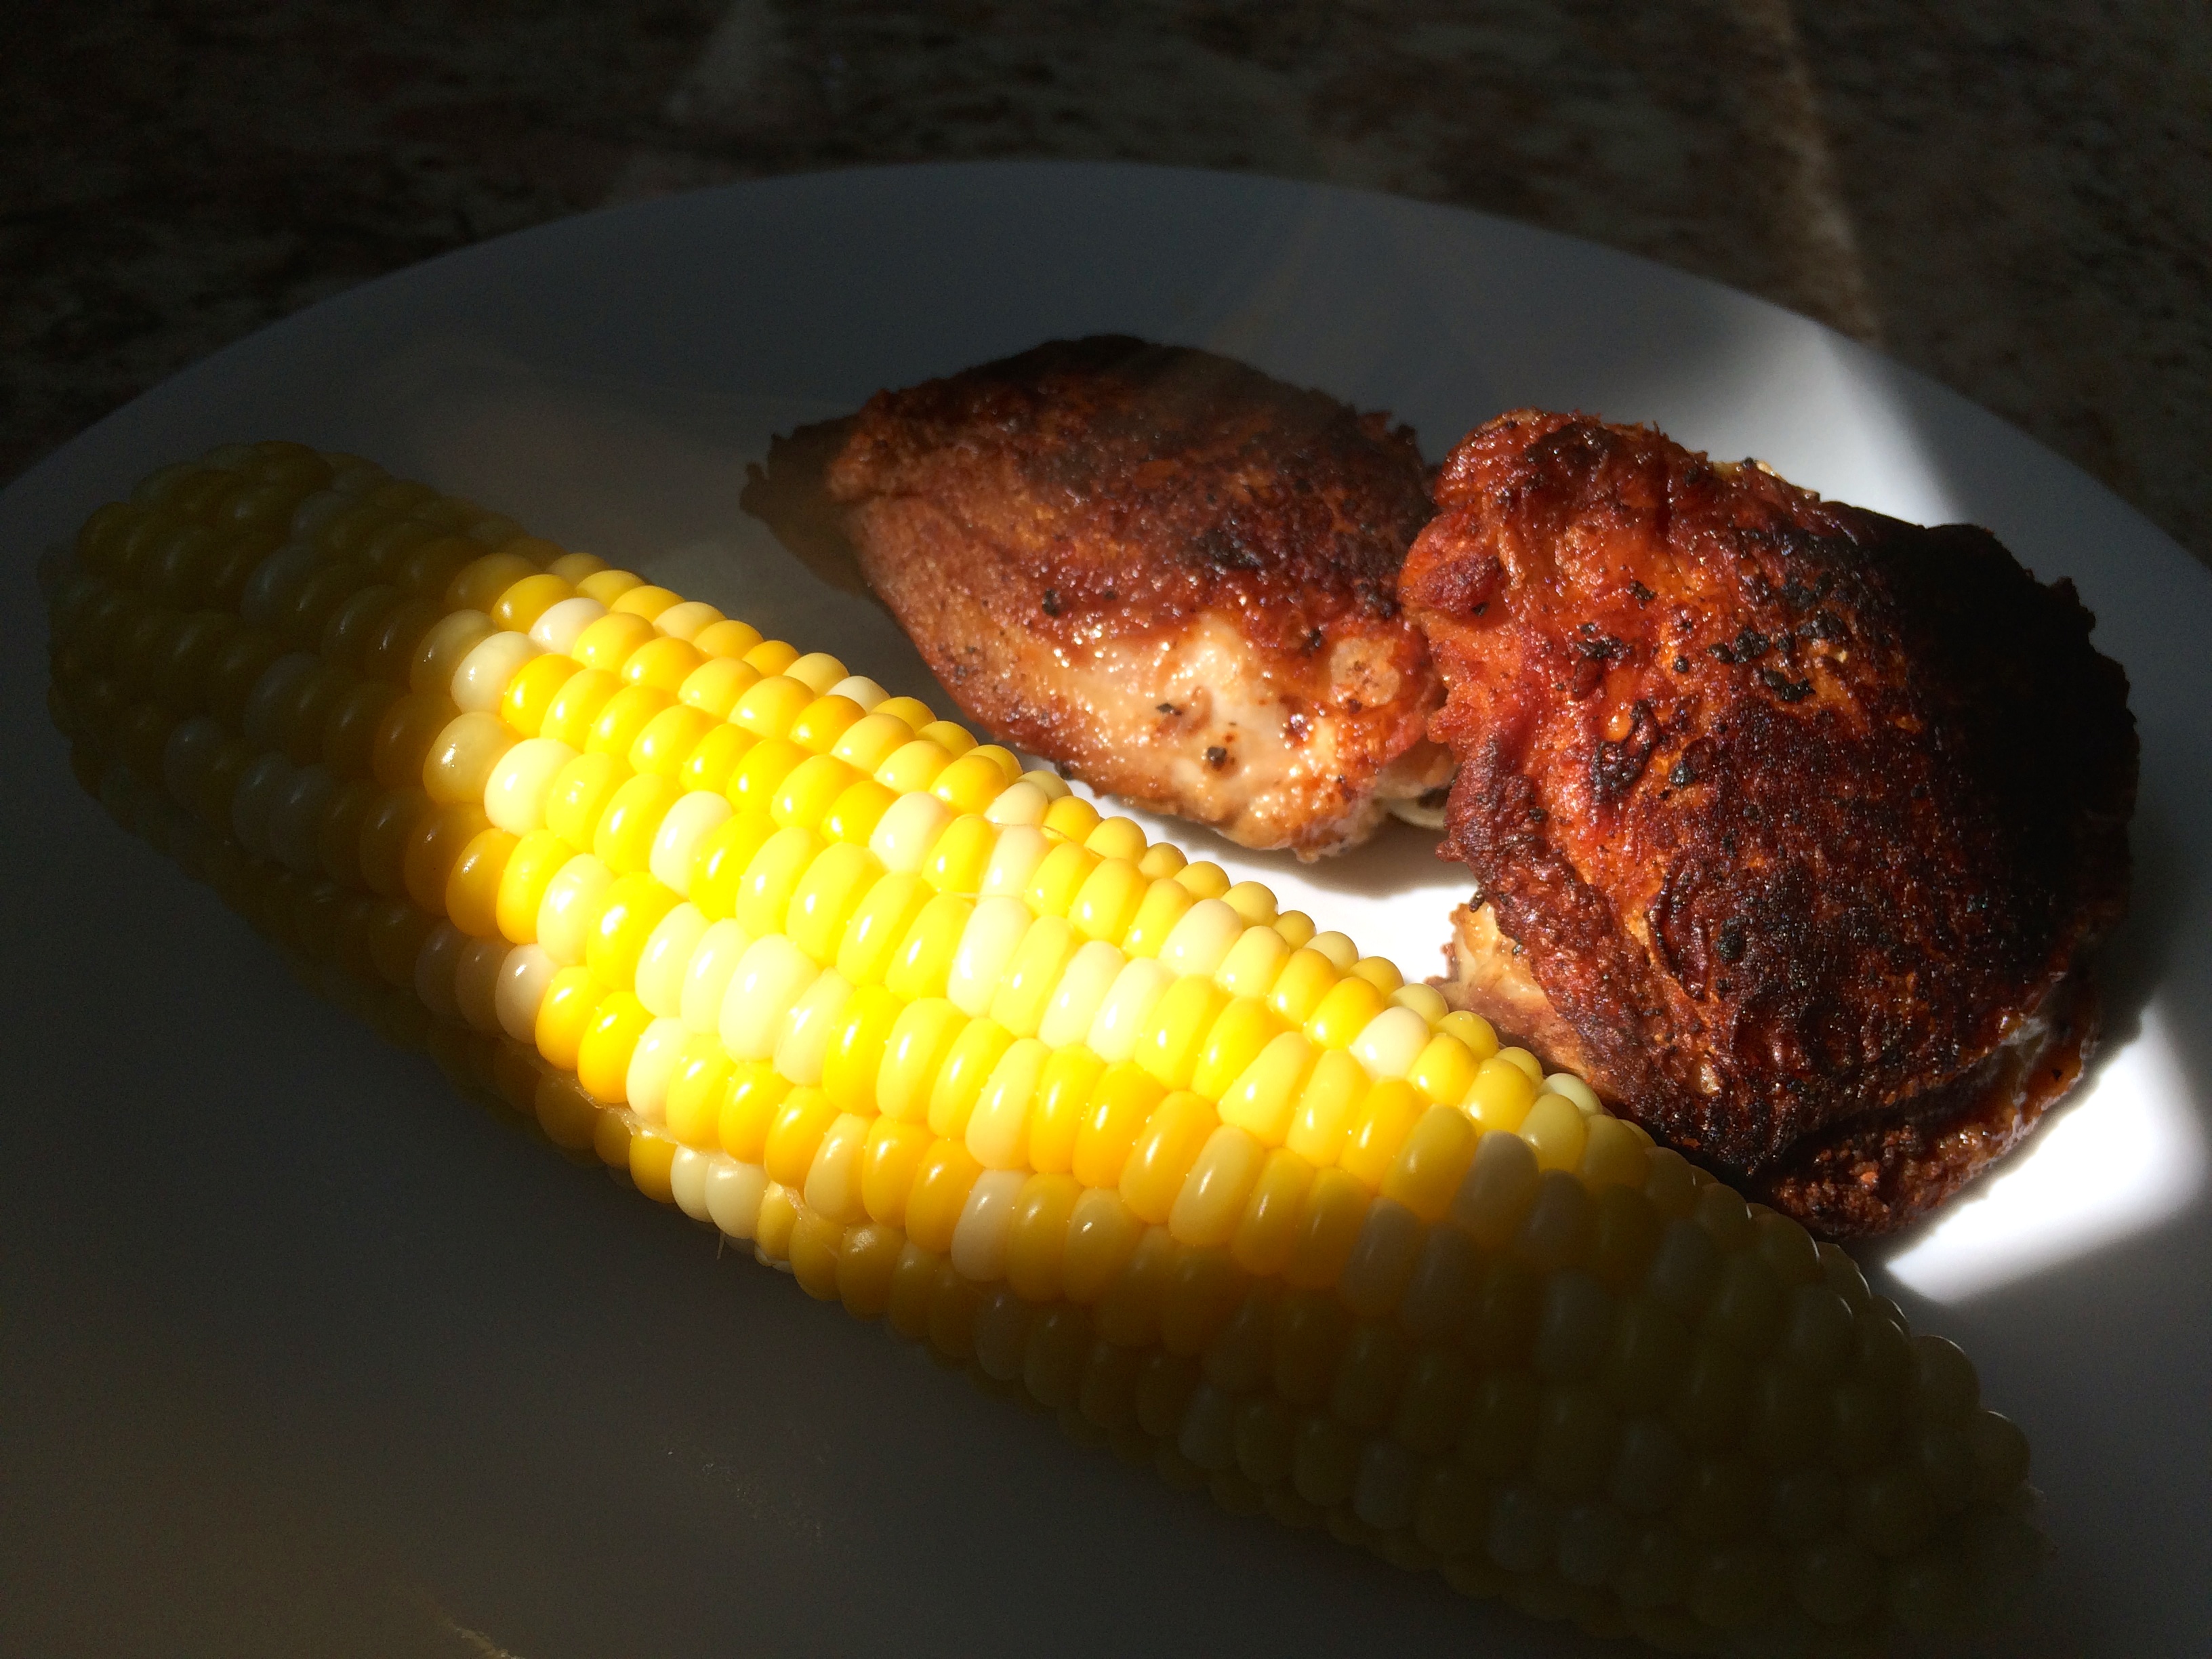
Superfast Crispy Chicken Thighs. I am now a chicken thigh convert! I never thought I liked dark meat, until… try this, I bet you will change your ways! Just look at these chicken thighs… crispy, but moist and tender. One little bone, and that’s it! Great with fresh corn on the cob!

Just LOOK at that crispy skin! All with 1 tablespoon of oil! The trick is cooking skin side down in a cast iron skillet for a certain time and then moving that pan into the oven to finish. Incredible.

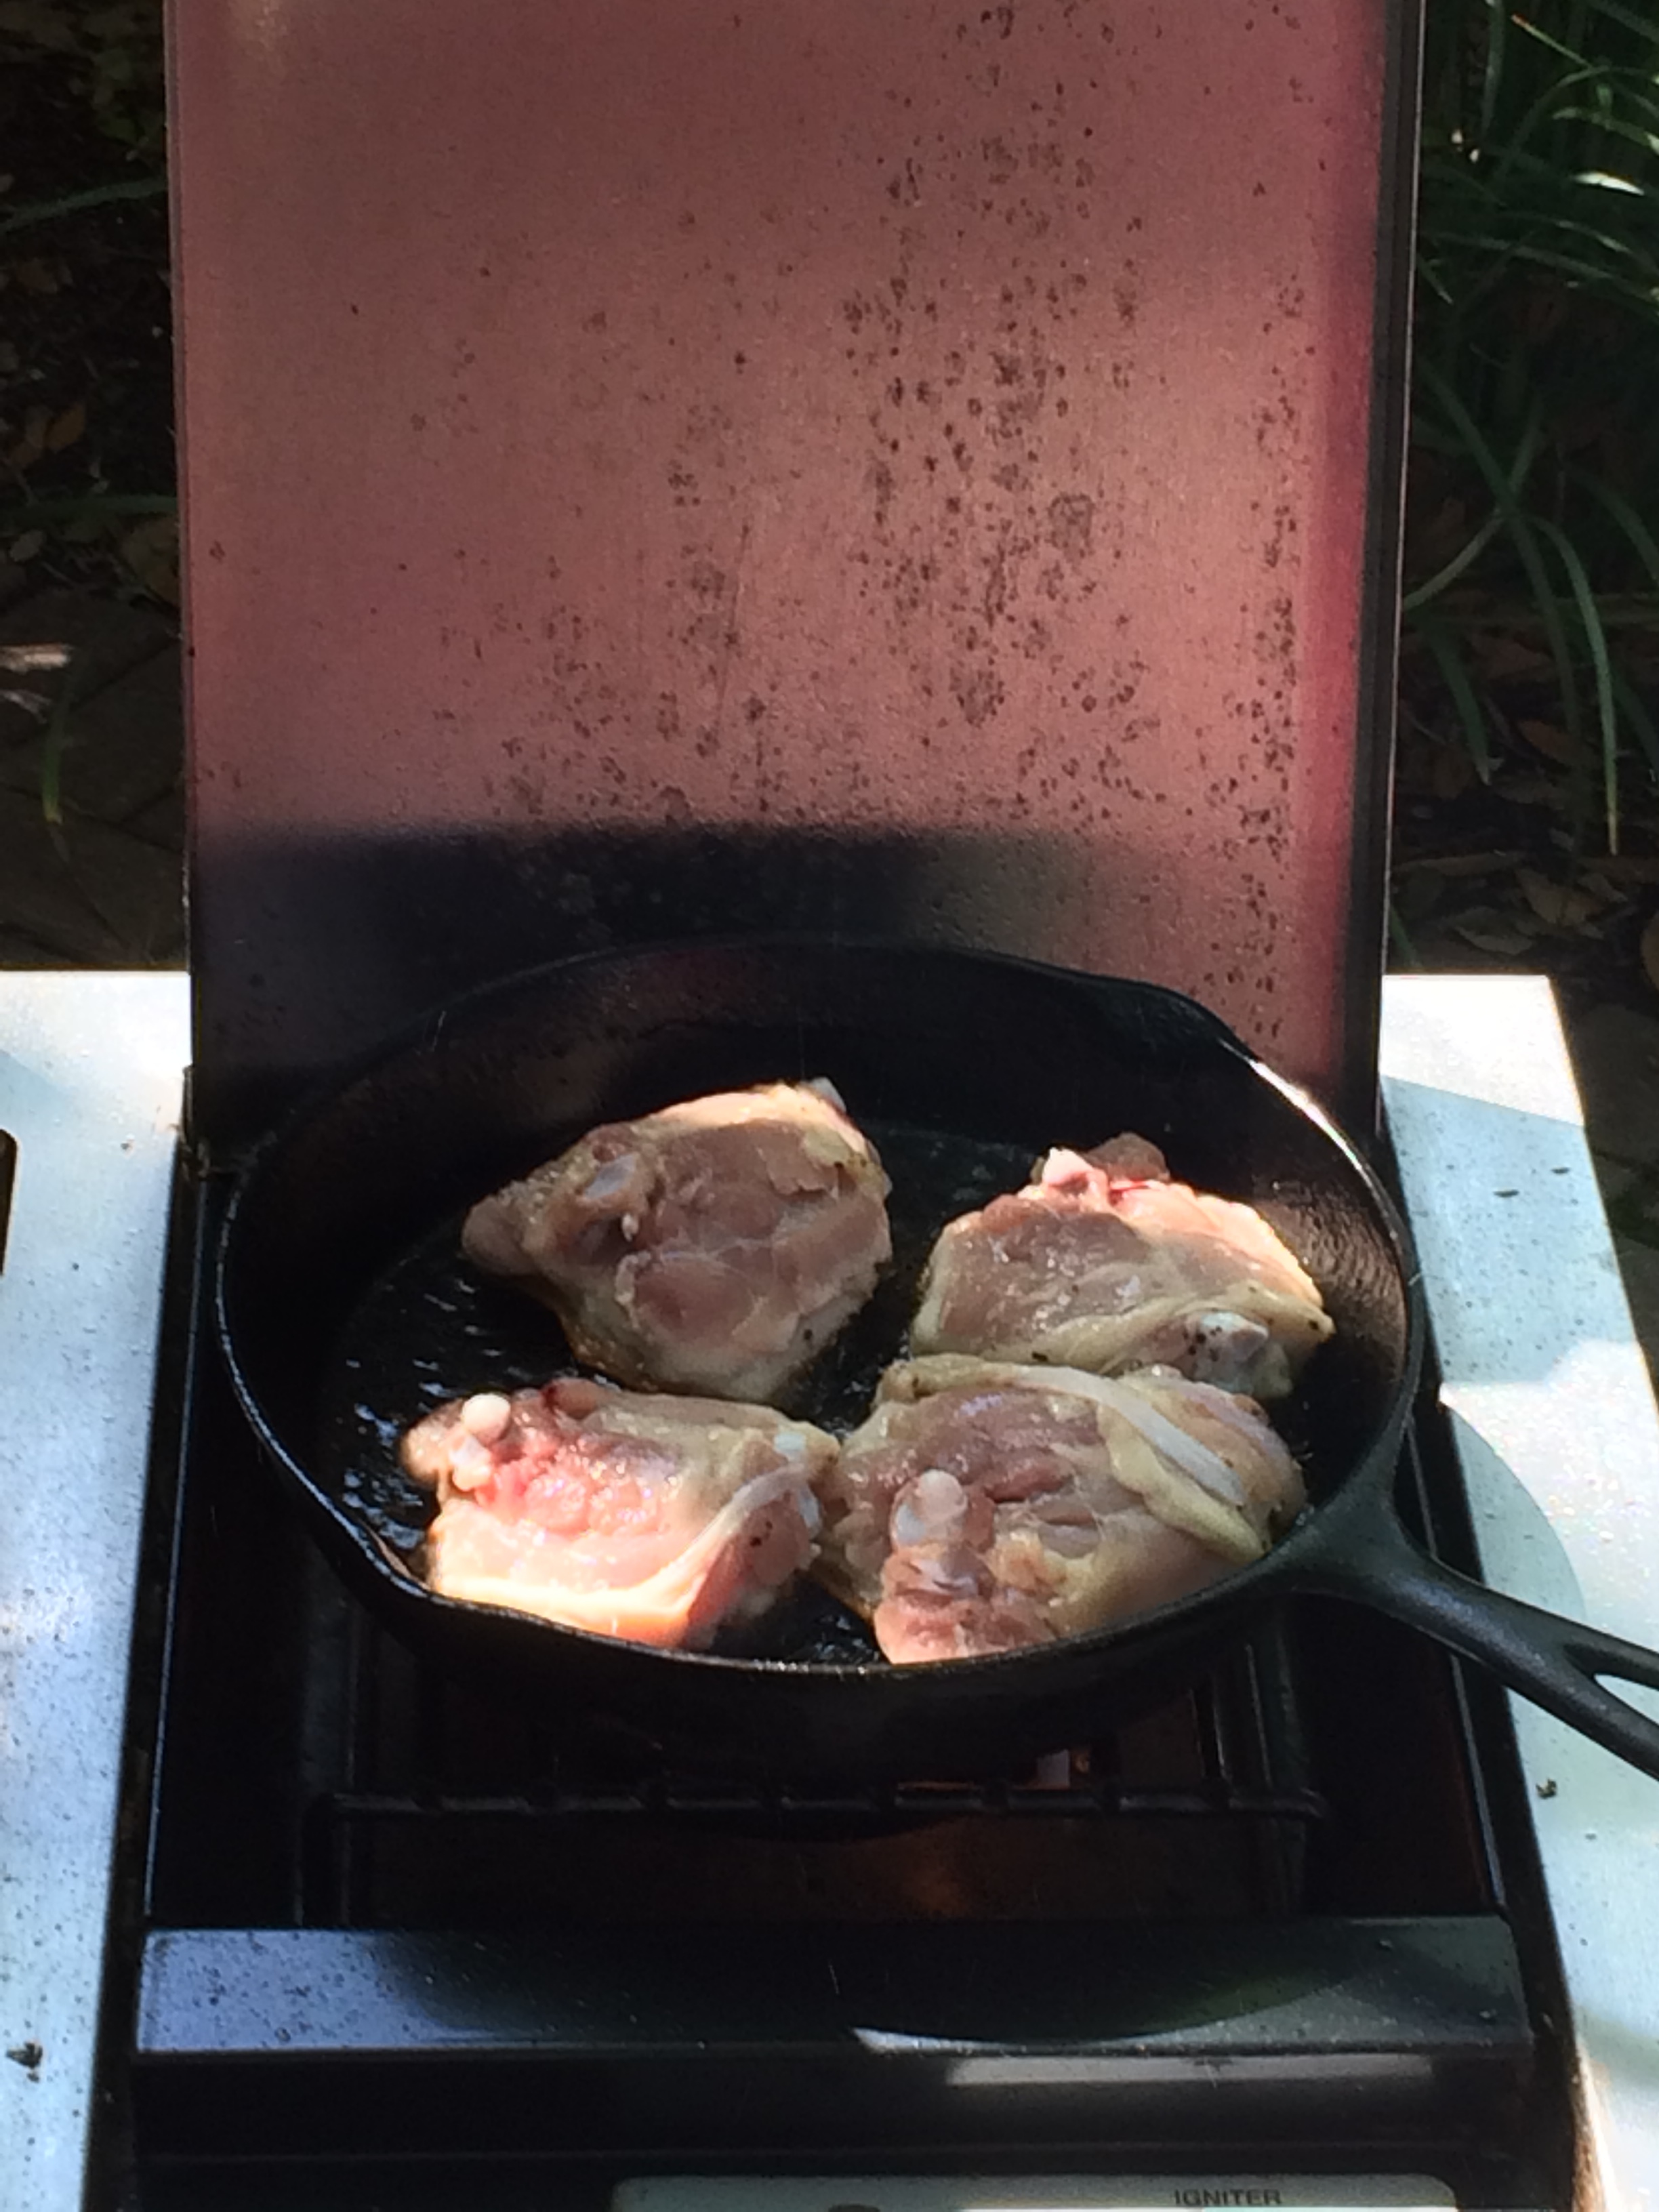
My only concern (what could we have done wrong?) is that despite the exceptional (and I do mean OUT OF THIS WORLD, BEST FRIED CHICKEN YOU EVER PUT IN YOUR MOUTH) taste of this chicken, the oven was a disaster. I don’t mean a little disaster, I mean while the pan was in the oven, black smoke started coming out of the oven. All windows open, fans going at high speed, oven cleaned, and it took a few days to get over it. The oven has almost fully recovered, so it may be time to try again. One thing we forgot to do is trim the extra fat from the skin. I would say this is key. We also had 4 thighs (not 6) and a 9″ (not 10″) pan, yet I used 1 tablespoon of oil. Next time I will try half that and see what happens. I really want to make this again!

Suggestions?

  • Print Recipe (takes you directly to this recipe on the MyRecipes.com website for Cooking Light recipes)…

SUPERFAST CRISPY CHICKEN THIGHS

Start by preheating your oven to 500°. While the oven is heating up, place the chicken thighs skin side UP on a cutting board (ideally, one you can put in the dishwasher), trim extra fat. Cover chicken with plastic wrap, and pound it to about 3/4″ thickness. This will help it cook quickly. You can use either a meat mallet or a heavy pan, I used the cast iron skillet, but was very careful to not hit the countertop. Pat the thighs dry with a paper towel and salt and pepper.

Heat a 12″ cast iron skillet over medium heat, and add the 1 tablespoon of canola oil. Swirl to coat the pan, then add the chicken SKIN SIDE DOWN. Cook 8 minutes without disturbing it (or until you see edges get a nice golden brown). We cooked it outside on the burner of the grill. We didn’t trim the excess fat (oops!) and it spit like you wouldn’t believe. If you cook it part way outside and then bring it in to put in the oven, be VERY careful. I put a piece of foil over the top, because it was really splattering. Then transfer the pan just like it is to the hot oven. Bake at 500° for 7 minutes, then turn the chicken over, and bake an additional 4 minutes (or until the chicken is done).

What you will end up with is THE crispiest fried chicken ever!

My oven was a mess, but hey, it needed to be cleaned anyway!

I highly recommend this recipe!

I think one of the tricks is not touching it while it’s cooking on top of the stove, or this case, the burner on the grill… Which I highly suggest!

IMG_3282

Recipe via MyRecipes.com (Cooking Light, and other magazine’s recipes are on this site).

Catch you back here tomorrow!

Featured Artist: Paul Wright!

The Oval Mirror by Paul Wright

Paul Wright is an amazing artist from England. I featured Paul a while back, but I haven’t featured his interiors and WOW, are they amazing or what?I think they exude such style, color and even movement. Stunning!

Yellow Door by Paul Wright

Now THAT’S a yellow door! Just look at that fabulous chair, the color of the room, the walls, again… that wonderful movement, the bits of splattered paint – WOW. I am a huge fan of Paul’s work!

Read a bit about Paul from his website:

Artist Statement

I have spent the last 15 years developing a painterly language through which I seek to capture a vitality beyond the establishment of a mere ‘likeness’ to the subject. Whilst I appreciate the importance of the subject being recognisable, they are glimpsed rather than exposed, their inner selves hinted at but ultimately inscrutable.

Though I often work on a large, potentially imposing scale, the work remains immediate through fluency of brush mark and a rich palette. The spaces the subjects inhabit are often indeterminate, providing an atmosphere that allows for ambiguity of psychological state. The subjects retain their integrity and yet a sense of intimacy is evoked.

All images via paul-wright.com, used with permission…

Catch you back here tomorrow!

Charleston Spring Photo… looks like fall!

ArtFoodHome.com | barbara stroud

I think in the area where we live, with the beautiful grand oak trees that shed in the spring, our spring looks more like fall… I guess that would make it SPRALL! These trees are tremendous with the Resurrection Fern growing and thriving, the Spanish moss that hangs from the trees and looks magnificent and the number of large, old, azaleas that dot the landscape from house to house.

Enjoy your Spring or Sprall!!

Catch you back here tomorrow!

ART WALK TONIGHT – CHARLESTON, SC!

TheGalleryOnBroad.com

FRENCH QUARTER ART WALK – TONIGHT   5/1/2015  5 – 8 PM  

The Gallery on Broad

29 Broad Street – Charleston, SC 29401

Don’t you love an art walk. No matter what city, an art walk is always such a good time. So many people out and about, perusing the galleries and the wonderful work.

ART = HAPPINESS!

A quick preview of some of the work that is on display…

ArtFoodHome.com | barbara stroud

ArtFoodHome.com | barbara stroudHope to see you there!

House Plan: TNH-LC-40A by Moser Design Group!

TNH-LC-40A by Moser Design Group

Isn’t this a classy house plan? This is the TNH-LC-40A by Moser Design Group. This plan is 2,485 square feet with 4 bedroom and 4 bathrooms. Don’t you just envy that wonderful porch? Wow!/

TNH-LC-40A by Moser Design Group

As I mentioned… what a wonderful front porch! Also a sweet side porch off of the kitchen and master suite, and a sunroom on the other side of the house. People often think that with an open plan you can sacrifice some of your privacy, since there aren’t as many walls to create intimate spaces. But this plan certainly has the best of both world. With the Master Suite on one side and the Guest Bedroom on the other side of the house. Also, a nice screened porch that is tucked away, or a sunroom on the other side of the house. An open Kitchen/Living/Dining space makes it nice when you want to get together as a group.

TNH-LC-40A by Moser Design Group

A nice upstairs with two additional bedrooms, two bathrooms and ample closet space! What a plan!

All images via MoserDesignGroup.com, used with permission…

Catch you back here tomorrow!

Workshop Event: Robert Abele

Robert Abele Workshop | ArtFoodHome.com

Plein air workshop with Robert Abele! Are you going to be in the Massachusetts area mid June? If so, you may be in luck! This is going to be a fantastic workshop, 3 days of plein air painting the South Coast of Massachusetts!

Robert is an amazing artist, who has a style all his own. His paintings are dynamite!

Read a little blip about Robert, from his website:

Robert Abele was born in Bronxville, NY in 1969. He has spent his life making images of the New England landscape. The south coast of MA. , North Fork of Long Island and Provincetown are a few of the places close to Robert’s heart. His paintings are done from life, plein air, in the tradition of Corot and Monet. Responding to the changing effects of light and atmosphere, using an economy of brushstroke capturing quick nuances and shifts in line and color. Robert studied art in New York at the School of Visual Arts & The Art Students League , graduating in 1993 with a B.F.A. in fine art. John Ruggeri, Juan Gonzalez and James McMullan were only a few of the professors that affected Robert’s early development as an artist at SVA. Robert’s work has appeared in the New York Times and The Washington Post. Many of Robert’s works have won national awards, often regarded as a painter’s painter.
Robert is inspired to paint what he calls a vanishing history of America’s past. This on going life’s passion to preserve the gentle New England coast is his muse as his dialog with this subject matter will continue to challenge him visually.

Here’s the REGISTRATION FORM…  More info, from Robert…


Screen Shot 2015-04-20 at 6.51.15 AMImages via RobertAbele.com, used with permission…

Catch you back here tomorrow!

Recipe: How to make a great wrap!

ArtFoodHome.com | barbara stroud

I am hooked on wraps right now. I’ve made so many different version, each as wonderful as the next. None of my wraps have included meat, but you certainly could!

Start by buying good tortilla’s. Read the ingredients. Many of the grocery store brands have horrible ingredients, (if you’re trying to be healthy) like one of the top three (listed by quantity) ingredients being Interesterified Soybean Oil, Hydrogenated Soybean Oil and/or Palm Oil. What? Yep, if you can’t say it DON’T EAT IT!

I found some wraps at EarthFare the healthy grocery store near us Maria & Ricardo’s tortillas... they’re amazing. I’ve tried the flour tortilla and the spinach, both are fabulous. NO INTERESTEREFIED anything in these tortilla’s… organic, non GMO, etc.

ArtFoodHome.com | barbara stroud

Step 1: I set out a tortilla on a piece of wax paper. Let it sit and come to room temperature while you prepare the ingredients.

Step 2: Spread your “base” (a bit off center, you want it to be more to one side), and add a little to the side of the tortilla to help hold it after you roll it.

Two options that I’ve tried are hummus and avocado (or guacamole)! Both are fabulous, they’re different, but oh so good!

Step 3: Add a slice of cheese (I have been using Havarti, sliced thin, and set out for a few minutes to be more pliable so it will bend when the wrap is rolled).

Step 4: Add some veggies. I like some crunch so I’ve used radishes and cucumber. But whatever you like would work perfectly here. I’ve also added sliced avocado, tomatoes, etc.

Step 5: Add greens. I’ve used arugula, bean sprouts and kale micro greens. All are fabulous! You could also use lettuce. Whatever you like!

Step 6: Optional: you can add some leftover chicken, turkey or whatever else you’ve got.

W O R D   O F   C A U T I O N . . .

Do not pack too much onto this tortilla or you won’t be able to roll it. Sounds like I might have done that, huh? Oh yeah. Fred made a wrap the other day, and it was hilarious. He stuck a knife through it to hold it together because there was so much in it, ha ha… wish I would have taken a photo of that!

To roll the tortilla, fold up a little at the bottom, (in photo above, fold up to cucumber slice at bottom. Then fold the left side over the pile of wonderful ingredients, try to roll it kind of tight so it doesn’t fall apart. Roll until the “glue” (hummus) has been rolled over. Now just tuck in the top portion of the wrap. Sometimes it’s easier to eat if you roll the wrap lightly in wax paper and put in fridge for a minute.

There is no wrong way to roll a wrap, I’ve Google’d it and read many different versions, use whatever is easiest for you. Some just roll it up, and tuck in the sides.

Owie! You’re going to love this!

What do you put in your wrap? Let me know! Catch you back here tomorrow!

Featured Artist: Frank Bruckmann! Monhegan Workshop 2 spots remain!

Frank Bruckmann Breaking Bread

Frank Bruckmann is a fabulous artist who I wrote about years ago… a fascinating story, if you get a chance, check it out. Frank is an artist who spent time with his family on Monhegan. It’s a wonderful story for sure!

Looking through Frank’s paintings I absolutely love the paintings from his “Breaking Bread” series. Wonderful, intimate dinners between friends/family. They evoke so much feeling and breath life! Wonderful! You must check them out!

WORKSHOP ALERT: If you’re going to be in the Monhegan Island area June 6-13, 2015, as I write this there are TWO SPOTS left in Frank’s workshop. It sounds heavenly! Check it out!

Read a bit about Frank, from his website:

Frank began his studies at the DuCret school of Art in New Jersey, and then took classes at the Art Students League in NYC. In Paris he sketched at the Ecole des Beaux Arts, and spent 8 years in France and Spain, copying the masters in the great museums like the Lourve and the Prado, and painting plein air landscapes in the cities and countryside. 

Now a resident of New Haven, CT, Frank has found endless subject matter for landscapes in New England, but periodically packs his easel and travels farther and wider in his VW camper. To continue reading, click HERE.

Image via FBruckmann.com, used with permission…

Catch you back here tomorrow!

Featured Artist: Cynthia Britain!

Landscape painting by Cynthia Britain

Cynthia Britain has a cool style. I enjoyed looking through her website! Fabulous paintings with wonderful light, shadow and contrast, which I think is so important!

Are you looking to take a workshop this year? Check out Cynthia’s WORKSHOP schedule!

Read a bit about Cynthia, from her website:

“My intent is to express the intrinsic truth and beauty of my subject. To reveal the power or presence of spirit in a place or person. I am inspired by what I feel and by what I see…They reflect one another.”

Cynthia’s favorite activities are twofold – painting and spending time in nature. It is the combination of these two passions that have resulted in her becoming an award winning plein air painter. “I can’t imagine a more gratifying experience than painting outdoors while listening to the birds sing and feeling the sun on my face.”

While majorning in fine art at Fullerton College, Cynthia was introduced tot he Impressionist painters. She continued her studies at UCLA and Putney College of Art in England. Both the French Impressionists and the early California Impressionists deeply influenced the direction and concentration of her work.

Europe, the Middle East, the Mediterranean, and the Yucatan Peninsula area all locales where she has enjoyed painting, but California holds a special place in her heart. “Future generations will not thave the experience of this quickly disappearing natural landscape. I aspire to create a permanent repository of these unique places in my paintings.”

Cynthia Britain’s work has been shown at The Laguna Art Museum, The Orange County Museum of Art, and the San Diego Museum of Art, where she was awarded a Gold Medal. Her work is shown in a corporate and private collections throughout the world.

Image via CynthiaBritain.com, used with permission… 

Catch you back here tomorrow!

House Plan: Oak Spring by Allison Ramsey Architects!

Oak Spring (C0023) by Allison Ramsey Architect

The Oak Spring (C0023) plan by Allison Ramsey is another great example of a Lowcountry plan that just works so well for so many reasons. It’s charming design is mixed with a smart, efficient layout, and provides great space for those who want to gather or sit in a more intimate setting. The porches are fabulous, and so necessary! If I had porches like this, I wouldn’t come inside very often!

This plan is 2,306 square feet with 3 bedrooms and 2.5 bathrooms. Great for a family with children or those who have guests, as it offers a private space upstairs.

Oak Spring (C0023) by Allison Ramsey Architect

I like how the master bedroom/bathroom/closet is on one side of the house and the kitchen/breakfast area is on the other, with the great room in the center/back of the house. Also a nice touch is the side entrance that leads to a utility room off the kitchen. A screen door would be nice there! Covered porches in the front and back of the house. What a wonderful place to spend your time! Click here to see more, real-life images from the Allison Ramsey website

Oak Spring (C0023) by Allison Ramsey Architect

The upstairs is perfect with a few bedrooms separated by the staircase, a nice little sitting room, to spend time away from the rest of the house and a shared bath. Very generous bedrooms and closets. Perfect!

Images via: AllisonRamseyArchitect.com, used with permission…

Catch you back here tomorrow!

Time for a little break and an iced coffee… hold the ice please!

IMG_3147

I love iced coffee once the weather starts to get warmer. Have you noticed that most places where you buy it charge you MORE for iced coffee. Here’s how to make it at home. It couldn’t be easier…

ArtFoodHome.com | barbara stroud

I make a pot of coffee in the morning. I make mine rather strong anyway, so if you make yours weak, and you use ice, try making a pot with a little more coffee added to it, then it won’t get watered down so easily. If you like yours sweetened, add the sugar while the coffee is still warm, stir until it dissolves. I take the lid off the pot and let it cool completely. Then pour it into a glass container, and store it in the fridge.

Mine keeps for several days, not that it typically sits around that long! Go pour yourself a glass, add cream (if you like) – Oowie, nothing better!

Catch you back here tomorrow!